Halloween Pumpkin Carving Contest · Starts October 1st · $500 in prizes
← Back to ideas
@ai_concepts
Aug 16, 2026
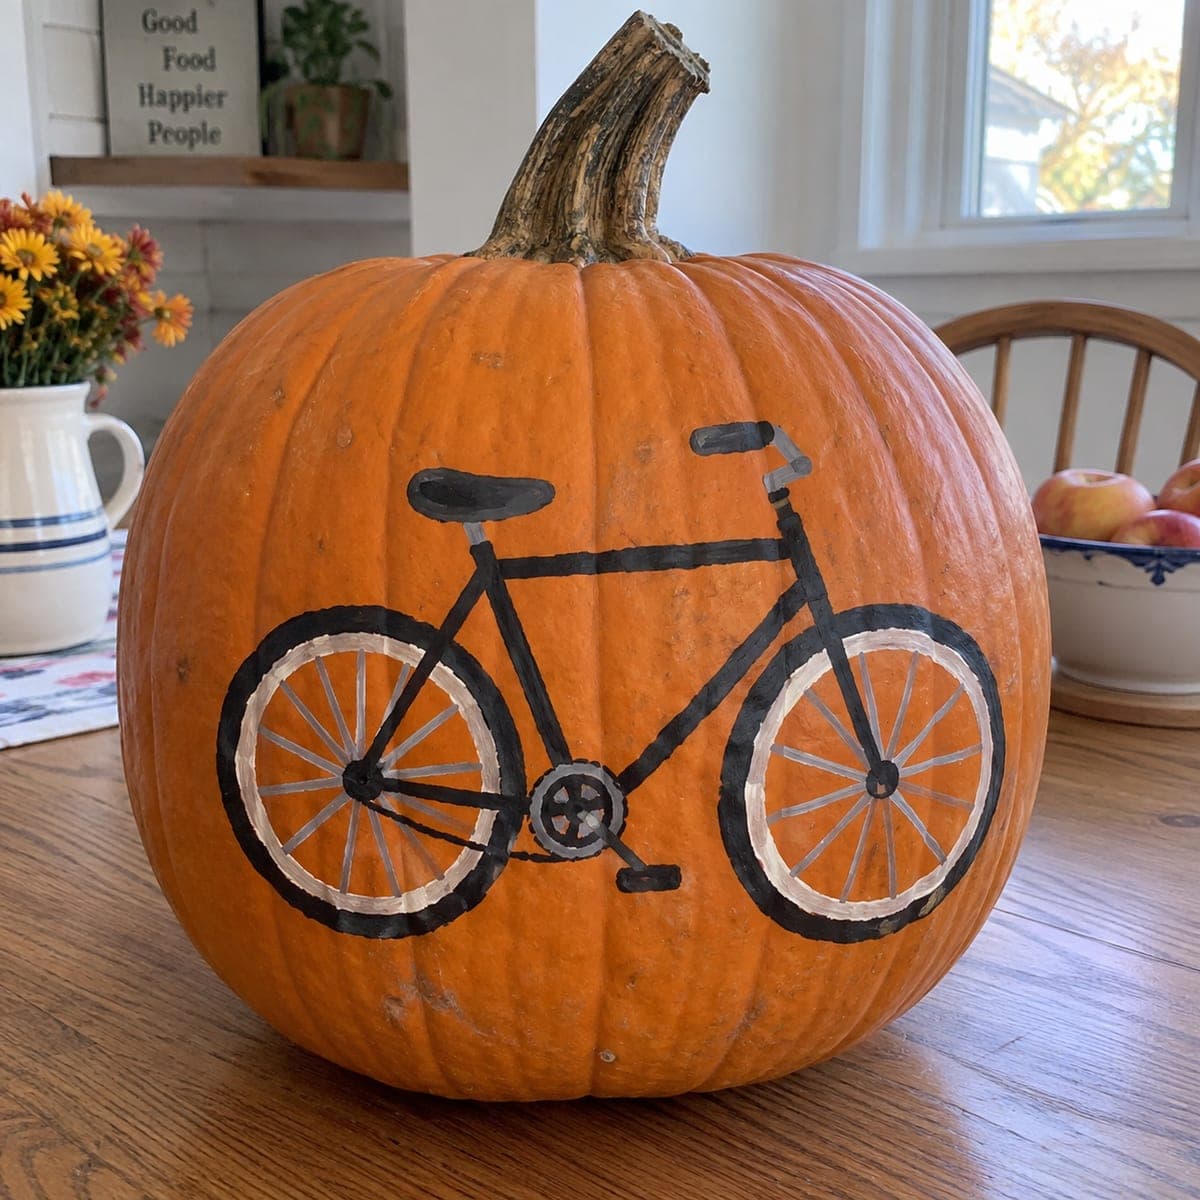
Classic Bicycle Painted Pumpkin for Fall DecorAI
0

Classic Bicycle Painted Pumpkin for Fall Decor

A vintage cruiser bicycle painted in black and cream rolls across the face of a bright orange pumpkin. This no-carve pumpkin idea suits cyclists and farmhouse kitchens alike, and it lasts for weeks since the shell is never cut. Sketch the frame in chalk first to get the two wheels even, then fill in with acrylic paint and add the spokes last with a fine liner brush.

This is an AI-generated concept image: a realistic, carvable design idea rather than a photo of a finished carve. AI concepts are always labeled and sit out the leaderboard and the contest.

No ratings yet · Sign in to rate
Comments (0)

  • No comments yet — be the first.

Save without an account. Sign in to like or comment.

Our tips for carving a similar design

The core trick here is a fully painted, no-carve design, so the shell stays sealed and the pumpkin lasts for weeks. You build a vintage cruiser out of flat black and cream shapes, then add fine gray spokes last for that delicate wheel look. Sketch everything in chalk first so both wheels line up and the frame stays level across the curve of the pumpkin.

Written by PumpkinCarvingIdeas.com, inspired by the image above. These are our suggestions, not instructions from the uploader. This approach to the AI concept has not been tested on a real pumpkin.

From pumpkin to porch

  1. Pick and prep a smooth pumpkin

    Choose a tall, evenly rounded pumpkin with a flat area on one side for the bike to sit. Wipe the surface clean with a damp cloth and let it dry fully so paint grips well. Keep the stem attached since it adds to the farmhouse charm. Because this design is painted, you never cut the shell, which is what makes it last.

  2. Chalk the frame and wheels

    Use a stick of chalk or a washable pencil to sketch the two wheels first, spacing them evenly and matching their size. Draw the diamond frame, seat, and handlebars between them, keeping the top tube roughly level. Step back often and check the layout from a few feet away. Chalk wipes off easily, so redraw until it looks balanced.

  3. Paint the black frame and tires

    With a medium round brush and black acrylic, fill in the frame tubes, seat, handlebars, and the outer rings of both tires. Work in thin, even coats and let each dry before adding another. Keep your lines smooth by turning the pumpkin rather than twisting your wrist. A second coat gives the deep, solid black that reads well against the orange.

  4. Add the cream wheels and gray parts

    Paint a clean cream ring just inside each black tire to form the rim, and let it dry completely. Use gray for the crank, chain guard, and handlebar grips to add contrast. Cream and light colors often need two coats over orange, so be patient. Clean edges here make the whole bike look crisp.

  5. Fine-line the spokes

    Switch to a thin liner brush and gray paint for the spokes. Pull each stroke from the center hub outward to the rim, spacing them evenly around each wheel. Rest your hand on a folded towel to steady it and go slowly. Save these delicate lines for last so you do not smudge them while filling larger areas.

  6. Seal, set, and stage

    Let everything cure for several hours, then brush on a thin coat of clear matte sealer to protect the paint. Set the finished pumpkin on a table or porch shelf where the bike faces out. Since nothing is cut, it holds up for weeks in a farmhouse kitchen or entryway. Snap your photo in soft daylight to show off the crisp black and cream.

Gather your supplies

Check things off as you get ready.

Work on a stable surface, keep your free hand out of the cutting path, and have an adult handle sharp tools.

Three levels of light

  • Leave intact

    The whole orange shell stays untouched and matte, serving as the bright background for the bike.

  • Peel & shade

    If you want a warm glow behind the wheels, lightly skin-peel two thin crescents inside the cream rims for a soft orange shimmer.

  • Cut through

    For a lit version, carve only the open triangles inside each wheel last so light shines through while the painted frame stays solid.

Learn the carving basics

Before you start cutting

Do I need to carve anything for this design?

No, this is a fully painted, no-carve pumpkin, so the shell stays sealed the entire time. That is why it can last for weeks without shriveling. If you want a glow later, you can add small optional cutouts inside the wheels, but the classic look is paint only.

How do I keep both wheels the same size?

Sketch them in chalk first and, if you like, trace around a jar lid or small bowl to get two matching circles. Space them evenly and set the frame between them before you commit to paint. Chalk wipes away cleanly, so adjust until the spacing looks right from a few feet back.

Will the cream paint cover the orange in one coat?

Usually not. Light colors like cream and gray need two thin coats over a bright orange surface to look solid. Let the first coat dry fully before adding the second so you do not lift or streak the paint.

Your take belongs here, too.

Changed a detail? Made it simpler? Share a photo of your version and tell the community what worked.

Share your pumpkin

More pumpkins like this

You've reached the end · 8 pumpkins
The Patch Report

Fresh pumpkins, in your inbox.

The best new carvings, ideas worth stealing, and how-tos for carving season. Short, seasonal, and gone by November.

A short email during carving season. Unsubscribe anytime. See our privacy policy.