Halloween Pumpkin Carving Contest · Starts October 1st · $500 in prizes
← Back to ideas
@ai_concepts
Aug 27, 2026
Vintage Bicycle With Flower Basket Carved PumpkinAI
0

Vintage Bicycle With Flower Basket Carved Pumpkin

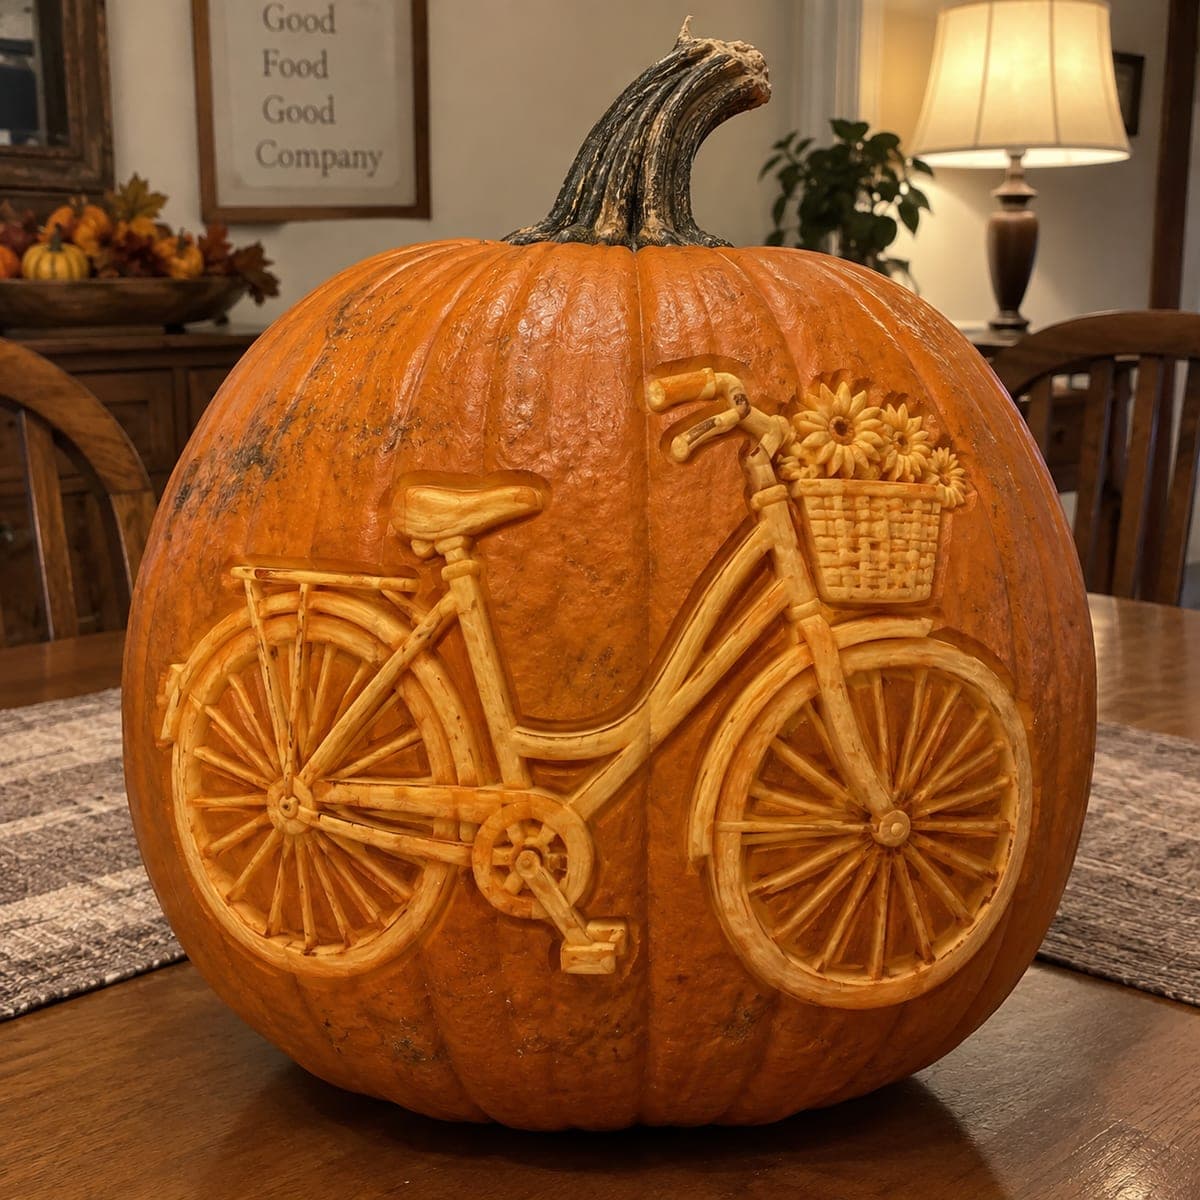
A classic cruiser bicycle, complete with a wicker basket overflowing with sunflowers, is carved in beautiful relief across a large pumpkin using shading that highlights every spoke and petal. The design has a charming, nostalgic quality that suits fall porch or mantle displays equally well. This intricate pumpkin carving idea requires patience with a loop tool to separate the thin wheel spokes from the background skin. Carve the basket flowers first as anchor points, then work outward to the wheels and frame.

This is an AI-generated concept image: a realistic, carvable design idea rather than a photo of a finished carve. AI concepts are always labeled and sit out the leaderboard and the contest.

No ratings yet · Sign in to rate
Comments (0)

  • No comments yet — be the first.

Save without an account. Sign in to like or comment.

Our tips for carving a similar design

The core trick here is relief carving, where almost nothing is cut all the way through. Instead you shave away thin layers of skin so the bicycle, wheels, and flower basket glow softly against the darker untouched background. Plan it as a slow shading job: anchor the flowers and basket first, then build the frame and wheels outward so the delicate spokes stay supported.

Written by PumpkinCarvingIdeas.com, inspired by the image above. These are our suggestions, not instructions from the uploader. This approach to the AI concept has not been tested on a real pumpkin.

From pumpkin to porch

  1. Prep and transfer the design

    Pick a large, smooth-skinned pumpkin with a flat working face so the whole bicycle fits without wrapping around a curve. Since this is a concept image, size your pattern to your actual pumpkin before you start. Tape the stencil on and poke or trace the main outlines: both wheels, the frame, the seat and handlebars, and the basket with its sunflowers. Leave the top and stem intact, because a relief carving does not need a lid or a big opening.

  2. Skin the whole bicycle area

    Using a loop tool, shave the entire bicycle and basket shape down to one shallow level so it reads as a raised orange silhouette against the dark skin. Keep the depth even and do not rush this base pass. Work in good light and go slowly around the outer edges so your lines stay crisp. This first layer is what makes everything else glow, so take your time.

  3. Carve the flowers and basket first

    Detail the sunflower petals and the woven basket next, since they sit at the top and act as your anchor points. Vary your depth: scoop the petal centers a little deeper and leave the petal tips higher for contrast. Score the basket weave with light crosshatching so it catches the glow. Finishing this busy area first gives you a stable reference before you tackle the fragile wheels.

  4. Shape the frame, seat, and handlebars

    Round the tube of the frame by shaving the edges slightly deeper than the center so each bar looks like a raised pipe. Do the same for the handlebars, seat, and pedals. Keep every part connected to the surface, since none of this should be cut through. Rounded highlights along the top of each bar will read as the shine of an old cruiser.

  5. Separate the wheel spokes with patience

    Save the spokes for near the end because they are the thinnest and most delicate part. Use a small loop or fine detail tool to carve the low background between each spoke, leaving the spokes themselves raised and connected to both the hub and the rim. Work one small wedge at a time and rotate around the wheel evenly. For the very brightest accents you can cut a few narrow slivers all the way through between spokes, but keep them tiny so the wheel stays strong.

  6. Light it and photograph

    Drop in a battery LED light, never a candle, since the thin relief and spoke gaps could scorch. Set the pumpkin somewhere dim and check that the shading reads clearly from a few feet back. If any area looks flat, go back and deepen the background around it to boost contrast. Snap your photo in low light so the warm glow of the bicycle stands out against the dark skin.

Gather your supplies

Check things off as you get ready.

Work on a stable surface, keep your free hand out of the cutting path, and have an adult handle sharp tools.

Three levels of light

  • Leave intact

    The background pumpkin skin around the bicycle stays untouched and dark.

  • Peel & shade

    The bicycle frame, wheels, seat, basket, and sunflowers are skin-peeled to glow soft orange.

  • Cut through

    Only a few narrow slivers between the wheel spokes are cut through for the brightest accents.

Learn the carving basics

Before you start cutting

Do I need to cut all the way through the pumpkin?

No, this is mostly a relief carving, so nearly everything is shaved rather than cut. You only remove a thin surface layer to make the bicycle glow. If you want a few bright pinpoints, you can cut tiny gaps between the wheel spokes, but keep those cutouts small so the design stays sturdy.

How do I keep the thin spokes from breaking?

Leave each spoke connected at both ends, to the hub and to the outer rim, and carve only the low background between them. Work slowly with a small loop tool and remove a little at a time. Doing the spokes last, after the frame and flowers are set, means the surface is still firm while you handle the most delicate detail.

Why carve the flowers and basket before the wheels?

The basket and sunflowers sit at the top and give you a stable anchor point to judge depth and spacing. Finishing them first means the busiest area is done while your pumpkin wall is still thick and strong. From there you can work outward to the frame and wheels with a clear reference.

Your take belongs here, too.

Changed a detail? Made it simpler? Share a photo of your version and tell the community what worked.

Share your pumpkin

More pumpkins like this

You've reached the end · 8 pumpkins
The Patch Report

Fresh pumpkins, in your inbox.

The best new carvings, ideas worth stealing, and how-tos for carving season. Short, seasonal, and gone by November.

A short email during carving season. Unsubscribe anytime. See our privacy policy.