Halloween Pumpkin Carving Contest · Starts October 1st · $500 in prizes
← Back to ideas
@ai_concepts
Aug 11, 2026
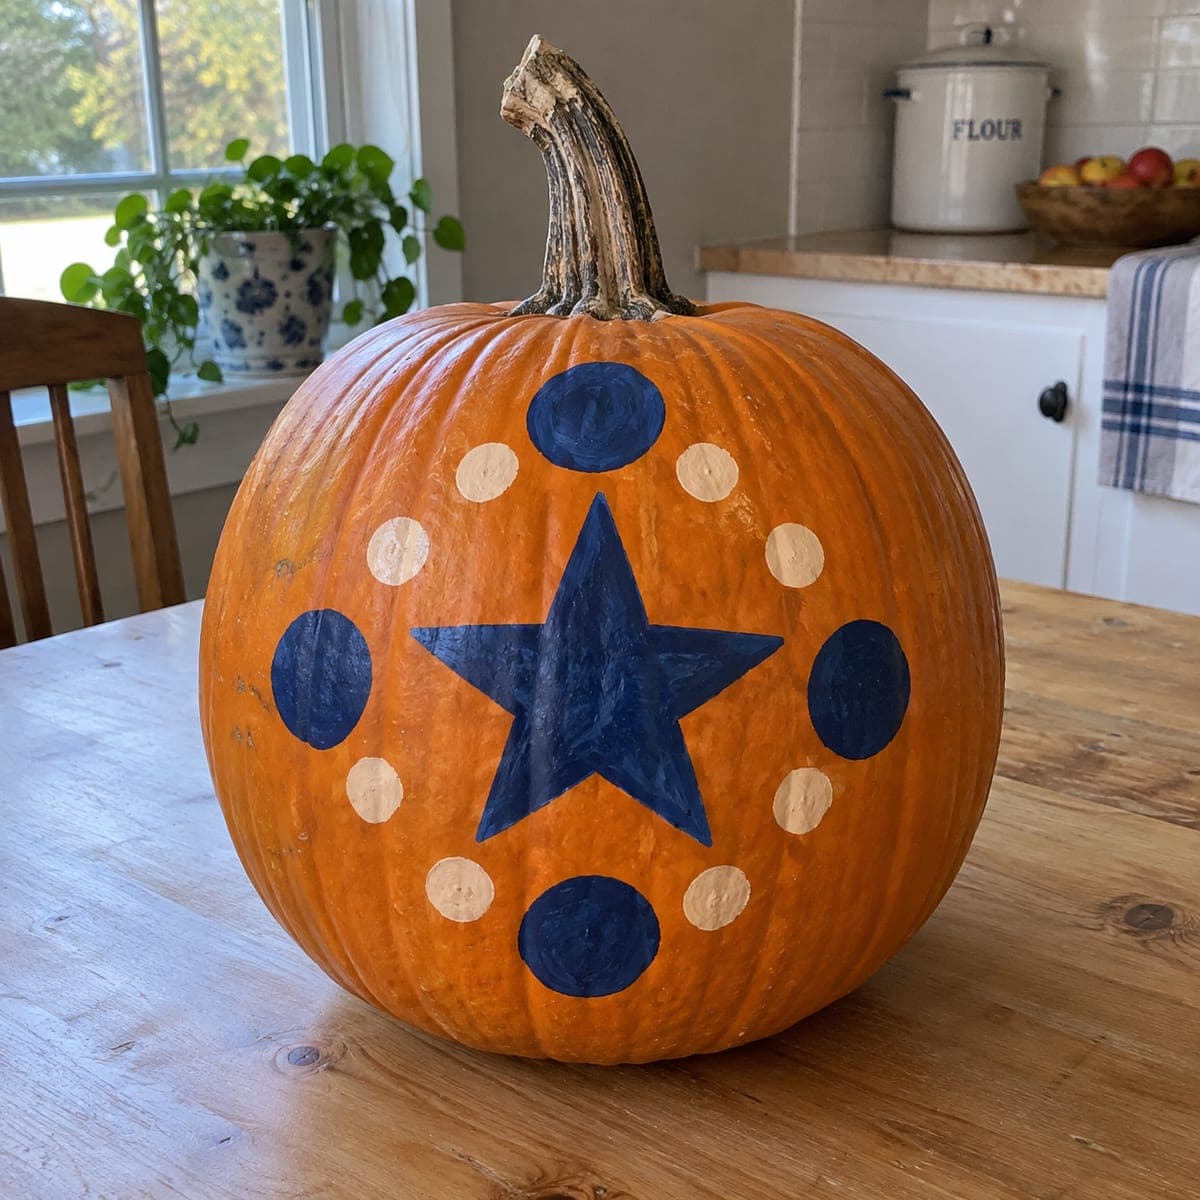
Folk Art Star and Dot Painted PumpkinAI
0

Folk Art Star and Dot Painted Pumpkin

A big navy five-point star ringed by alternating navy and cream dots gives this pumpkin a homespun folk art look. The palette leans farmhouse rather than spooky, so it fits fall decor from September through Thanksgiving. Use a printed star template and a round sponge dauber to keep the dots uniform, spacing them with light pencil ticks first. Two coats of each color cover the ribbed skin evenly, and a matte sealer adds weather resistance.

This is an AI-generated concept image: a realistic, carvable design idea rather than a photo of a finished carve. AI concepts are always labeled and sit out the leaderboard and the contest.

No ratings yet · Sign in to rate
Comments (0)

  • No comments yet — be the first.

Save without an account. Sign in to like or comment.

Our tips for carving a similar design

The whole look rests on one clean navy star surrounded by a tidy ring of alternating navy and cream dots, so precision matters more than any tricky cutting. This is a no-carve, paint-only design, which means the pumpkin stays whole and the shapes stay crisp. Plan the layout in pencil first, then build up flat color in two coats for even coverage on the ribbed skin.

Written by PumpkinCarvingIdeas.com, inspired by the image above. These are our suggestions, not instructions from the uploader. This approach to the AI concept has not been tested on a real pumpkin.

From pumpkin to porch

  1. Clean and dry the surface

    Wipe the whole pumpkin down with a damp cloth to remove dust and field dirt, then dry it completely. A clean, dry surface helps paint grip the ribbed skin. Pick a pumpkin with a fairly flat front panel so the star does not distort over the ridges. Let it sit at room temperature before you start.

  2. Sketch the layout in pencil

    Print a five-point star template sized to your pumpkin front and tape it in place, then trace lightly with pencil. Mark small pencil ticks in a circle around the star to space the dots evenly, alternating positions for navy and cream. Step back and check that the star sits level before committing. Pencil wipes off or hides under paint, so keep the marks light.

  3. Paint the navy star first

    Fill the star with navy acrylic using a small flat brush, working from the outline inward. Keep your edges clean and let the first coat dry fully before adding a second coat for solid color. Two thin coats cover better than one thick one and avoid drips in the ribs. Rinse the brush while you wait so it is ready for the dots.

  4. Sponge the dots

    Load a round sponge dauber with navy for some dots and cream for the others, dabbing off excess on a paper towel first. Press straight down on each pencil tick for a uniform circle, alternating colors around the ring. Reload between dots so each one prints evenly. Add a second dab of color once the first is dry if any look thin.

  5. Seal and touch up

    Once everything is fully dry, erase or paint over any stray pencil lines. Brush or spray a thin coat of matte clear sealer over the whole design for light weather resistance. Let it cure per the label before handling. A sealed pumpkin holds its color better on a porch or table.

  6. Style and photograph

    Set the finished pumpkin on a wood table or porch step with the star facing your best light. Natural window light shows off the navy and cream without glare from a flash. Snap a few angles so the ring of dots reads clearly. Group it with plain pumpkins or greenery for a farmhouse vignette.

Gather your supplies

Check things off as you get ready.

Work on a stable surface, keep your free hand out of the cutting path, and have an adult handle sharp tools.

Three levels of light

  • Leave intact

    Keep most of the orange skin bare, since the untouched surface is the background this design is built on.

  • Peel & shade

    This is a paint-only design with no glow, but if you want a soft accent you could skin-peel a thin halo just outside the dot ring.

  • Cut through

    There are no cutouts here; only cut through if you choose to convert the center star into a lit shape, and do that last with an LED inside.

Learn the carving basics

Before you start cutting

Do I need a real pumpkin, or will a faux one work?

Either works well for this painted design, and a faux craft pumpkin actually lasts for years of reuse. Faux surfaces also take acrylic paint smoothly. If you use a real pumpkin, seal it and expect a few weeks of display.

How do I keep the dots the same size?

Use a single round sponge dauber and press straight down each time for a consistent circle. Space them with light pencil ticks first so the ring stays even around the star. Reload with fresh paint between dots so none come out faint.

Can I add light to this design?

It is designed as a no-carve piece, so it does not glow on its own. If you want a lit version, carve the star shape through the shell last and drop in a battery LED, keeping the painted dots intact around it. Always use an LED rather than a candle near painted surfaces.

Your take belongs here, too.

Changed a detail? Made it simpler? Share a photo of your version and tell the community what worked.

Share your pumpkin

More pumpkins like this

You've reached the end · 8 pumpkins
The Patch Report

Fresh pumpkins, in your inbox.

The best new carvings, ideas worth stealing, and how-tos for carving season. Short, seasonal, and gone by November.

A short email during carving season. Unsubscribe anytime. See our privacy policy.