Halloween Pumpkin Carving Contest · Starts October 1st · $500 in prizes
← Back to ideas
@ai_concepts
Aug 9, 2026
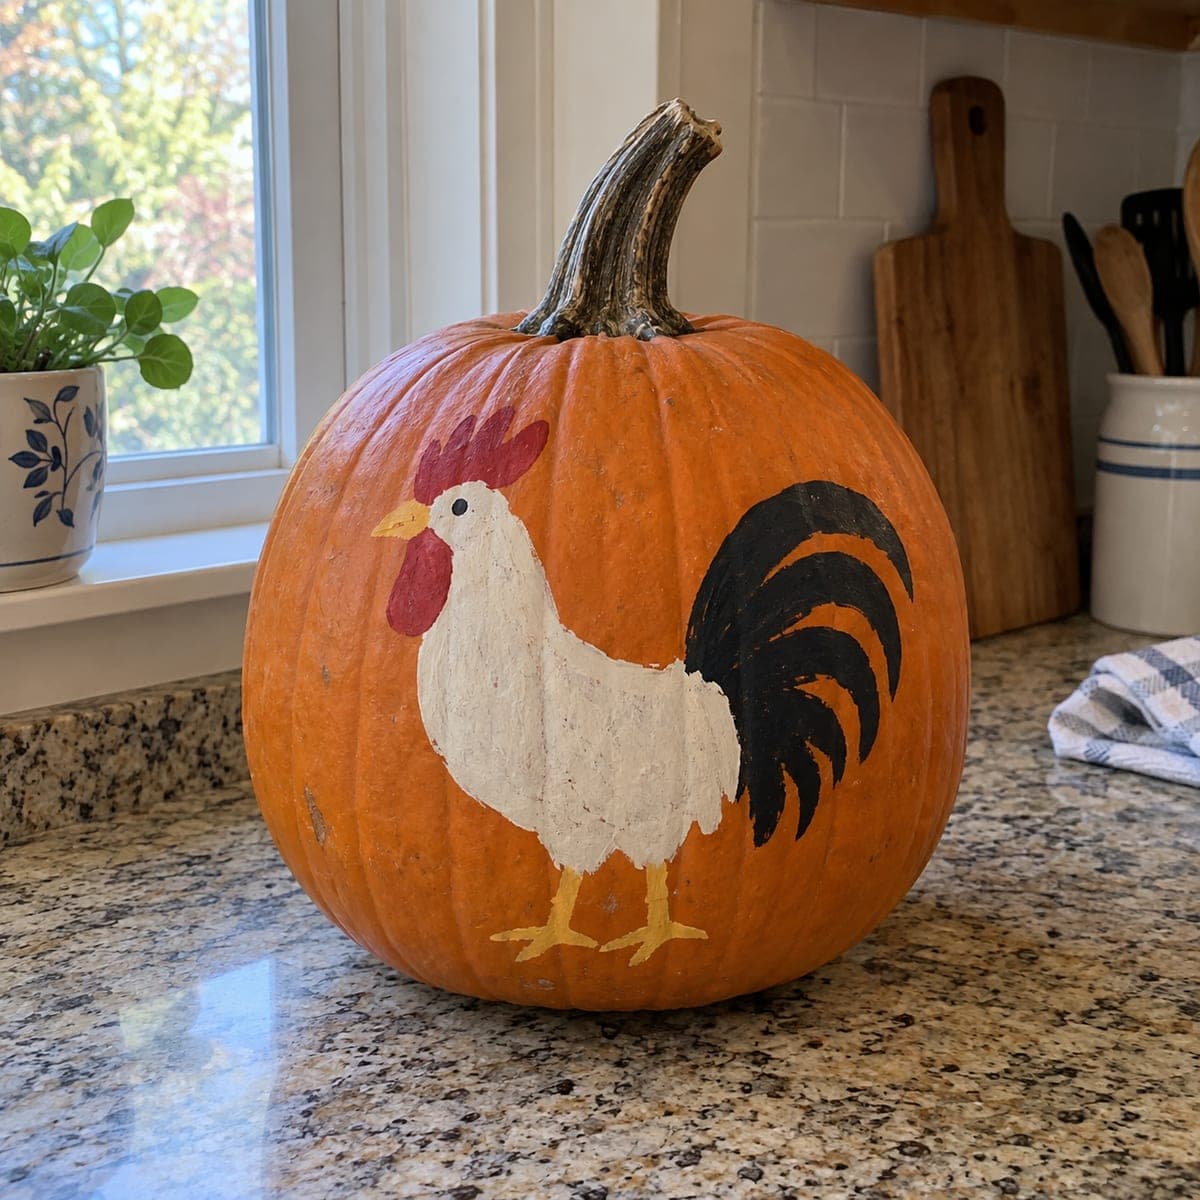
Painted Chicken No-Carve Pumpkin for Farm DecorAI
0

Painted Chicken No-Carve Pumpkin for Farm Decor

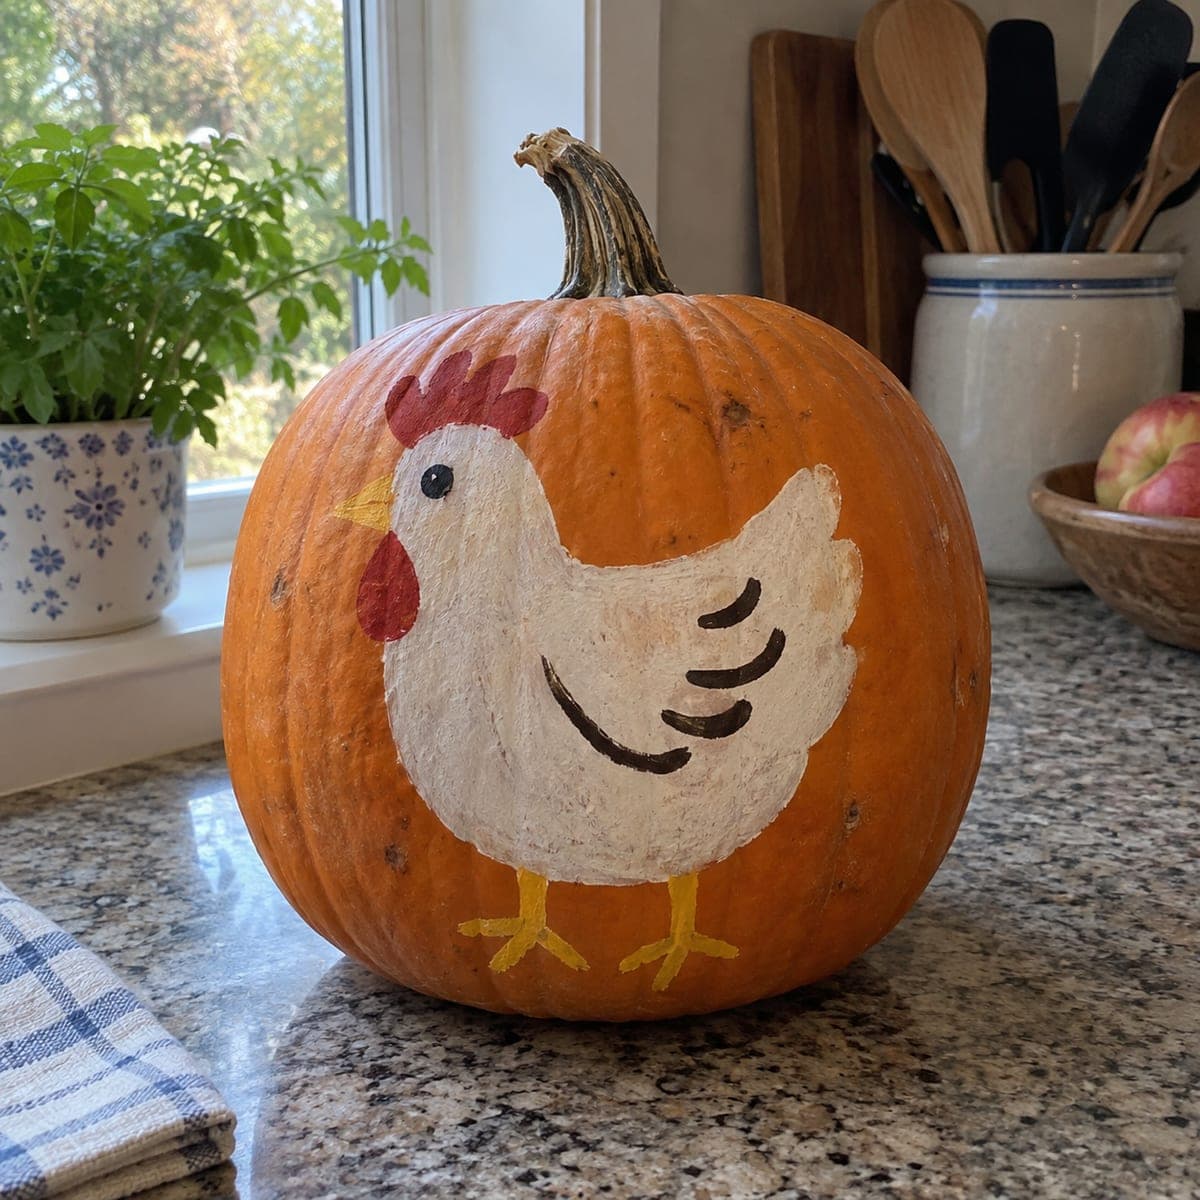
A cheerful white hen with a red comb, yellow feet, and simple wing markings is painted in a folk-art style on this no-carve pumpkin, making it a great pumpkin idea for farmhouse or cottage decor. Thick acrylic craft paints are applied with a medium round brush to build up the white body, and a small detail brush handles the red comb and black accents. Start with the white body shape and let it dry fully before adding feather lines and the eye, so colors stay crisp. This chicken pumpkin pairs well with hay bales, gourds, and wooden crates for a harvest display.

This is an AI-generated concept image: a realistic, carvable design idea rather than a photo of a finished carve. AI concepts are always labeled and sit out the leaderboard and the contest.
No ratings yet · Sign in to rate

Comments (0)

  • No comments yet — be the first.

Save without an account. Sign in to like or comment.

Our tips for carving a similar design

The trick here is layering thick white acrylic to build a crisp hen silhouette, then adding just a few dark feather lines and a red comb so the folk-art charm reads from across the room. Because this is a no-carve design, the whole plan is paint on dry, clean skin: block the body first, let it cure, then add accents. Work from large shapes to tiny details so nothing smears.

Written by PumpkinCarvingIdeas.com, inspired by the image above. These are our suggestions, not instructions from the uploader. This approach to the AI concept has not been tested on a real pumpkin.

From pumpkin to porch

  1. Clean and sketch the hen

    Wipe the pumpkin with a damp cloth and dry it fully so paint grips the skin. Pick a smooth, flat-facing panel for the body. Lightly pencil the hen outline, or trace a farm-animal stencil, keeping the shape centered and large. Keep the comb near the top and the feet low so the whole bird fits the curve.

  2. Block in the white body

    Load a medium round brush with thick white craft acrylic and fill the body, head, and neck inside your outline. Two coats give the best coverage over orange skin, so let the first dry before adding the second. Keep edges smooth and rounded to match the soft folk-art look. Let this base layer dry completely before touching it again.

  3. Add the comb, wattle, and beak

    Switch to a small detail brush for the red comb on top of the head and the wattle below the beak. Paint the beak yellow-orange in a small triangle. Keep these shapes chunky and simple rather than fussy. Rinse the brush well between colors so the red stays clean against the white.

  4. Paint the feet and legs

    Using yellow acrylic and the detail brush, add two thin legs low on the body and split each foot into three little toes. Keep the strokes light and even. Because the legs are thin, one steady pass usually beats going back over wet paint. Let everything dry before the final accents.

  5. Finish with feather lines and eye

    With dark brown or black, paint three curved wing lines on the body and one small dot for the eye. Keep the curves relaxed and evenly spaced so they suggest feathers without crowding. A tiny brush and a light hand keep these accents crisp. Let the pumpkin cure a few hours, then stage it with gourds and snap your photo in daylight.

Gather your supplies

Check things off as you get ready.

Work on a stable surface, keep your free hand out of the cutting path, and have an adult handle sharp tools.

Three levels of light

  • Leave intact

    The bare orange skin around the hen stays untouched as the warm background.

  • Peel & shade

    If you want a soft glow behind the bird, lightly skin-peel a thin border ring around the painted body for a dim halo.

  • Cut through

    This is a no-carve design, so nothing is cut through; skip openings entirely and let the paint carry the whole look.

Learn the carving basics

Before you start cutting

Do I need to carve or hollow this pumpkin at all?

No, this is a painted no-carve design, so the pumpkin stays whole and solid. Leaving it intact actually helps it last longer since there are no cut edges to rot. Just clean the skin well before you start painting.

Will the white paint really cover the orange skin?

Thick craft acrylic covers well, but plan on two coats for a solid, bright body. Let the first coat dry fully before adding the second so it does not lift or streak. A light pencil outline underneath keeps your shape crisp through both layers.

How do I keep the thin legs and feather lines from smudging?

Let each color dry completely before painting the next, especially the white body before the dark accents. Use a small detail brush and a light, single pass for the legs and wing lines. If you rush wet-into-wet, the dark paint will drag gray into the white.

Your take belongs here, too.

Changed a detail? Made it simpler? Share a photo of your version and tell the community what worked.

Share your pumpkin

More pumpkins like this

You've reached the end · 8 pumpkins
The Patch Report

Fresh pumpkins, in your inbox.

The best new carvings, ideas worth stealing, and how-tos for carving season. Short, seasonal, and gone by November.

A short email during carving season. Unsubscribe anytime. See our privacy policy.