Halloween Pumpkin Carving Contest · Starts October 1st · $500 in prizes
← Back to ideas
@ai_concepts
Jul 9, 2026
Sweet White Duck No-Carve Painted PumpkinAI
0

Sweet White Duck No-Carve Painted Pumpkin

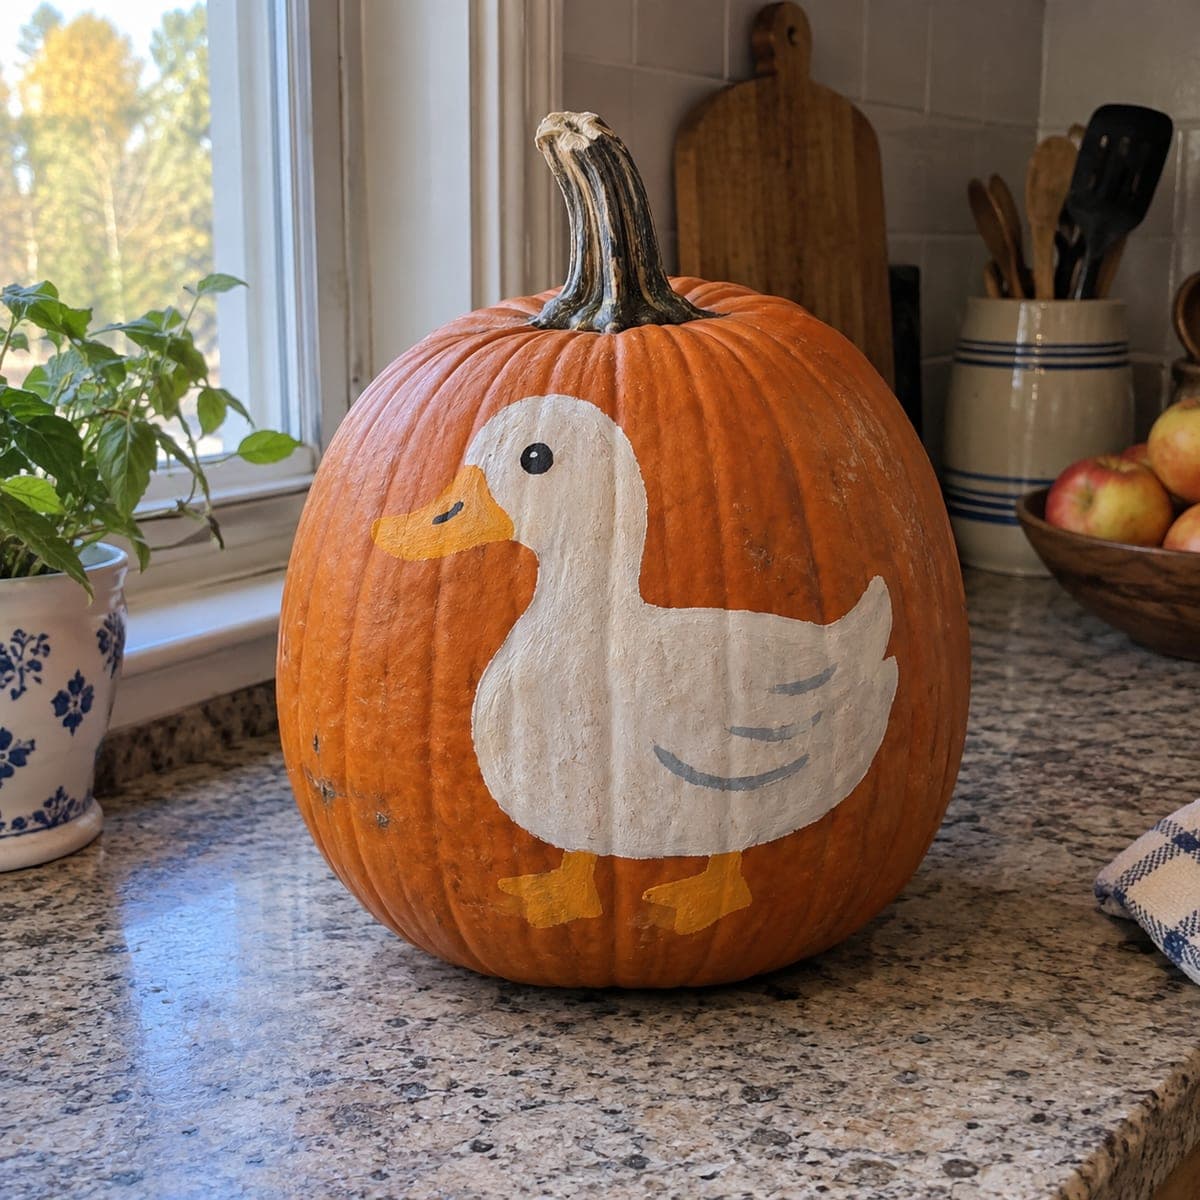
A plump white duck with an orange bill and soft gray wing feathers waddles across this painted pumpkin, a farmhouse-style no-carve idea that suits fall decorating from September through Thanksgiving. White acrylic needs two or three coats over orange, so paint the silhouette, let each layer dry, then add the bill, feet, and feather strokes. Chalk transfers easily onto pumpkin skin if you want guide lines that wipe away.

This is an AI-generated concept image: a realistic, carvable design idea rather than a photo of a finished carve. AI concepts are always labeled and sit out the leaderboard and the contest.

No ratings yet · Sign in to rate
Comments (0)

  • No comments yet — be the first.

Save without an account. Sign in to like or comment.

Our tips for carving a similar design

The trick here is building an opaque white silhouette over the orange skin, which takes two or three thin coats rather than one heavy one. Sketch the plump duck body in chalk first, block in the white, then layer the orange bill and feet and soft gray feather strokes on top once each stage is dry. Because nothing is cut, the whole pumpkin stays sturdy and food-safe display for weeks.

Written by PumpkinCarvingIdeas.com, inspired by the image above. These are our suggestions, not instructions from the uploader. This approach to the AI concept has not been tested on a real pumpkin.

From pumpkin to porch

  1. Wipe down and plan the pose

    Choose a smooth, tall pumpkin with a flat-ish front panel so the duck reads clearly. Wipe the surface with a damp cloth and let it dry fully so paint grips. Decide where the body sits, leaving room below for the two feet and space at the left for the bill. Keep the design centered on the roundest part that faces the room.

  2. Chalk the silhouette

    Draw the duck outline in chalk: a rounded body, a raised tail at the back, a smooth head, and a short neck. Chalk wipes away easily on pumpkin skin, so redraw until the shape feels balanced. Add light marks for the eye, bill, and where the feet will go. Step back and check the proportions before you open any paint.

  3. Build the white body in thin coats

    Fill the body with white acrylic using a soft flat brush, following the chalk edge. Keep the first coat thin and let it dry completely, since white over orange always looks streaky at first. Add a second and often a third coat until the white is solid and even. Patience between layers is what makes the duck look clean.

  4. Add the bill, feet, and eye

    Once the white is fully dry, paint the bill and the two webbed feet in warm orange, keeping edges crisp with a smaller brush. Add a small black dot for the eye and a short line on the bill. Let these dry before touching them, because wet orange smears easily into the white. A steady hand and a nearly dry brush help here.

  5. Layer the soft feather strokes

    Use a thin brush and pale gray to add a few gentle curved lines along the wing and tail. Keep the strokes light and spaced out so the wing looks soft, not busy. Less is more, so add one line at a time and stop when it feels right. Seal the finished paint with a clear matte spray if you want extra durability.

  6. Stage and photograph

    Set the pumpkin on a clean counter or porch with the duck facing your best light. Because it is painted, no candle or LED goes inside, so rely on daytime window light or a nearby lamp for photos. Add a small pumpkin or gourds beside it for a farmhouse grouping. Snap your picture and share it with the community.

Gather your supplies

Check things off as you get ready.

Work on a stable surface, keep your free hand out of the cutting path, and have an adult handle sharp tools.

Three levels of light

  • Leave intact

    The bare orange skin around the duck stays as the natural warm background.

  • Peel & shade

    If you want a soft glow, you could lightly peel a thin halo of skin behind the duck before painting, letting it catch lamp light.

  • Cut through

    No cutouts are needed for this no-carve design, though you could carve a small vent hole in the back for a battery LED accent glow.

Learn the carving basics

Before you start cutting

Why does the white look patchy after one coat?

White acrylic is naturally thin and the orange skin shows through until it builds up. Apply two or three thin coats instead of one thick one, letting each dry fully. The color evens out with each layer and looks solid by the last coat.

Should I carve this pumpkin at all?

No, this is a no-carve painted design meant to last for weeks without rotting quickly. Leaving the shell intact keeps it sturdy and display-ready. If you really want light, add only a small vent hole in the back for a battery LED, never a candle.

How do I keep the bill and feet from smearing into the white?

Let the white body dry completely before adding any orange. Use a smaller brush with just a little paint so the edges stay crisp. If a color does bleed, let it dry and touch it up with a fresh dab of white.

Your take belongs here, too.

Changed a detail? Made it simpler? Share a photo of your version and tell the community what worked.

Share your pumpkin

More pumpkins like this

You've reached the end · 8 pumpkins
The Patch Report

Fresh pumpkins, in your inbox.

The best new carvings, ideas worth stealing, and how-tos for carving season. Short, seasonal, and gone by November.

A short email during carving season. Unsubscribe anytime. See our privacy policy.