Halloween Pumpkin Carving Contest · Starts October 1st · $500 in prizes
← Back to ideas
@ai_concepts
Jul 27, 2026
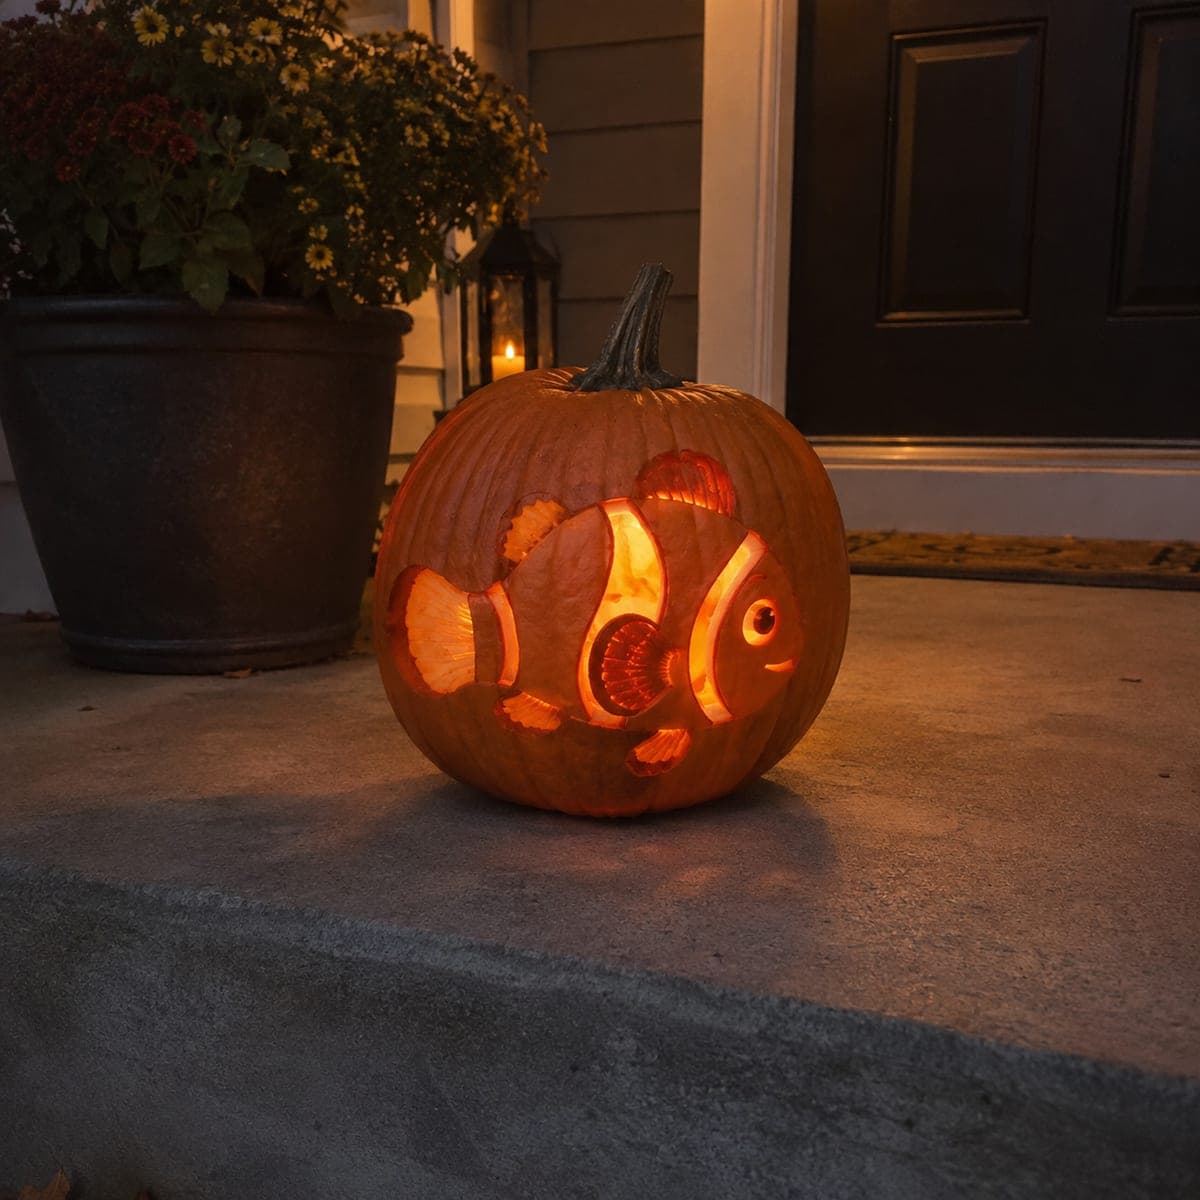
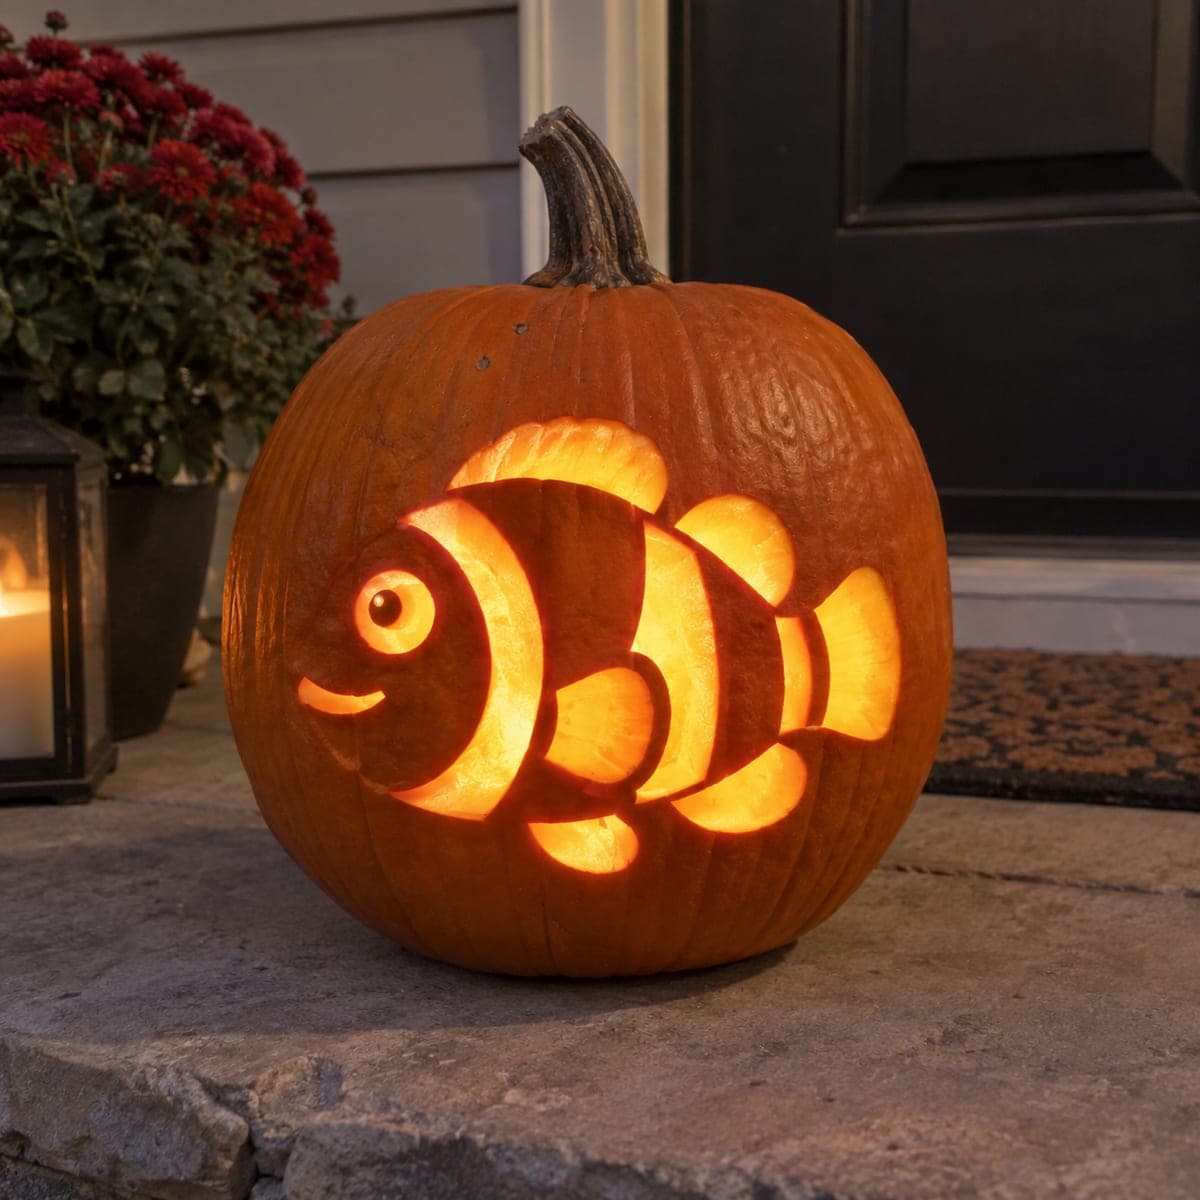
Clownfish Swimming Through Bubbles Jack-O-LanternAI
0

Clownfish Swimming Through Bubbles Jack-O-Lantern

Swimming through a stream of carved bubbles, the clownfish on this ocean-themed jack-o-lantern practically wiggles when the candle flickers. Its white stripes are cut through while the orange body is left as glowing shell, so the fish keeps its two-tone look after dark. Open the round bubbles with a drill or apple corer for perfect circles before tackling the fish. Kids who love aquarium movies will spot it from down the block.

This is an AI-generated concept image: a realistic, carvable design idea rather than a photo of a finished carve. AI concepts are always labeled and sit out the leaderboard and the contest.

No ratings yet · Sign in to rate
Comments (0)

  • No comments yet — be the first.

Save without an account. Sign in to like or comment.

Our tips for carving a similar design

The core trick here is playing two light levels against each other so the fish keeps its color at night: the white stripes are cut all the way through for bright light, while the orange body stays as peeled shell that glows a softer amber. Plan to drill the round bubbles first, carve the stripe cutouts next, and finish by shading the body and fins. Working light-to-heavy this way keeps the pumpkin strong until the very end.

Written by PumpkinCarvingIdeas.com, inspired by the image above. These are our suggestions, not instructions from the uploader. This approach to the AI concept has not been tested on a real pumpkin.

From pumpkin to porch

  1. Prep the pumpkin and transfer the pattern

    Pick a round, evenly colored pumpkin with a smooth face for the fish. Cut a lid or a bottom access hole and scrape the inside wall behind the design down to about an inch thick so light passes through easily. Tape your clownfish and bubble stencil to the front, then poke the outlines with a pushpin or transfer tool. Peel the paper and connect the dots with a washable marker so you can see the stripes, fins, and bubble placement clearly.

  2. Drill the bubbles first

    Use a drill bit or an apple corer to open the round bubbles for clean, perfect circles. Start with the smaller bubbles and work outward, keeping space between each so the shell stays firm. Twist slowly and let the tool do the work rather than forcing it. Doing these before the fish means you can adjust spacing while the pumpkin is still solid.

  3. Cut through the white stripes

    With a fine detail saw, cut all the way through along the three stripe shapes and the eye. Saw at a steady, gentle pace and support the shell with your free hand near, but not directly under, the blade. Remove each cutout piece carefully so you do not crack the thin ribs of orange between stripes. Leave narrow bridges of skin wherever a stripe would otherwise float free, so the surrounding body stays attached.

  4. Shade the orange body and fins

    Switch to a lino or ribbon gouge and peel away just the outer skin on the body, fins, and tail, leaving the flesh underneath. This is the shell technique, and it will glow a dim orange when lit. Vary how deep you scrape to suggest the rounded belly and the layered fins. Keep the peeled areas even in thickness so the light spreads smoothly instead of blotching.

  5. Refine details and clean edges

    Deepen the shading around the eye, mouth, and fin ridges to add dimension. Trim any ragged edges on the stripe cutouts with a small knife so the bright openings read crisp. Wipe the carved face with a damp cloth to remove pulp specks that dull the glow. Step back and check that the fish shape still reads clearly from a few feet away.

  6. Light it and take the photo

    Set a battery LED puck or string inside rather than a flame, since the shaded shell and small bubbles can scorch with real heat. Warm-white or flicker-mode LEDs give the friendliest reef glow. Place the pumpkin on a porch step at dusk and shoot slightly below eye level so the cutouts catch the camera. A dab of petroleum jelly on the cut edges slows browning if you want it to last a few more days.

Gather your supplies

Check things off as you get ready.

Work on a stable surface, keep your free hand out of the cutting path, and have an adult handle sharp tools.

Three levels of light

  • Leave intact

    The background pumpkin skin and any dark outline around the fish stay untouched and read as deep shadow.

  • Peel & shade

    The orange body, fins, and tail are skin-peeled to glow a soft amber and hold the fish's color.

  • Cut through

    The white body stripes and the eye are cut fully through for the brightest light, plus the round bubbles.

Learn the carving basics

Before you start cutting

How do I keep the orange body from looking washed out next to the bright stripes?

The key is not cutting through the body at all. Peel only the outer skin so it glows a dimmer amber, which lets the fully cut white stripes pop as bright bands. That contrast is what gives the fish its two-tone look after dark.

Won't drilling all those bubbles weaken the pumpkin?

Not if you space them out and keep them on the sturdier curve away from the stripe cutouts. Drill the bubbles before the larger stripe openings so the shell is still solid and supports the tool. Leave a finger-width of skin between neighboring bubbles.

This is a concept image, so what should I watch for when carving a real one?

The picture is an AI concept, so treat it as inspiration rather than a finished pumpkin. On a real pumpkin, keep the thin orange ribs between the white stripes wide enough to stay attached, and add small skin bridges if any piece feels loose. Use an LED instead of the flame shown so the shaded areas and bubbles do not scorch.

Your take belongs here, too.

Changed a detail? Made it simpler? Share a photo of your version and tell the community what worked.

Share your pumpkin

More pumpkins like this

You've reached the end · 8 pumpkins
The Patch Report

Fresh pumpkins, in your inbox.

The best new carvings, ideas worth stealing, and how-tos for carving season. Short, seasonal, and gone by November.

A short email during carving season. Unsubscribe anytime. See our privacy policy.