Halloween Pumpkin Carving Contest · Starts October 1st · $500 in prizes
← Back to ideas
@ai_concepts
Aug 17, 2026
Colorful Painted Sugar Skull No-Carve PumpkinAI
0

Colorful Painted Sugar Skull No-Carve Pumpkin

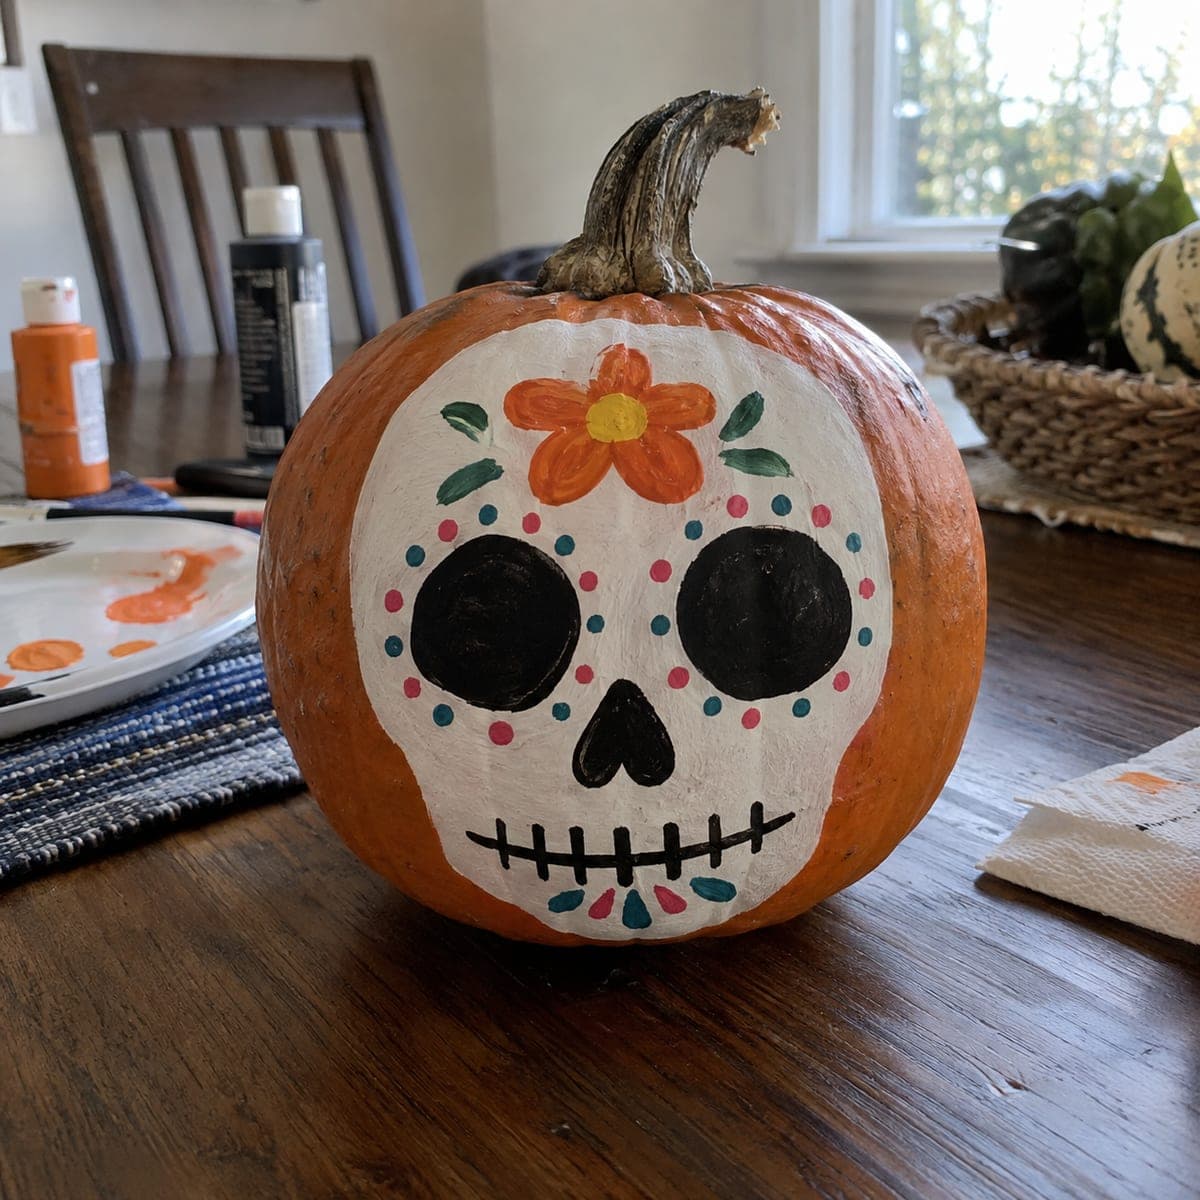
A bold graphic sugar skull painted in white with orange, pink, purple, and green polka dots on a white base creates a festive Dia de los Muertos no-carve pumpkin idea that anyone can tackle in an afternoon. Use a wide flat brush to lay down the white face oval, let it dry, then stamp the colored dots using a pencil eraser or round sponge brush for clean circles. The black outline of the skull, nose cavity, and stitched mouth adds definition and is best applied last with a fine liner brush. This design is ideal for kids and works beautifully as a classroom or party craft activity.

This is an AI-generated concept image: a realistic, carvable design idea rather than a photo of a finished carve. AI concepts are always labeled and sit out the leaderboard and the contest.

No ratings yet · Sign in to rate

Comments (0)

  • No comments yet — be the first.

Save without an account. Sign in to like or comment.

Our tips for carving a similar design

The core trick here is treating the pumpkin like a round canvas: a solid white face oval anchors everything, and simple stamped dots do the decorative heavy lifting. You build in layers, letting each dry before the next, and save the crisp black outlines for last so nothing smears. Because this is a painted concept and nothing is cut, the whole design stays sturdy and travels well to a classroom or party.

Written by PumpkinCarvingIdeas.com, inspired by the image above. These are our suggestions, not instructions from the uploader. This approach to the AI concept has not been tested on a real pumpkin.

From pumpkin to porch

  1. Clean and plan the face

    Wipe the pumpkin with a damp cloth and let it dry fully so paint grips the skin. Pick the flattest, most forward-facing side for the skull. Lightly sketch a large oval with a pencil to mark where the white face will sit. Keep the oval centered under the stem so the finished skull looks balanced.

  2. Lay down the white base

    Load a wide flat brush with white acrylic or craft paint and fill the oval with smooth, even strokes. Work in one direction, then let it dry and add a second coat for solid coverage. A clean bright base is what makes the colored dots and black lines pop later. Be patient and let this layer dry completely before moving on.

  3. Stamp the colored dots

    Dip a pencil eraser or a small round sponge into orange, pink, purple, or green paint and press straight down for clean circles. Place one dot on the forehead, then mirror pairs on the cheeks and temples so both sides match. Reload paint between stamps for consistent color. Let the dots dry before you outline anything.

  4. Add the eyes and nose

    Fill two large black circles for the eye sockets, spacing them evenly on either side of center. Paint a small upside-down heart or triangle below and between the eyes for the nose cavity. Use a rounded brush and take your time keeping the edges smooth. Let these solid black shapes dry fully.

  5. Outline and stitch the mouth

    Switch to a fine liner brush and trace the outer edge of the white oval in black to define the skull shape. Paint a horizontal stitched-mouth line with short vertical marks crossing it, like sutures. Keep your hand steady and rest your wrist against the pumpkin for control. This final detail pass is what gives the face its crisp, graphic look.

  6. Seal and stage your photo

    Once everything is bone dry, brush on a thin coat of clear acrylic sealer to protect the paint and add a soft sheen. Set the pumpkin on a table with a marigold or two nearby for a Dia de los Muertos feel. Shoot your photo in daylight so the colors read true. Share it with the community when you are done.

Gather your supplies

Check things off as you get ready.

Work on a stable surface, keep your free hand out of the cutting path, and have an adult handle sharp tools.

Three levels of light

  • Leave intact

    The natural orange pumpkin skin around the face stays bare and untouched as the background.

  • Peel & shade

    This is a painted design, so there is no peeling; the white base coat plays the role of the bright surface instead.

  • Cut through

    Nothing is cut on this no-carve concept, but if you wanted a glow you could later cut small holes inside the black eye sockets and drop in an LED.

Learn the carving basics

Before you start cutting

Do I have to carve anything at all?

No, this is a fully painted no-carve design, which is why it works so well for kids and classrooms. You skip the knives entirely and just build up paint layers. If you ever want a glow, an adult can add small LED-lit cutouts in the eyes later.

How do I get the dots to look like clean circles?

Use a pencil eraser for tiny dots or a round sponge dauber for larger ones, pressing straight down and lifting without dragging. Reload paint between each stamp so the color stays even. Practice a few times on scrap paper first to find the right pressure.

Will the paint last through Halloween?

Acrylic and craft paints hold up well on a clean, dry pumpkin, especially with a thin coat of clear sealer on top. Keep the pumpkin out of rain and direct sun, and it should stay bright for a couple of weeks. A real pumpkin will eventually soften on its own regardless of paint.

Your take belongs here, too.

Changed a detail? Made it simpler? Share a photo of your version and tell the community what worked.

Share your pumpkin

More pumpkins like this

You've reached the end · 8 pumpkins
The Patch Report

Fresh pumpkins, in your inbox.

The best new carvings, ideas worth stealing, and how-tos for carving season. Short, seasonal, and gone by November.

A short email during carving season. Unsubscribe anytime. See our privacy policy.