@jackslantern
Sep 7, 2026
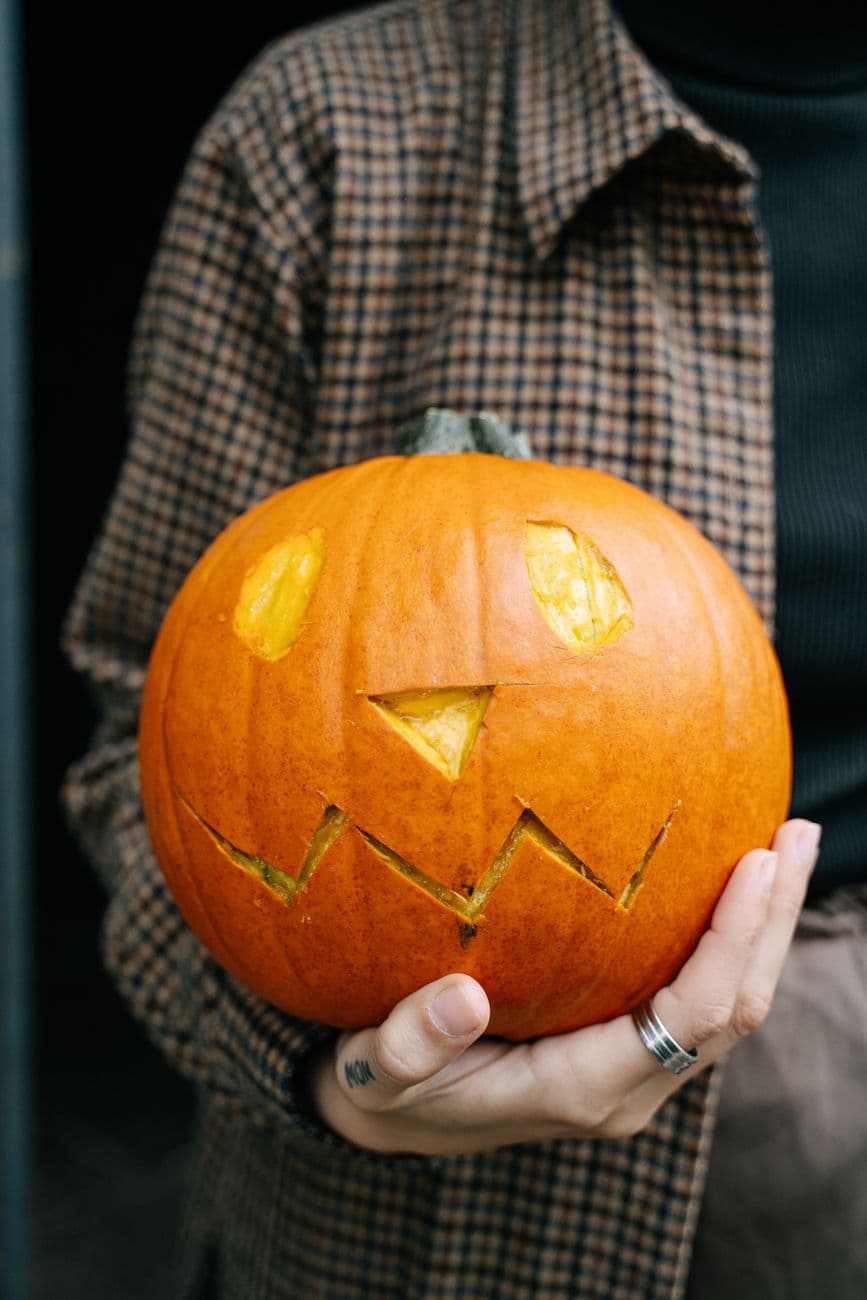
The whole charm here is imperfection, so the goal is a lopsided, hand-drawn face rather than anything precise. Two angled eyes, a small triangle nose, and a jagged zigzag mouth give it a goofy, slightly crooked expression. You can carve the eyes shallow so they glow soft while the mouth cuts clean through for a bright grin.
Written by PumpkinCarvingIdeas.com, inspired by @jackslantern's photo above. These are our suggestions, not instructions from the uploader, and this approach hasn't been tested on their exact carve.
Choose a medium, evenly round pumpkin with a flat-ish face to draw on. Have an adult cut a lid around the stem at an angle so it does not fall in later. Scoop out the seeds and pulp, then scrape the front inside wall down to about one inch thick. A thinner wall is far easier to push a blade through.
With a washable marker, sketch two eyes tilted at slightly different angles so the face looks a little off-kilter. Add a small triangle nose below and between them. Draw a wide zigzag mouth with a few pointed teeth, letting it dip and rise unevenly. Step back and adjust before you cut, since the wonky look is the point.
Start with the smaller shapes while the pumpkin is still strong. Use a small serrated carving saw and gently saw along each line, keeping your other hand clear of the blade. Push the cut pieces out from the inside with your thumb. Take your time on the triangle nose so the points stay crisp.
For the dim orange look seen here, use a loop tool or the edge of a spoon to scrape a thin border of skin just outside each eye. Removing only the outer skin lets a gentle glow bleed around the cutouts. Keep the flesh here fairly thick so it stays warm and dim, not bright. This small touch makes the face feel softer and less flat.
The mouth is the biggest opening, so cut it after the eyes to keep the pumpkin sturdy. Saw each tooth in short, controlled strokes and remove the flesh in a couple of sections rather than one long piece. Leave the little triangle teeth attached at top and bottom so they do not snap off. Clean up any ragged edges with the tip of your saw.
Drop a battery LED tealight or two inside and set the lid back on. Skip real candles, since the thin flesh near the cutouts can scorch. Try it in a dim room to check the balance between the glowing mouth and the softer eyes. Hold it up for a proud photo just like the one that inspired this guide.
Check things off as you get ready.
Work on a stable surface, keep your free hand out of the cutting path, and have an adult handle sharp tools.
The main pumpkin face and cheeks stay as untouched skin, keeping most of the surface dark.
A thin scraped border around the eyes glows dim orange for a soft outline.
The eyes, triangle nose, and zigzag mouth cut fully through for the brightest light.
Commit to the tilt on purpose and make it consistent across the whole face. Angle both eyes and let the mouth wander up and down in a deliberate zigzag. A little symmetry in the chaos reads as playful rather than accidental.
Either works, but for the look here you can cut the eyes through and add a scraped border around them for a soft halo. If you want them dimmer than the mouth, scrape them deep without cutting all the way through. Test with your light before deciding.
Keep each tooth connected to the pumpkin at both the top and bottom of the mouth line rather than free-floating. Cut with gentle strokes and avoid prying pieces out with force. If a tooth feels wobbly, leave a touch more flesh at its base for support.
Changed a detail? Made it simpler? Share a photo of your version and tell the community what worked.
The best new carvings, ideas worth stealing, and how-tos for carving season. Short, seasonal, and gone by November.





Comments (0)