Halloween Pumpkin Carving Contest · Starts October 1st · $500 in prizes
← Back to ideas
@ai_concepts
Aug 24, 2026
Cute Hamster Portrait Etched Pumpkin CarvingAI
0

Cute Hamster Portrait Etched Pumpkin Carving

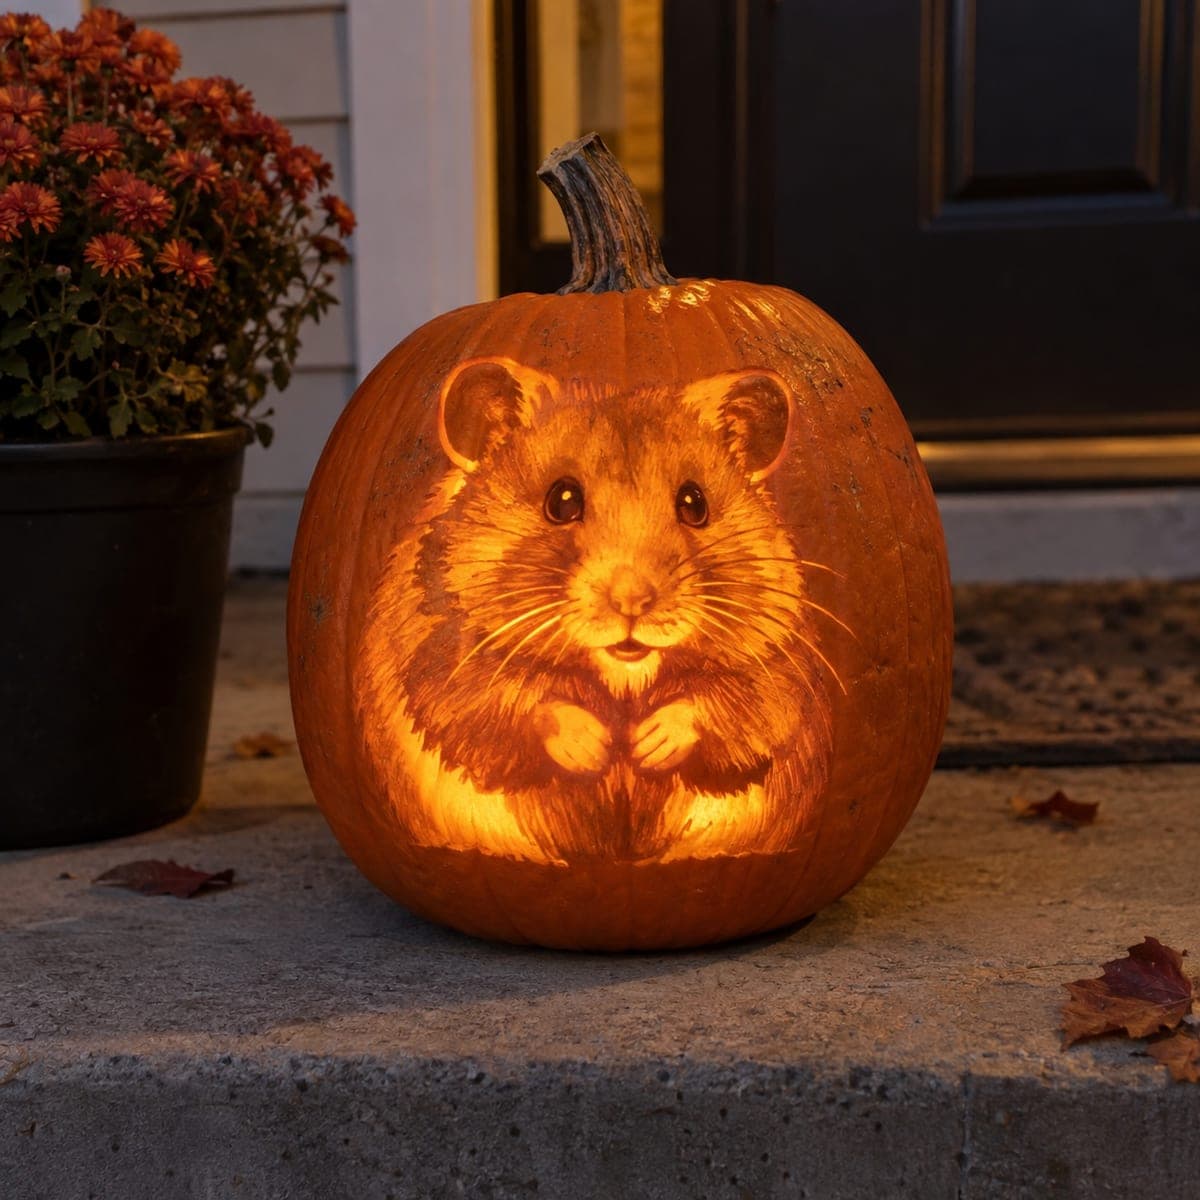
An adorable round-cheeked hamster peers out from the pumpkin's surface with big glassy eyes and tiny clasped paws, fully rendered through surface etching that brings out the soft fur texture and gentle expression. This pumpkin carving idea suits animal lovers and families looking for something sweet rather than spooky. Use a fine loop tool to build up the fur in short strokes, leaving the darkest areas un-etched for depth. A tea light inside warms the lighter-etched zones to a soft golden glow.

This is an AI-generated concept image: a realistic, carvable design idea rather than a photo of a finished carve. AI concepts are always labeled and sit out the leaderboard and the contest.

No ratings yet · Sign in to rate
Comments (0)

  • No comments yet — be the first.

Save without an account. Sign in to like or comment.

Our tips for carving a similar design

The whole design lives in the skin, so the trick is depth through shading rather than cutouts. You build the hamster's fur with short loop-tool strokes, leaving the darkest fur and outlines untouched while thinning the cheeks, paws, and belly to glow. The eyes get the lightest treatment so they read as bright and glassy.

Written by PumpkinCarvingIdeas.com, inspired by the image above. These are our suggestions, not instructions from the uploader. This approach to the AI concept has not been tested on a real pumpkin.

From pumpkin to porch

  1. Prep the pumpkin and pick a flat face

    Choose a large, evenly rounded pumpkin with a smooth front panel and no soft spots. Cut a lid or a bottom access hole so you can reach inside, and scrape the inner wall down to about one inch thick where the face will sit. A thinner wall etches more evenly and glows better. Wipe the surface dry before transferring your pattern.

  2. Transfer the hamster outline

    Tape a hamster portrait stencil over your flat face, centering the head and clasped paws. Use a poking tool or a dull pencil to dot along the main shapes: the head, ears, eyes, nose, cheeks, paws, and body outline. Remove the paper and lightly connect the dots so you have a clear map. Keep the eyes and outlines marked as areas you will leave dark.

  3. Skin the mid-tone fur zones

    With a fine loop tool, peel just the outer skin off the cheeks, forehead, and outer body to make a soft mid glow. Work in short strokes that follow the direction the fur grows, which builds that fuzzy texture. Leave the deepest shadows, the outline, and the ear insides un-etched so they stay dark for contrast. Go shallow here and check often, since you can always remove more.

  4. Deepen the bright highlights

    Etch a little deeper on the belly, the clasped paws, and the highlights along the nose and cheeks so those areas glow brightest. Thin the pumpkin wall gradually rather than punching through, since this design uses no full cutouts. The gradient from dark outline to bright belly is what makes the hamster look round and soft. Keep the eyes crisp by leaving a dark ring around each lighter etched center.

  5. Refine the face and whiskers

    Add fine whisker lines with the tip of your loop tool or a small detail gouge, keeping them thin and shallow. Sharpen the nose and mouth, and leave tiny un-etched dots as eye catchlights so the eyes look glassy. Step back frequently to judge the expression from a few feet away. Small adjustments to the cheeks and brow shift the whole mood toward cute.

  6. Light it and photograph

    Set a battery LED tea light or a small puck light inside rather than a flame, since the thin etched wall can scorch. Warm white light brings out the golden glow in the belly and cheeks. Place the pumpkin on a covered front step at dusk and shoot slightly off to one side so the fur texture catches shadow. Mist the cut edges with water and refrigerate overnight to keep it fresh.

Gather your supplies

Check things off as you get ready.

Work on a stable surface, keep your free hand out of the cutting path, and have an adult handle sharp tools.

Three levels of light

  • Leave intact

    The outline of the body, the deep shadows between fur clumps, the ear insides, and the dark ring around each eye stay untouched and dark.

  • Peel & shade

    The cheeks, forehead, and outer body get skin-peeled for a soft mid glow with fuzzy fur texture.

  • Cut through

    Nothing is cut fully through; instead the belly, clasped paws, nose highlights, and eye centers are etched thinnest for the brightest glow.

Learn the carving basics

Before you start cutting

There are no cutouts, so how does any light show through?

All the glow comes from thinning the pumpkin wall to different depths. Where you peel only the outer skin the light comes through dim, and where you etch deeper it glows brighter. Getting the inner wall down to about an inch first makes this work far better.

How do I keep the eyes looking glassy and alive?

Leave a dark un-etched ring around each eye, then etch the center a bit lighter, and leave one tiny un-etched dot as a catchlight. That contrast between dark rim, glowing iris, and a small dark highlight is what reads as a shiny eye. Work these last so you can fine tune the expression.

This is graded hard. Can a newer carver still attempt it?

Yes, but plan on practice. The challenge is controlling shading depth across the whole face, which takes patience and a steady hand. Start with a simpler etched animal to learn loop-tool strokes, then work up to the full hamster portrait.

Your take belongs here, too.

Changed a detail? Made it simpler? Share a photo of your version and tell the community what worked.

Share your pumpkin

More pumpkins like this

You've reached the end · 8 pumpkins
The Patch Report

Fresh pumpkins, in your inbox.

The best new carvings, ideas worth stealing, and how-tos for carving season. Short, seasonal, and gone by November.

A short email during carving season. Unsubscribe anytime. See our privacy policy.