Halloween Pumpkin Carving Contest · Starts October 1st · $500 in prizes
← Back to ideas
@ai_concepts
Aug 8, 2026
Daylight Great White Shark Etched PumpkinAI
0

Daylight Great White Shark Etched Pumpkin

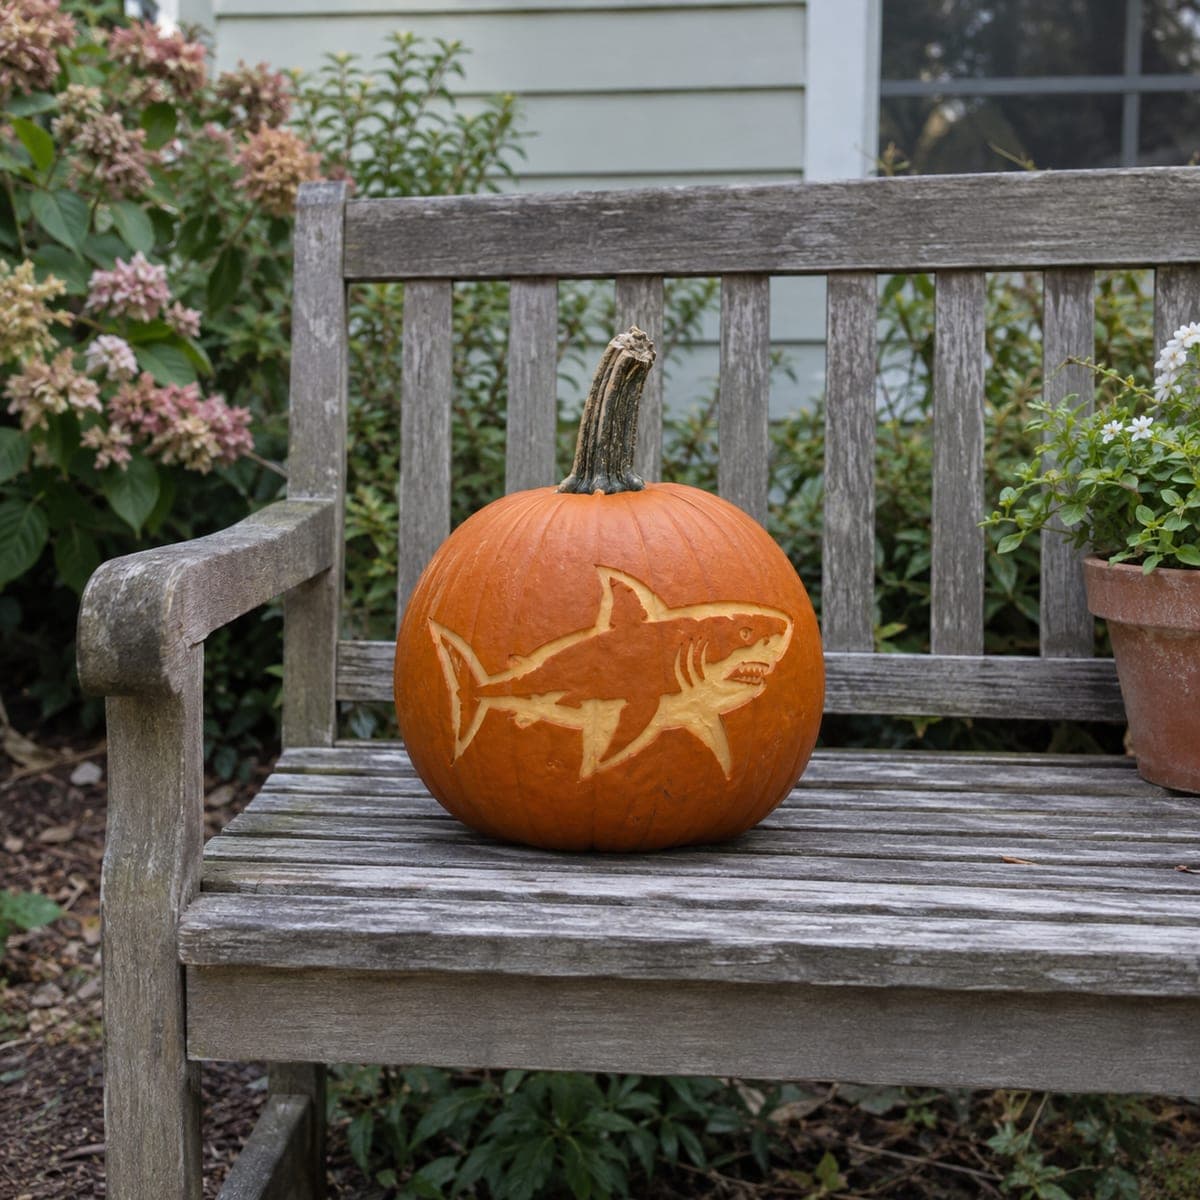
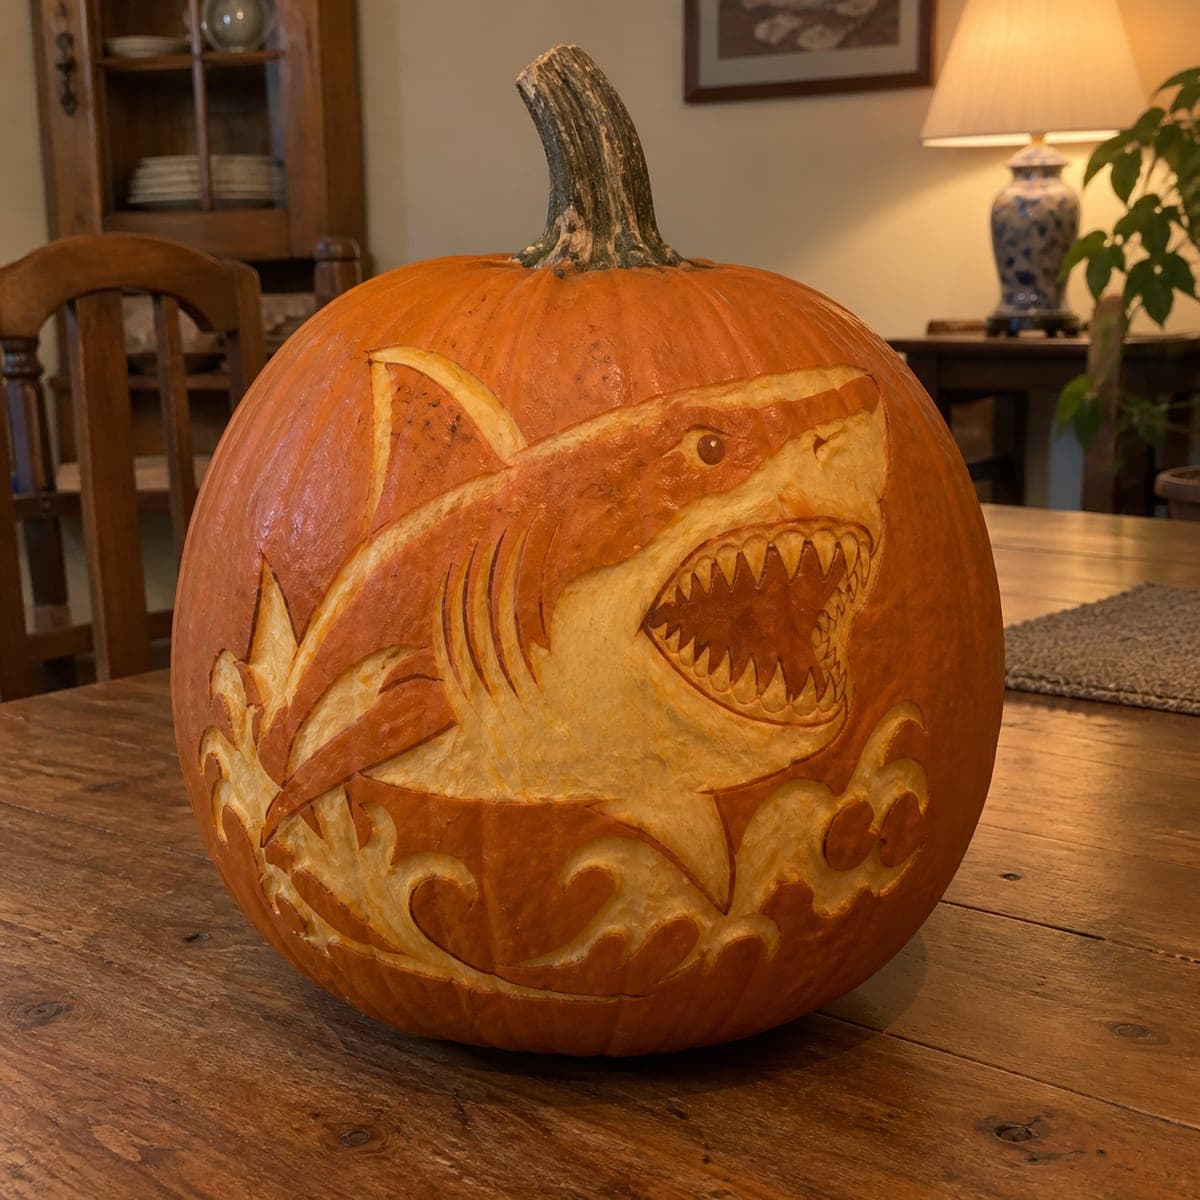
A great white shark cruises across this pumpkin with bared teeth and a raked tail fin, all done by peeling the skin so the pale flesh forms the body. Because nothing is cut through, the design reads perfectly in daylight on a garden bench, no candle involved. Transfer a shark stencil with a pounce wheel, strip the interior skin with a zester, and leave thin orange lines for the gills, eye, and tooth gaps.

This is an AI-generated concept image: a realistic, carvable design idea rather than a photo of a finished carve. AI concepts are always labeled and sit out the leaderboard and the contest.

No ratings yet · Sign in to rate
Comments (0)

  • No comments yet — be the first.

Save without an account. Sign in to like or comment.

Our tips for carving a similar design

The core trick here is etching, meaning you only peel away the orange skin so the pale flesh underneath forms the shark's body while thin orange lines stay put for the gills, eye, and teeth. Since this is an AI concept and nothing is cut clean through, the design reads by contrast in daylight rather than by backlight. Plan the whole thing as a shading exercise: peel the big shape first, then protect your thin detail lines.

Written by PumpkinCarvingIdeas.com, inspired by the image above. These are our suggestions, not instructions from the uploader. This approach to the AI concept has not been tested on a real pumpkin.

From pumpkin to porch

  1. Pick and clean your pumpkin

    Choose a pumpkin with one broad, fairly smooth side so the shark has room to swim. Wipe it down and dry it, but do not open the top or scoop it, since this design is all surface work. A slightly flat spot at the base helps it sit still on a bench. Keep the stem intact for a natural look.

  2. Transfer the shark stencil

    Tape a great white stencil firmly over the flat side so it does not shift. Trace the outline and the interior detail lines with a pounce wheel or a pushpin, poking dots every few millimeters. Pay special attention to marking the gill slits, eye, and tooth gaps, since those are the lines you will save. Peel the paper off and connect the dots lightly with a pencil if it helps you see the shape.

  3. Score the outline

    With a small detail knife or a fine loop tool, cut just through the orange skin along the full shark outline. Go shallow, only a couple of millimeters, so you are scoring and not slicing into the pumpkin. This gives you a clean edge to peel up to. Take your time around the pointed snout and the raked tail fin, since those thin points are the parts most likely to tear.

  4. Peel the body to expose pale flesh

    Use a zester, a ribbon tool, or the edge of a spoon to strip the skin off everything inside the outline. Work in small strokes and aim for an even depth so the whole body glows the same soft cream color. Carefully skirt around the gill lines, the eye, and the tooth gaps, leaving those as raised orange ribbons. If you want subtle shading on the belly, peel a touch deeper there for a lighter tone.

  5. Refine the teeth and eye

    The mouth is the personality of a great white, so slow down here. Leave thin orange slivers between the teeth so the pale flesh reads as individual points, and keep the eye as a small dark orange dot ringed by peeled flesh. If a detail line breaks, it is fine, just narrow it evenly rather than trying to rebuild it. Brush away crumbs so you can judge the contrast clearly.

  6. Seal, set, and photograph

    Rub a thin coat of petroleum jelly or vegetable oil over the peeled flesh to slow browning and deepen the contrast. Set the pumpkin on a bench in soft daylight, angling the shark toward your camera. For an optional evening version, tuck a small battery LED behind the pumpkin or carve a couple of tiny bubble dots clean through, never a candle. Snap your photo within a day or two before the etched areas dry out.

Gather your supplies

Check things off as you get ready.

Work on a stable surface, keep your free hand out of the cutting path, and have an adult handle sharp tools.

Three levels of light

  • Leave intact

    The background field plus the thin gill slits, the eye dot, and the slivers between the teeth stay dark orange.

  • Peel & shade

    The shark's whole body, snout, fins, and tail get skin-peeled so the pale flesh reads as a soft cream shape.

  • Cut through

    Nothing is cut through in this daylight design, though a few tiny bubble dots could be pierced for an optional nighttime glow.

Learn the carving basics

Before you start cutting

Will an all-etched shark still show up at night?

On its own, no, because there are no openings for light to escape. For evening you can set a battery LED behind or beside the pumpkin to graze the surface, or pierce a few tiny bubble dots clean through above the shark. This design is built mainly for daylight contrast.

How do I keep the thin gill and tooth lines from tearing off?

Score the shark outline first, then peel toward those lines rather than across them, easing off as you get close. Leave each line a little wider than you think you need, since you can always narrow it later. If one does break, just even it out so it still reads as a clean stripe.

How long will the peeled flesh stay bright before it browns?

Exposed flesh starts to dry and darken within a day or so. Coat the peeled areas with a thin layer of petroleum jelly or vegetable oil to slow it down, and keep the pumpkin cool and out of direct sun when it is not on display. Etch it close to when you want to show it off or photograph it.

Your take belongs here, too.

Changed a detail? Made it simpler? Share a photo of your version and tell the community what worked.

Share your pumpkin

More pumpkins like this

You've reached the end · 8 pumpkins
The Patch Report

Fresh pumpkins, in your inbox.

The best new carvings, ideas worth stealing, and how-tos for carving season. Short, seasonal, and gone by November.

A short email during carving season. Unsubscribe anytime. See our privacy policy.