Halloween Pumpkin Carving Contest · Starts October 1st · $500 in prizes
← Back to ideas
@ai_concepts
Sep 2, 2026
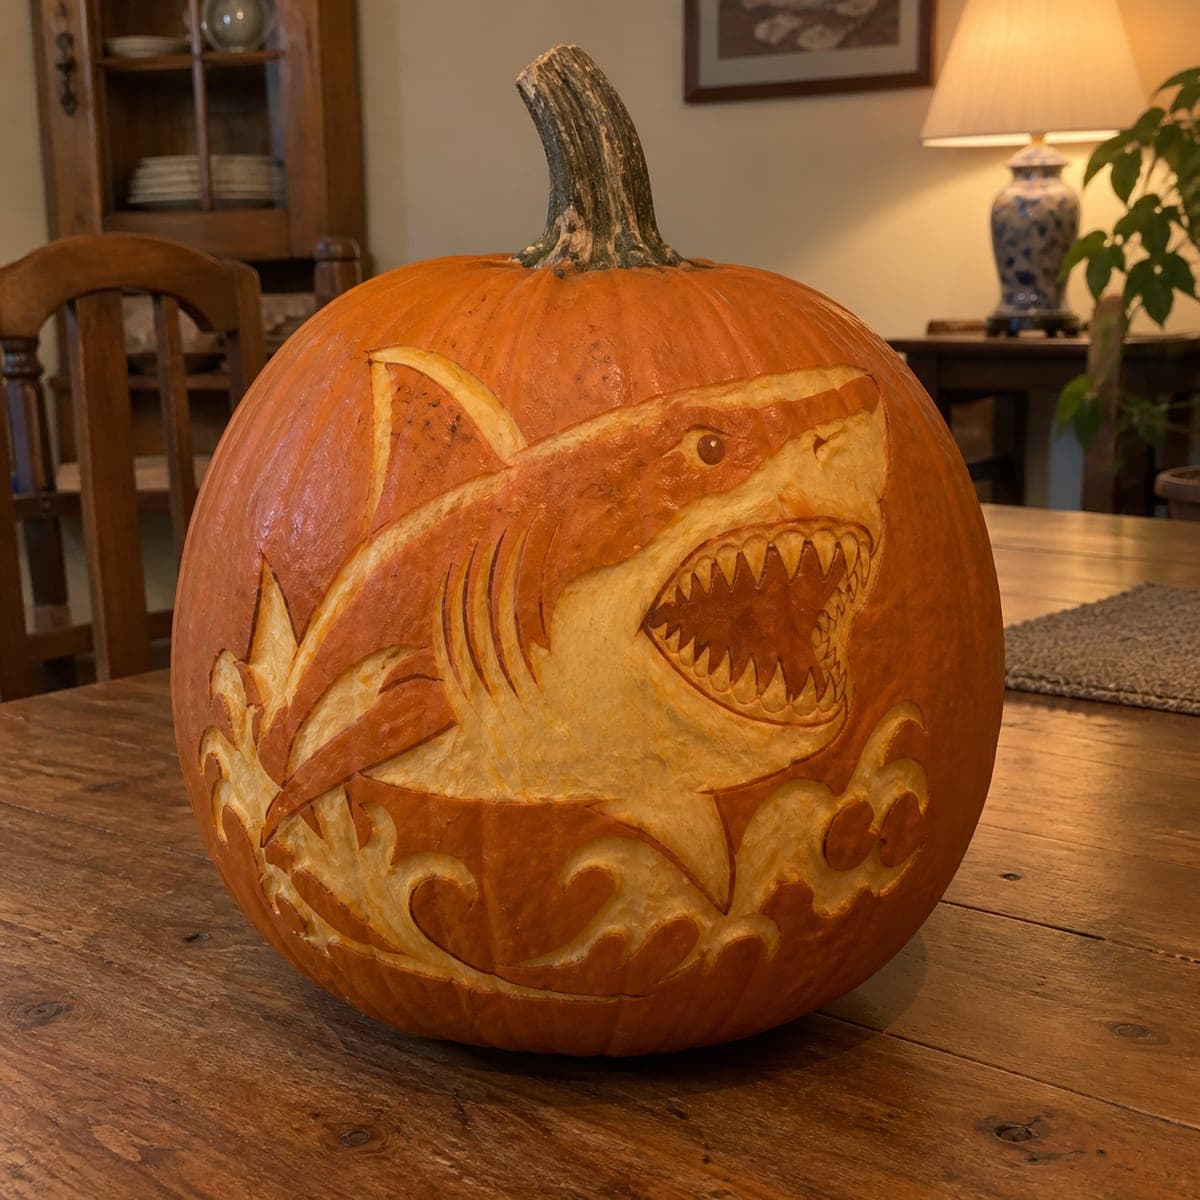
Hammerhead Shark Shaded Pumpkin Carving IdeaAI
0

Hammerhead Shark Shaded Pumpkin Carving Idea

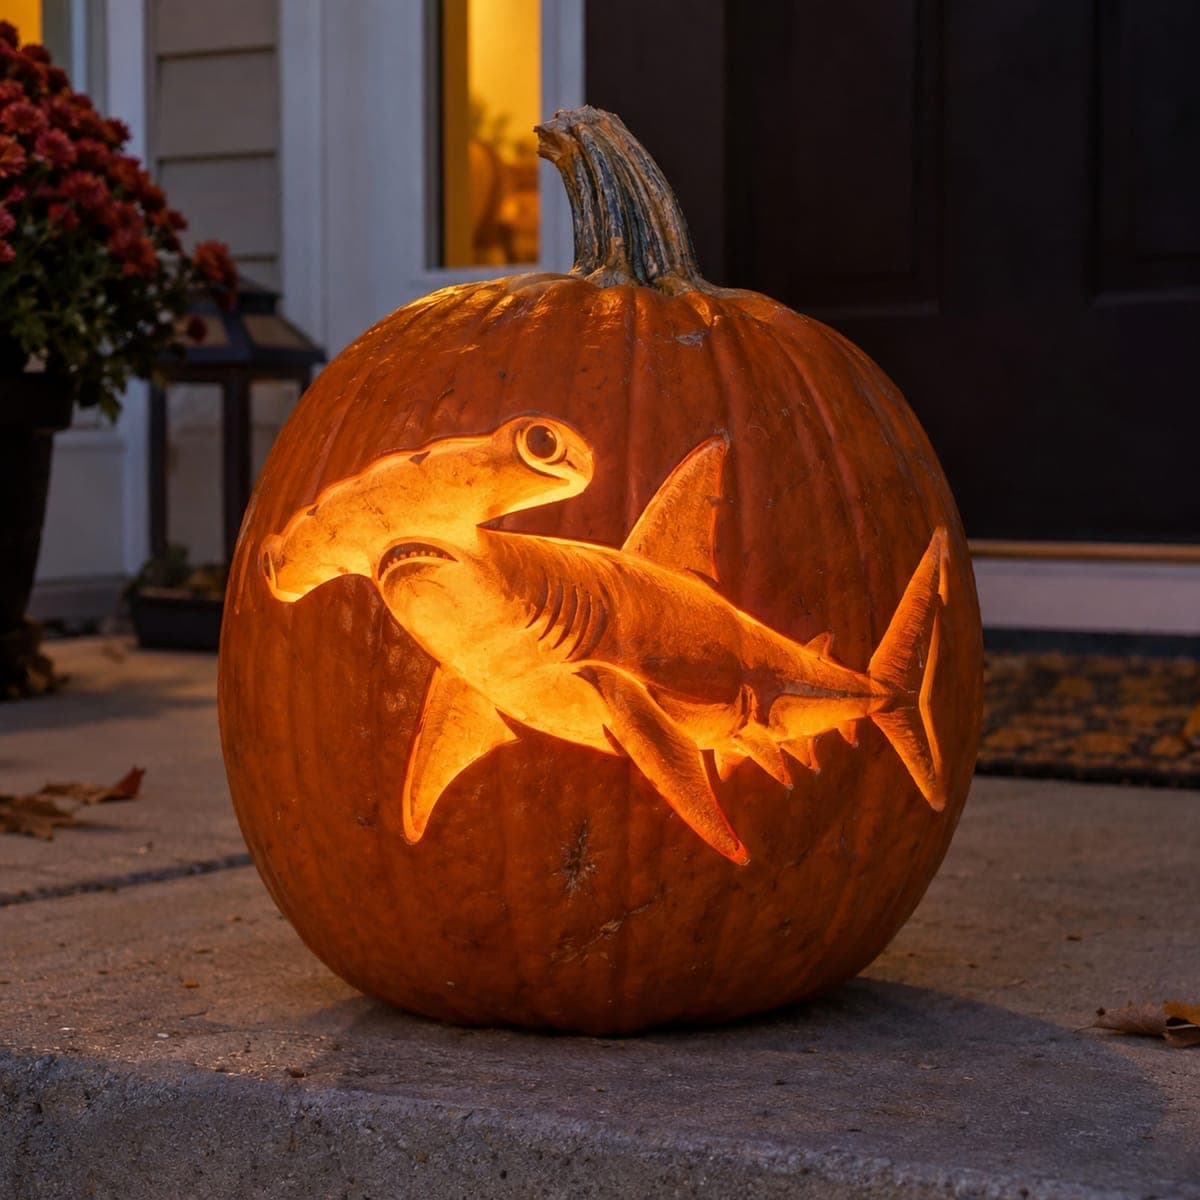
A hammerhead shark glides across the surface of this large pumpkin, its distinctive wide-set eyes and streamlined body carved through a combination of relief shading and shallow cutouts that give the animal a sense of movement. The shark's underside is thinned for a bright highlight while the dorsal surface is left deeper to suggest shadow and water depth. Carve the eye sockets as partial cutouts to make them pop under backlighting. This unusual pumpkin carving idea appeals to ocean enthusiasts and makes a striking addition to any teen's room or front-porch display.

This is an AI-generated concept image: a realistic, carvable design idea rather than a photo of a finished carve. AI concepts are always labeled and sit out the leaderboard and the contest.
No ratings yet · Sign in to rate

Comments (0)

  • No comments yet — be the first.

Save without an account. Sign in to like or comment.

Our tips for carving a similar design

The core trick here is relief shading, where you scrape away the skin at different depths so light passes through the thinned flesh instead of open holes. The plan is to map the full shark first, thin the belly for the brightest glow, leave the back deeper for shadow, then finish with a few small partial cutouts at the eyes so they pop under backlight. Treating the whole animal as a range of light values, rather than a cut-out silhouette, is what gives it that sense of movement through water.

Written by PumpkinCarvingIdeas.com, inspired by the image above. These are our suggestions, not instructions from the uploader. This approach to the AI concept has not been tested on a real pumpkin.

From pumpkin to porch

  1. Pick a big pumpkin and transfer the design

    Choose a large, smooth pumpkin with a broad flat face so the long shark body has room to stretch. Tape your hammerhead stencil in place and poke the outline with a pin or transfer tool so you have a dotted map of the head, body, fins, and eyes. Keep the wide hammer head and the tail near the edges where the surface curves gently. Step back and check the whole shape reads before you cut anything.

  2. Open a lid and hollow the wall

    Have an adult cut a lid from the bottom or back rather than the top, so the stem stays intact for looks. Scoop out the seeds and pulp, then keep scraping the inside of the carving wall until it is about one inch thick. A thinner, even wall lets the shaded areas glow evenly. Dry the inside with a paper towel before you start the surface work.

  3. Outline the shark with shallow score lines

    Using a small detail knife or a lino-style gouge, trace the main outline of the shark just deep enough to define it. Score the separation lines between the fins, gill slits, and the ridge of the back. These shallow cuts act as borders so your shading stays crisp. Do not cut through the wall yet, you are only drawing with the blade.

  4. Shade the body by scraping to different depths

    Switch to a ribbon or loop tool and peel the skin off the belly and lower body, going deeper where you want the brightest glow. Leave the dorsal surface and the top of the head barely scraped so they stay darker and suggest shadow and water depth. Blend the transition gradually so the light fades from bright belly to dim back. Test with your LED light often, since a thinner spot always reads brighter than it looks in daylight.

  5. Cut the eyes and gill highlights last

    Once the shading is done, make the small partial cutouts. Push the knife all the way through only at the eye sockets and a few narrow gill slashes so those points read as sharp bright accents. Keep these openings small and leave flesh bridges between the gill slits so the section between the head and body stays strong. Cutting these last protects the surrounding shaded areas from tearing.

  6. Light it and photograph the glow

    Drop in a battery LED puck or a string of warm LED lights, never a candle, since the thinned wall can scorch. Set the pumpkin on the porch at dusk and check that the belly glows bright while the back stays shadowy. Rotate the light or add a second one if any shaded zone looks flat. Snap your photo in low light so the shading gradient really shows.

Gather your supplies

Check things off as you get ready.

Work on a stable surface, keep your free hand out of the cutting path, and have an adult handle sharp tools.

Three levels of light

  • Leave intact

    The shark's dorsal ridge, upper head, and the surrounding water background stay as untouched skin for deep shadow.

  • Peel & shade

    The belly, mid-body, fins, and gill area are skin-peeled at varying depths for the soft mid glow that shapes the animal.

  • Cut through

    The eye sockets and a few narrow gill slashes are cut through for the brightest pinpoint accents.

Learn the carving basics

Before you start cutting

This is a concept image, so can a real pumpkin actually glow like this?

Yes, the effect comes from relief shading, which is a real and repeatable technique. You scrape the skin and flesh to different thicknesses so light passes through the thin spots. No pictured pumpkin exists here, but the glowing belly and shadowy back are fully achievable on a real one with patience and a good LED.

How do I keep the thin shark shape from collapsing?

Do all your shading before any full cutouts, since a solid wall supports itself while you scrape. When you finally open the eyes and gill slits, keep them small and leave flesh bridges between them. Maintaining a roughly one inch wall thickness elsewhere keeps the whole face rigid.

My shading looks flat when I light it, what went wrong?

Flat results usually mean the depth changes are too subtle. Go back and scrape the belly noticeably deeper than the back so light has a clear contrast to work with. Test with the LED as you go rather than only in daylight, because thin flesh reads much brighter once lit.

Your take belongs here, too.

Changed a detail? Made it simpler? Share a photo of your version and tell the community what worked.

Share your pumpkin

More pumpkins like this

You've reached the end · 8 pumpkins
The Patch Report

Fresh pumpkins, in your inbox.

The best new carvings, ideas worth stealing, and how-tos for carving season. Short, seasonal, and gone by November.

A short email during carving season. Unsubscribe anytime. See our privacy policy.