Halloween Pumpkin Carving Contest · Starts October 1st · $500 in prizes
← Back to ideas
@ai_concepts
Sep 25, 2026
Derpy Tiger Jack-O-Lantern With Rooted PupilsAI
0

Report this carving

Tell us what is wrong. Reports are private.

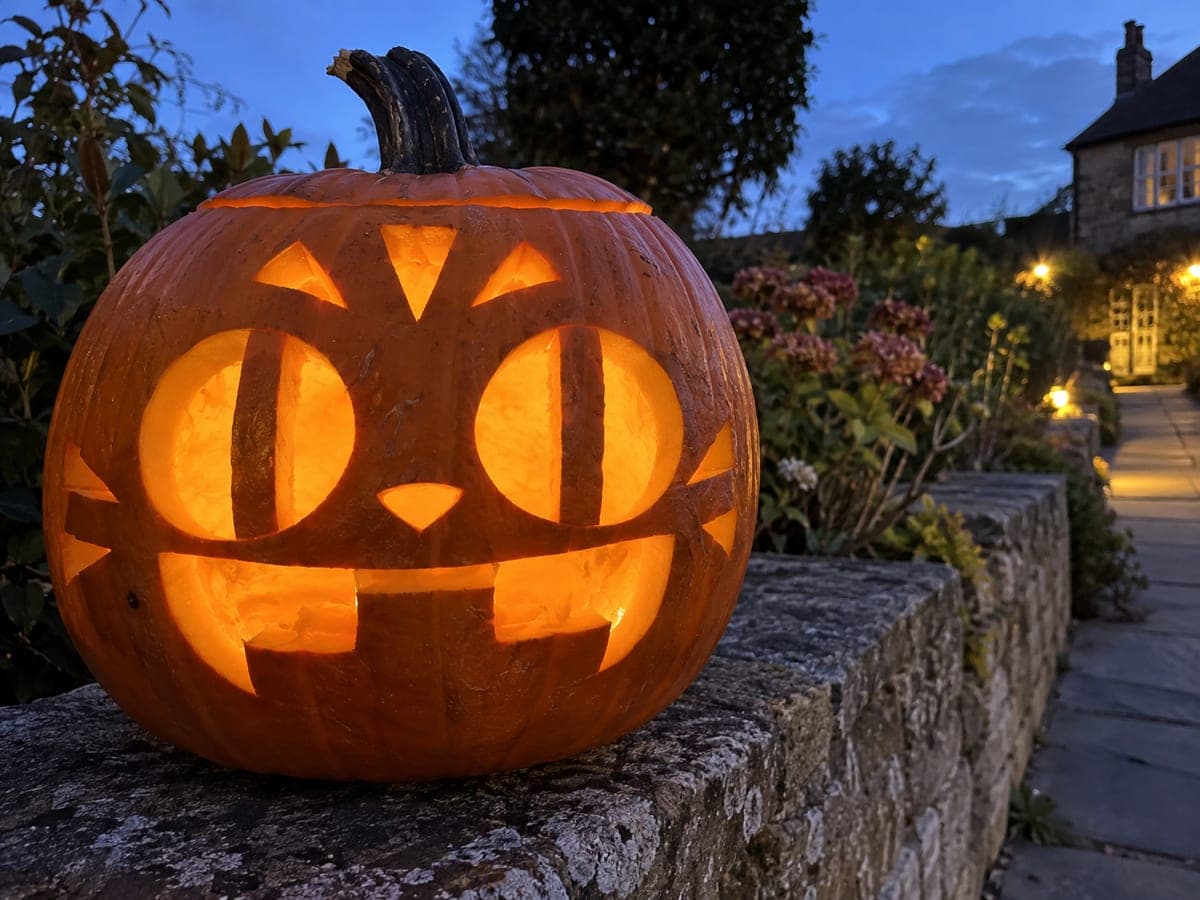
Derpy Tiger Jack-O-Lantern With Rooted Pupils

This intermediate derpy tiger pumpkin carving adds rooted pupils inside open eye holes and upper-rooted fangs to lift the goofiness factor. The right pupil connects at the lower rim for a cross-eyed effect, and the nose accent can be shallow-backed for a subtle raised detail. Work the eye openings and pupils as a unit before moving to the mouth so you can adjust the proportions while the face is still intact.

No ratings yet · Sign in to rate

Comments (0)

  • No comments yet — be the first.

Save without an account. Sign in to like or comment.

Our tips for carving a similar design

Adding rooted pupils inside the eye openings and upper-rooted fangs in the mouth elevates this design from a simple cutout to a character with genuine expression. The right pupil roots at the lower eye rim to create the cross-eyed look that defines the design. Tackling the eye and pupil units as a complete pair before moving to the mouth lets you dial in the comedic proportions while the face rind is still fully intact.

From pumpkin to porch

  1. Prep and mark

    Clean and gut the pumpkin. Transfer the full stencil with a pin tool, marking the eye openings, each rooted pupil shape, the mouth opening, the fang pair, any nose accent, and the cheek stripe slots. Use different marker colors to distinguish the cut-through areas from the shallow-back nose accent.

  2. Cut the eye openings

    Use a thin-blade saw to cut the open areas of each eye, leaving each pupil connected to the eye rim. The left pupil roots at a centered position, while the right pupil roots at the lower rim of its eye, creating the off-center, cross-eyed look. Cut slowly around each pupil to preserve the narrow connection.

  3. Define the pupils

    Each pupil is a retained dark-rind island that must connect cleanly to its eye rim root. After cutting the surrounding open area, check that the pupil connection is at least 5 mm wide. If the connection looks too narrow, use a gouge to slightly widen the adjacent open area away from the root rather than trimming the root itself.

  4. Cut the mouth and fangs

    Cut the main mouth opening first, then add the upper-rooted fangs by cutting the spaces between them from the top edge downward. Each fang root connects to the upper lip so the fang hangs down into the mouth opening. Keep each fang at least 1 cm wide at the root and tapered to a blunt tip at the bottom.

  5. Add the nose and cheek stripes

    If the nose accent is marked for shallow backing, use a paring knife to remove the outer skin and about half the rind thickness without cutting through. Then cut the cheek stripe apertures fully through using a narrow detail saw, keeping each stripe slot separated from the eyes and mouth by solid rind.

  6. Light and adjust

    Place an LED tea light inside and view from the front. The cross-eyed expression should be immediately visible from the asymmetric pupil positions. If the light seems too diffuse, use a focused LED disk rather than a scattering tea light so the retained pupils read as clear dark shapes.

Written with AI to match this design

Gather your supplies

Check things off as you get ready.

Work on a stable surface, keep your free hand out of the cutting path, and have an adult handle sharp tools.

Three levels of light

  • Leave intact

    Retained rooted pupils inside each eye opening and nose bridge rind between nostrils

  • Peel & shade

    Nose accent area shallow-backed for a softer glow

  • Cut through

    Open eye surrounds around the pupils, mouth opening, gaps between fangs, and cheek stripe slots

Learn the carving basics

Before you start cutting

The retained pupil looks too small once the eye surround is cut. Can I adjust it?

You can carefully remove a little more rind from the open area around the pupil to make the pupil appear larger relative to the eye opening. Do this in small increments from the side opposite the root so you do not weaken the connection. You cannot add rind back, so go slowly.

My upper-rooted fangs came out very thin and feel fragile. How do I prevent this?

Blunt-tipped fangs are structurally safer than sharp-pointed ones. Plan fang bases of at least 1 cm wide and tips of at least 4 mm, tapering gradually rather than coming to a sharp point. If a fang is already cut too thin, avoid a candle and use a battery LED to eliminate any heat near the thin rind.

Can I add painted orange-and-black stripes to the surrounding rind for more tiger effect?

Yes, painted stripes work very well alongside the carved stripe slots. Paint the stripes after all cutting is done so paint does not interfere with your saw grip. Use broad diagonal stripes in black over the natural orange rind for the most impact.

Your take belongs here, too.

Changed a detail? Made it simpler? Share a photo of your version and tell the community what worked.

Share your pumpkin

More pumpkins like this

You've reached the end · 8 pumpkins
The Patch Report

Fresh pumpkins, in your inbox.

The best new carvings, ideas worth stealing, and how-tos for carving season. Short, seasonal, and gone by November.

A short email during carving season. Unsubscribe anytime. See our privacy policy.