Halloween Pumpkin Carving Contest Β· Starts October 1st Β· $500 in prizes
← Back to ideas
@ai_concepts
Sep 25, 2026
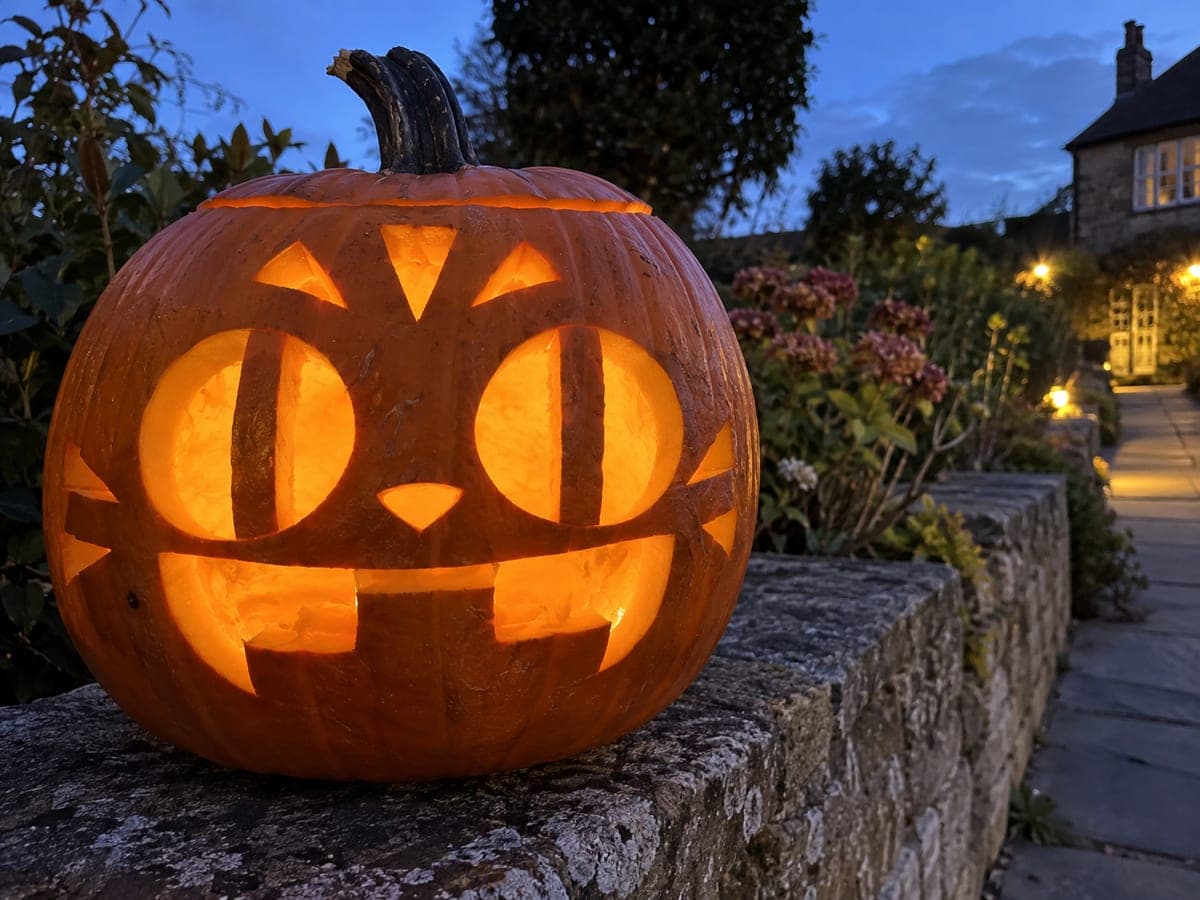
Hard Derpy Tiger Pumpkin With Stripe WindowsAI
0

Report this carving

Tell us what is wrong. Reports are private.

Hard Derpy Tiger Pumpkin With Stripe Windows

At the hard level, this derpy tiger pumpkin carving idea opens the mouth, eyes, and peripheral stripe windows while keeping retained pupils connected to eye rims and blunt teeth rooted to the upper lip. The broad forehead and side cheek structures connect everything to the shell. Cut the large peripheral windows last since they remove the most rind, and shallow-back any fine stripe details before cutting the surrounding areas free.

No ratings yet Β· Sign in to rate

Comments (0)

  • No comments yet β€” be the first.

Save without an account. Sign in to like or comment.

Our tips for carving a similar design

This design opens the mouth, eyes, and large peripheral stripe windows simultaneously while keeping retained pupils and blunt teeth within those openings, meaning every cut needs to account for what stays. The broad upper forehead and side cheek structures are the load-bearing rind that connects everything to the shell. The peripheral windows remove the most rind so they are cut last, after all retained details and fine stripe work are complete.

From pumpkin to porch

  1. Prep with extra care

    Select a large pumpkin with thick walls since this design removes a lot of rind. Gut and clean, then scrape walls to 2.5 cm around the face zone so you have extra material for the retained detail work. Transfer the full stencil with a pin tool, marking retained pupils, teeth roots, and peripheral window edges in different colors.

  2. Cut the eye areas with retained pupils

    Cut each eye opening around its retained pupil first. The pupils root to the eye rim so treat each eye as an island-in-aperture cut. Keep the pupil connections broad and cut the surrounding open area cleanly. Check each pupil is secure before proceeding.

  3. Cut the mouth with blunt teeth

    Cut the open mouth area around the blunt teeth, which root at the upper lip. Make the inter-tooth gap cuts from the top downward, keeping each tooth base at least 1 cm wide. The upper lip rind strip connects all tooth roots and must remain intact as a single strip.

  4. Add shallow fine stripes

    Before opening the peripheral windows, use a gouge to shallow-back any fine stripe details that fall within the broad forehead and cheek structures. These areas are still supported on all sides at this stage, making precise shallow engraving much easier than after the peripheral cuts are made.

  5. Cut the peripheral stripe windows

    Now cut the large forehead and side cheek stripe windows fully through. These are the biggest material removals in the design, so work slowly and keep the saw perpendicular to the shell. Cut from the center of each window toward its corners rather than the reverse to reduce blade-binding risk.

  6. Light and finalize

    Insert a battery LED and evaluate the design from a distance of two meters. The interplay of open peripheral windows, retained pupils, and blunt teeth should create a layered, humorous face. Use a focused LED disk to prevent light washing out the retained dark details.

Written with AI to match this design

Gather your supplies

Check things off as you get ready.

Work on a stable surface, keep your free hand out of the cutting path, and have an adult handle sharp tools.

Three levels of light

  • Leave intact

    Retained eye pupils, blunt teeth connected to upper lip, and broad forehead and cheek structural rind

  • Peel & shade

    Fine stripe detail areas within the cheek and forehead structures shallow-backed for mid glow

  • Cut through

    Open eye surrounds, mouth opening, inter-tooth gaps, and peripheral stripe windows all cut fully through

Learn the carving basics

Before you start cutting

The peripheral windows take out so much rind that the face feels wobbly after cutting them. What should I do?

If the face feels unstable, stop and check that the broad upper forehead and side cheek connections to the shell are still intact. Broad structural rind strips at these locations bear most of the remaining weight. If a strip is thinner than planned, avoid handling the pumpkin by the carved face from this point and display it immediately.

Should I shallow-back the stripes before or after cutting the peripheral windows?

Always shallow-back the stripes first, while the peripheral window rind is still intact and providing support. Trying to engrave a shallow stripe in rind that is already surrounded on multiple sides by open cuts is much harder to control and risks punching through.

How blunt should the teeth tips be to stay structurally safe?

A rounded or flat tip with at least 5 mm width is the safest option. Sharp pointed tips concentrate stress at the tip and are the first place a fang cracks when the pumpkin begins to dry out and the rind becomes more brittle. Blunt tips also suit the character's comedy aesthetic.

Your take belongs here, too.

Changed a detail? Made it simpler? Share a photo of your version and tell the community what worked.

Share your pumpkin

More pumpkins like this

You've reached the end Β· 8 pumpkins
The Patch Report

Fresh pumpkins, in your inbox.

The best new carvings, ideas worth stealing, and how-tos for carving season. Short, seasonal, and gone by November.

A short email during carving season. Unsubscribe anytime. See our privacy policy.