Halloween Pumpkin Carving Contest · Starts October 1st · $500 in prizes
← Back to ideas
@ai_concepts
Sep 25, 2026
Silly Derpy Tiger Pumpkin With Chunky GrinAI
0

Report this carving

Tell us what is wrong. Reports are private.

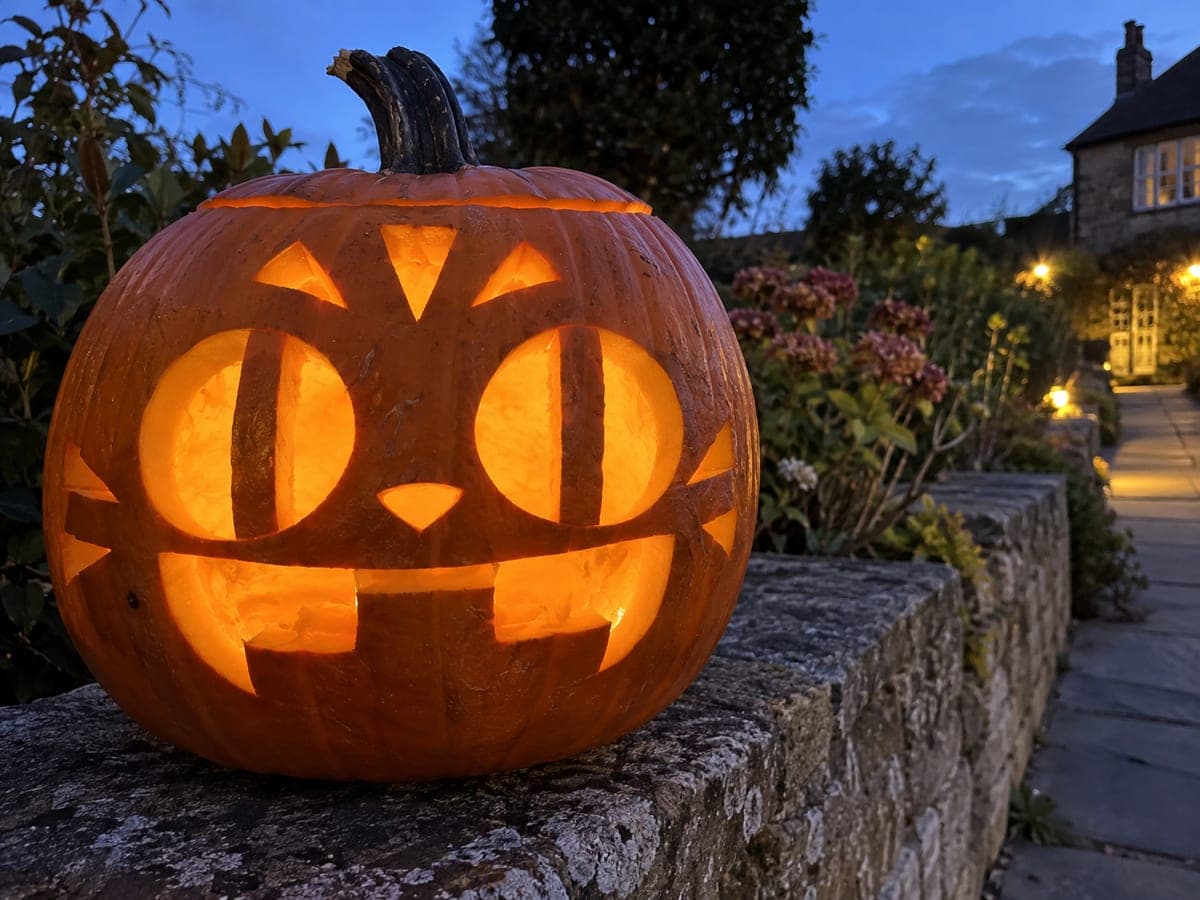
Silly Derpy Tiger Pumpkin With Chunky Grin

This easy derpy tiger pumpkin carving idea features oversized eye holes split by full rind bars, a wide-open grin with chunky bottom-rooted teeth, and forehead and cheek stripe slots separated by solid rind. Cut the large eye openings first to establish the face proportions, then add the grin and stripe slots. The bold shapes light up brilliantly with a standard candle, making this pumpkin carving idea a crowd-pleaser for the front porch.

No ratings yet · Sign in to rate

Comments (0)

  • No comments yet — be the first.

Save without an account. Sign in to like or comment.

Our tips for carving a similar design

Oversized eye holes split by full rind bars plus a wide grin with chunky bottom-rooted teeth are the design's core elements, and every shape here is deliberately bold to work at beginner skill level. Stripe slots on the forehead and cheeks are separated by solid rind so the shell stays sturdy. Cutting the large eyes first establishes the face proportions before adding the smaller grin and stripe details.

From pumpkin to porch

  1. Prep and gut the pumpkin

    Select a round pumpkin and cut a back lid so the light source can be positioned without obstructing the face. Scrape the inside wall to about 2 cm thickness in the face area. A thinner wall makes the large eye shapes glow more warmly without requiring extra tools.

  2. Transfer the stencil

    Tape the stencil to the pumpkin face and pin-transfer the eye shapes, grin outline, tooth positions, and stripe slots. Remove the stencil and darken the transfer dots with a marker. Double-check that the two eye openings are the same size and centered on the face before cutting.

  3. Cut the eye openings with rind bars

    Use a thin-blade saw to cut each large eye opening, stopping at both ends of the full rind bar that divides each eye. The rind bars run across the center of each eye hole and must remain intact to maintain the silly divided-eye look. Cut carefully around both ends of each bar.

  4. Cut the grin and teeth

    Cut the wide grin opening next, cutting the upper curved lip line first and then the lower jagged tooth profile. The chunky teeth are rooted at the bottom, so each tooth gap is a separate cut between them rather than a continuous opening. Keep each tooth at least 1.5 cm wide at the base.

  5. Add the stripe slots

    Cut the forehead and cheek stripe slots last, using a narrow detail saw. Each slot is a short rectangular opening separated from its neighbors by intact rind. Keeping at least 5 mm of rind between slots and between any slot and the nearest eye or grin opening prevents cracking.

  6. Light and photograph

    Place a battery tea light inside and view the face in a darkened room. The bold shapes should light up brightly and the rind bars across the eyes give the tiger its signature derpy expression. Photograph before displaying outside so you capture the full warm glow.

Written with AI to match this design

Gather your supplies

Check things off as you get ready.

Work on a stable surface, keep your free hand out of the cutting path, and have an adult handle sharp tools.

Three levels of light

  • Leave intact

    Rind bars across each eye hole, the nose bridge, and rind between stripe slots and around the grin

  • Peel & shade

    None required for this bold simple design

  • Cut through

    Both large eye openings on either side of the rind bars, the wide grin, tooth gap slots, and all stripe openings

Learn the carving basics

Before you start cutting

How do I cut neatly around the rind bars that split the eyes without accidentally removing them?

Cut each eye in two halves, treating the rind bar as a stopping point. Cut from the outer edge of the eye hole to one end of the bar, then start again from the outer edge on the other side to the other end of the bar. Approach each end of the bar with short, controlled strokes.

The chunky teeth look good on paper but keep cracking when I cut them. What am I doing wrong?

Tooth gaps that are too narrow put stress on the tooth base when the saw wiggles. Keep each tooth base at least 1.5 cm wide and each gap at least 8 mm wide. Cutting the grin's upper lip line first, before any tooth gaps, also reduces flexing of the rind during the detail cuts.

Can I add painted-on tiger stripes around the carved stripe slots for extra effect?

Yes, that works well. Use orange and black acrylic to extend the stripe pattern beyond the carved slots, blending the painted rind into the glowing cut areas. Apply the paint after carving and let it dry before inserting the light source.

Your take belongs here, too.

Changed a detail? Made it simpler? Share a photo of your version and tell the community what worked.

Share your pumpkin

More pumpkins like this

You've reached the end · 8 pumpkins
The Patch Report

Fresh pumpkins, in your inbox.

The best new carvings, ideas worth stealing, and how-tos for carving season. Short, seasonal, and gone by November.

A short email during carving season. Unsubscribe anytime. See our privacy policy.