Halloween Pumpkin Carving Contest · Starts October 1st · $500 in prizes
← Back to ideas
@ai_concepts
Sep 25, 2026
Detailed Floppy-Eared Dog Portrait Pumpkin CarvingAI
0

Report this carving

Tell us what is wrong. Reports are private.

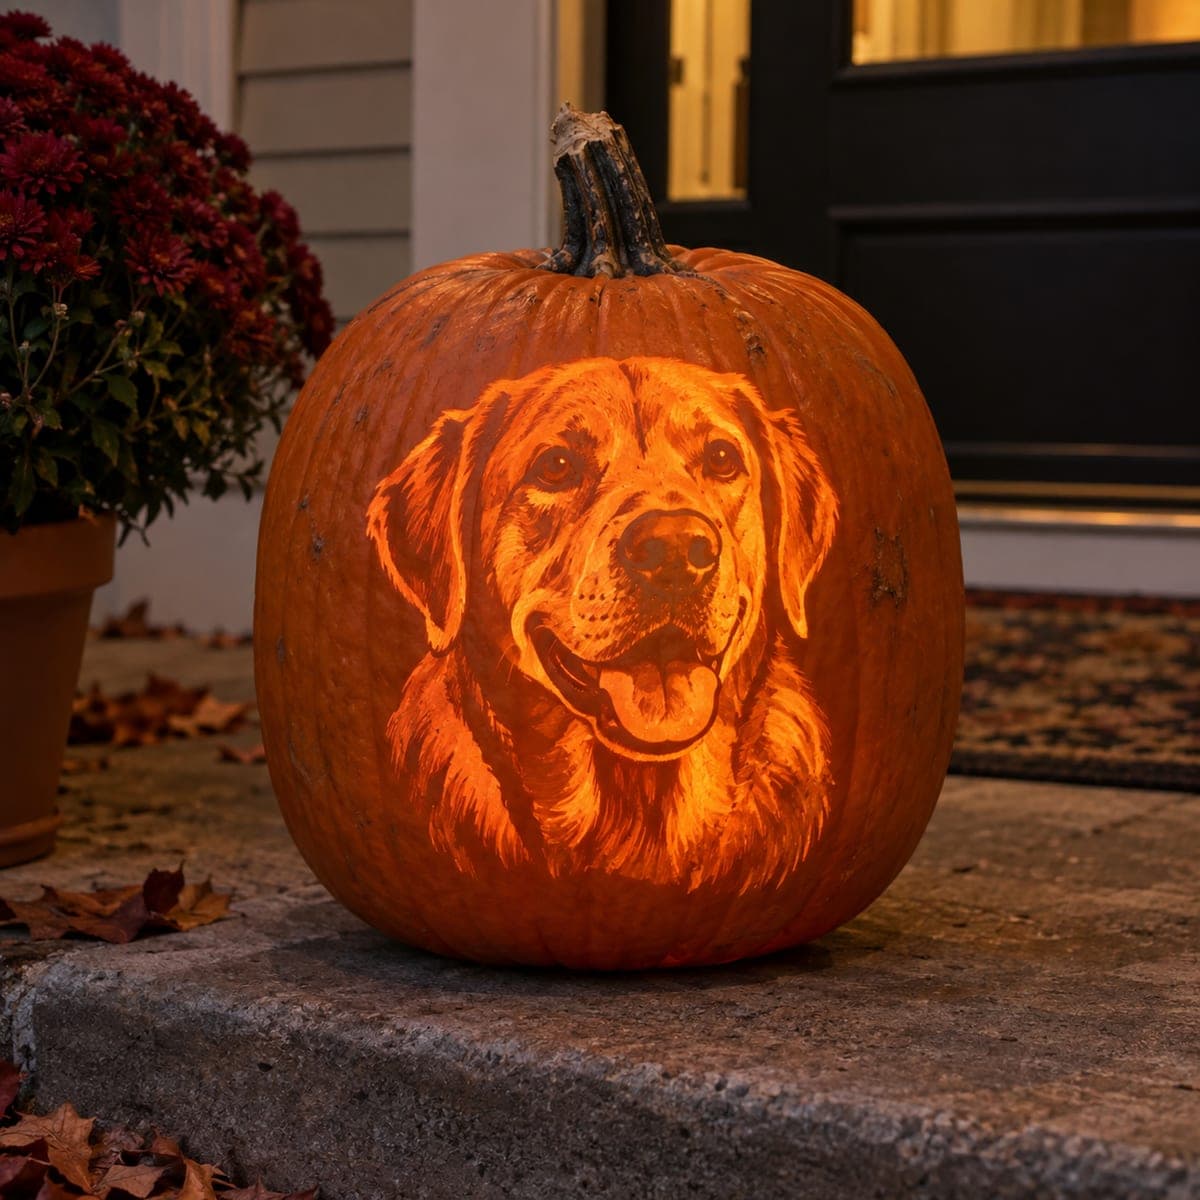
Detailed Floppy-Eared Dog Portrait Pumpkin Carving

A close-up dog portrait with glowing facial apertures, surface coat groove detail and ears that connect to the retained head makes this hard dog pumpkin carving a realistic and rewarding project. Anchor the portrait broadly at the chest and where the head meets the side rind, and score coat texture grooves from the outside, removing only the top layer so they show without cutting through. The ears need their own connection to the main head, so leave a rind bridge at the base of each ear.

No ratings yet · Sign in to rate

Comments (0)

  • No comments yet — be the first.

Save without an account. Sign in to like or comment.

Our tips for carving a similar design

The retained dog head is anchored broadly at the chest and where the sides of the head meet the outer rind. Facial apertures provide the glow while shallow coat grooves add realism without breaking through the shell. The ears each need their own bridge at the base to prevent them from snapping away from the head under pressure.

From pumpkin to porch

  1. Hollow and prep

    Access through the back and scrape the interior to a uniform inch of thickness. A consistent wall depth is especially important for a portrait design because thin patches will glow brighter and create unintended light spots in what should be a dark, shaped face.

  2. Transfer the full portrait

    Use a detailed portrait template. Poke-transfer the outer head boundary, the ear outlines, the facial aperture positions and all coat groove lines. Use one color marker for through-cuts and another for scored-only areas to keep them distinct during carving.

  3. Establish the outer background cuts

    Cut away the background surrounding the dog head first, leaving the chest and side head connections intact. Removing the background defines the portrait's outer shape and makes subsequent cuts much easier to visualize.

  4. Cut facial apertures and ear bridges

    Cut the eye holes, nose and mouth openings as separate through-cuts. Keep a solid muzzle strip between nose and mouth. For the ears, cut around each ear outline but leave a rind bridge at the ear base connecting each ear to the main head.

  5. Score coat texture grooves

    Using a detail knife, score the coat groove lines by removing only the top rind layer. Work in the direction of fur growth with long, confident strokes. Keep the depth shallow and even. Score all texture last, after every through-cut is complete.

  6. Light and display

    Insert an LED candle and check that facial apertures glow cleanly while the coat grooves cast fine shadows. A warm amber or natural white LED shows the texture detail to best effect. Display at a height where the portrait face is at viewer eye level.

Written with AI to match this design

Gather your supplies

Check things off as you get ready.

Work on a stable surface, keep your free hand out of the cutting path, and have an adult handle sharp tools.

Three levels of light

  • Leave intact

    The retained dog head, muzzle strip, ear bodies and chest anchor

  • Peel & shade

    Coat groove lines scored into the rind surface, which cast fine shadow lines

  • Cut through

    Eye apertures, nose opening, mouth opening and background sections around the portrait

Learn the carving basics

Before you start cutting

Why do the ears need their own bridge at the base?

Floppy ears extend away from the main head and have no natural attachment at their lower edge if you remove all the background around them. A rind bridge connecting each ear base back to the head transfers weight downward and prevents the ear from snapping off when the pumpkin is moved.

How deep should the coat groove scoring be?

Aim for about two to three millimeters of depth. You want to remove the outer rind layer without exposing the pale inner flesh all the way through. Score lightly on a test area first and check the depth before committing to longer strokes across the face.

What happens if a coat groove line goes too deep and starts to show light?

A groove that nearly cuts through will glow faintly rather than casting a shadow. You can partially fill it with a thin strip of electrical tape pressed from the inside, or you can accept it as an accent line. For future grooves on that pumpkin, reduce your knife angle to a shallower approach.

Your take belongs here, too.

Changed a detail? Made it simpler? Share a photo of your version and tell the community what worked.

Share your pumpkin

More pumpkins like this

You've reached the end · 8 pumpkins
The Patch Report

Fresh pumpkins, in your inbox.

The best new carvings, ideas worth stealing, and how-tos for carving season. Short, seasonal, and gone by November.

A short email during carving season. Unsubscribe anytime. See our privacy policy.