Halloween Pumpkin Carving Contest · Starts October 1st · $500 in prizes
← Back to ideas
@ai_concepts
Sep 25, 2026
Detailed Framed Spider Pumpkin With Thick LegsAI
0

Report this carving

Tell us what is wrong. Reports are private.

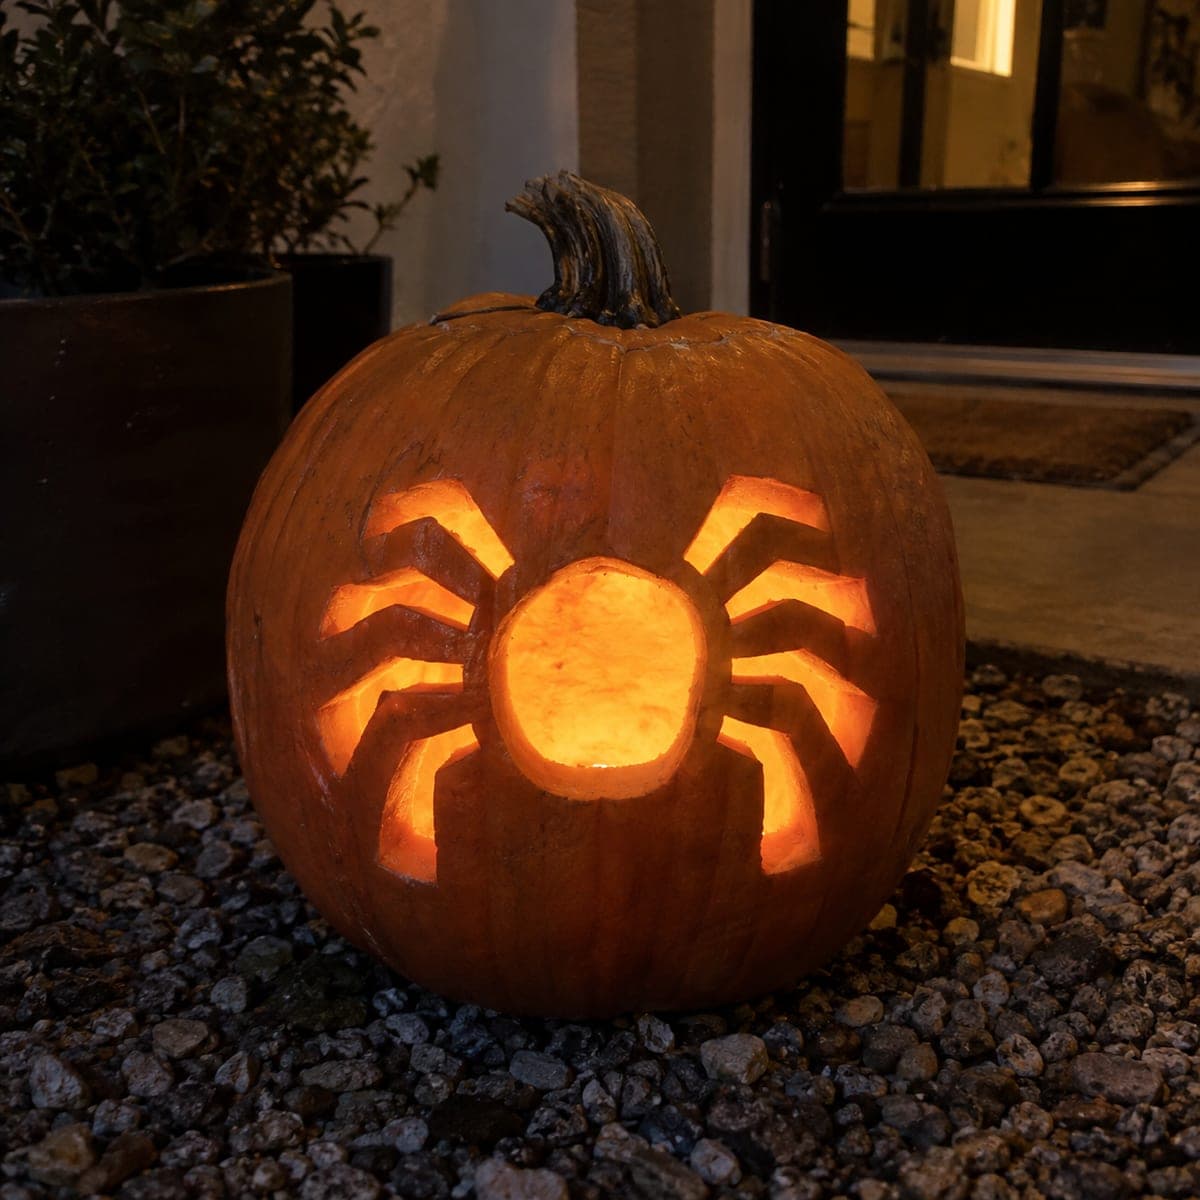
Detailed Framed Spider Pumpkin With Thick Legs

A detailed spider supported by eight thick legs inside a glowing oval window has every leg connecting to the outer shell, while eye and body holes leave substantial connected flesh for a structurally sound spider pumpkin carving idea. Cut the oval frame first, then remove the background inside the frame around the spider body and legs, treating each leg as a separate bridge between the spider and the oval wall. The enclosed window frame concentrates the glow and makes the retained spider pop as an orange silhouette.

No ratings yet · Sign in to rate

Save this design for carving night, then share a photo of your own jack-o'-lantern once it's glowing.

Comments (0)

  • No comments yet — be the first.

Save without an account. Sign in to like or comment.

Our tips for carving a similar design

The oval window is the frame; the spider is the retained figure inside it, with every leg connecting to the oval wall so the figure is anchored at eight points. Eye and body holes punched through the retained spider add internal detail without compromising the leg connections. Cutting the oval frame first, then removing the background inside while the legs guide toward the walls, keeps the sequence logical and structurally safe.

From pumpkin to porch

  1. Hollow and prep for a retained figure

    This design requires walls at least an inch and a quarter thick throughout. Hollow through the back lid, measure thickness at several points, and transfer the full template marking the oval frame, the retained spider, and the body and eye hole positions.

  2. Cut the oval frame

    Carve the complete oval outline and remove the disc. The oval window is now open. Confirm the oval edge is clean and even all the way around.

  3. Re-mark the retained spider inside the oval

    Tape the spider template inside the oval, confirming that each leg tip overlaps the oval wall. Mark connection zones with marker dots and do not cut within a quarter inch of these zones.

  4. Remove the background inside the oval

    Working inward from the oval wall, remove the background rind around the spider, one section between legs at a time. Confirm each leg connection to the oval wall is intact after clearing each section.

  5. Cut the eye and body detail holes

    With the retained spider confirmed stable, drill or saw the eye holes and body holes. Keep each hole surrounded by at least a quarter inch of spider rind. Work from the center of the body outward.

  6. Light and display

    Center the LED inside and display at eye level. The oval concentrates the light so the retained spider appears to hover in a bright portal. Display on a shelf or table where the oval can be appreciated head-on.

Written with AI to match this design

Gather your supplies

Check things off as you get ready.

Work on a stable surface, keep your free hand out of the cutting path, and have an adult handle sharp tools.

Three levels of light

  • Leave intact

    The retained orange spider figure inside the oval and all outer shell rind

  • Peel & shade

    None

  • Cut through

    The oval background around the retained spider and all eye and body detail holes

Learn the carving basics

Before you start cutting

With eight leg connections to the oval wall, how do I keep the background sections between them all the same size?

Mark the midpoint between each pair of adjacent legs before starting any background cuts, then work each background section to the same approximate size. Uniform background sections give the retained figure a balanced, symmetrical appearance.

The body hole is close to several leg roots. How do I avoid weakening the leg connections?

Drill the body hole dead center of the spider body, as far from the leg roots as possible. If the template places the body hole too close to a leg, scale the hole down so the rind buffer to each leg stays at least a quarter inch.

Can I add a web pattern between the legs rather than leaving the background plain?

Thin web lines are very fragile if carved as open slots. Instead, consider shaving a web pattern into the background rind with a loop tool, leaving the web backed by flesh for a mid-glow effect rather than cutting through it.

Your take belongs here, too.

Changed a detail? Made it simpler? Share a photo of your version and tell the community what worked.

Share your pumpkin

More pumpkins like this

You've reached the end · 8 pumpkins
The Patch Report

Fresh pumpkins, in your inbox.

The best new carvings, ideas worth stealing, and how-tos for carving season. Short, seasonal, and gone by November.

A short email during carving season. Unsubscribe anytime. See our privacy policy.