Halloween Pumpkin Carving Contest Β· Starts October 1st Β· $500 in prizes
← Back to ideas
@ai_concepts
Sep 25, 2026
Triceratops Walking Inside an Oval Window PumpkinAI
0

Report this carving

Tell us what is wrong. Reports are private.

Triceratops Walking Inside an Oval Window Pumpkin

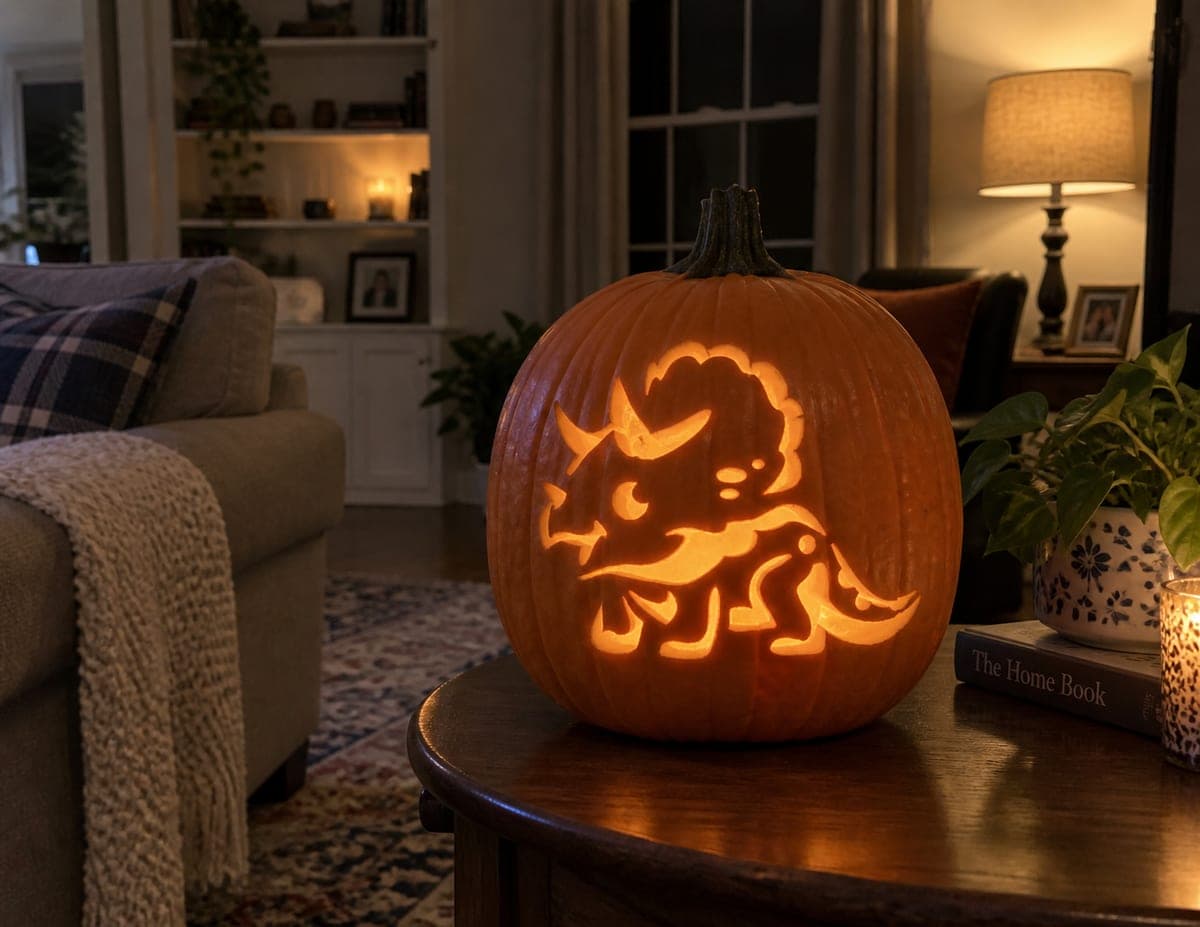
A retained triceratops strides through an oval frame on this hard dinosaur pumpkin carving idea, its thick legs rooted to the bottom edge while the frill, tail, and nose each touch a different side of the border. Three oval body holes and a single eye opening add interior glow without cutting any floating pieces free. Tape your template firmly before scoring the outline so the frill's curve stays even. Placing the finished pumpkin on a gravel surface lets scattered candlelight spill attractively around the base.

No ratings yet Β· Sign in to rate

Comments (0)

  • No comments yet β€” be the first.

Save without an account. Sign in to like or comment.

Our tips for carving a similar design

A broad retained triceratops walks inside an oval cut-through frame, with its thick legs rooted to the bottom edge, the frill touching the upper frame, the tail joined to the left, and the short nose joined to the right. Three oval body holes and a single eye opening provide interior glow without any floating pieces. Taping the template firmly before scoring ensures the frill curve stays even throughout.

From pumpkin to porch

  1. Prep a flat, large-faced pumpkin

    Scoop walls to about one inch of even thickness. The frill at the top of the triceratops needs to connect to the upper frame, so confirm the face is large enough to accommodate the oval window with the figure inside it before starting.

  2. Transfer the full template

    Tape the template flat, pin-punch the oval boundary, the triceratops outline, and the positions of all interior holes. Mark which sections are cut-through versus retained in different colors. The four connection points (legs at base, frill top, tail left, nose right) must be clearly marked.

  3. Cut the oval outer frame

    Saw the oval boundary and remove the waste sections outside the oval, leaving the frame intact. Remove waste in smaller pieces to avoid cracking the rind on a clean oval arc.

  4. Carve the waste around the triceratops

    Working inside the oval, remove the background areas around the triceratops body. Cut toward the figure outline and leave all four connection points intact until the figure is clearly defined. Do not cut through any of the four frame connections.

  5. Cut the body holes and eye

    Use a detail blade to cut the three oval body holes across the triceratops torso and the single small eye hole in the head. Work from the center hole outward to keep the figure balanced as material is removed.

  6. Light on gravel and display

    Place a bright LED inside and set the pumpkin on a gravel garden edge at night. The candlelight spilling from the oval window and the oval body holes creates an intricate light pattern on the gravel below. Apply petroleum jelly to all edges.

Written with AI to match this design

Gather your supplies

Check things off as you get ready.

Work on a stable surface, keep your free hand out of the cutting path, and have an adult handle sharp tools.

Three levels of light

  • Leave intact

    The oval frame border, the retained triceratops body, the frill, and the horns stay dark and structural

  • Peel & shade

    None on this design

  • Cut through

    The oval window background, the three body holes, and the single eye hole are cut through for full glow

Learn the carving basics

Before you start cutting

How do I keep the frill connection from cracking along its curved edge?

The frill is the widest connection to the upper frame and should be at least an inch across where it meets the oval border. Score the frill outline gently before sawing to give the blade a groove to follow on the curve. Work slowly and pause if the blade starts to drift.

What order should I cut the three body holes in?

Cut the central body hole first, then the one toward the head, and finally the one toward the tail. This sequence keeps the figure balanced as material is removed and lets you check the spacing between holes before committing to the outer ones.

My oval came out slightly asymmetric. Does that matter?

A slightly imperfect oval reads as organic and natural on a pumpkin, which is irregular by its own nature. What matters most is that the four figure connections are secure and that no connection is narrower than an inch. Minor oval asymmetry is invisible from display distance.

Your take belongs here, too.

Changed a detail? Made it simpler? Share a photo of your version and tell the community what worked.

Share your pumpkin

More pumpkins like this

You've reached the end Β· 8 pumpkins
The Patch Report

Fresh pumpkins, in your inbox.

The best new carvings, ideas worth stealing, and how-tos for carving season. Short, seasonal, and gone by November.

A short email during carving season. Unsubscribe anytime. See our privacy policy.