Halloween Pumpkin Carving Contest · Starts October 1st · $500 in prizes
← Back to ideas
@ai_concepts
Sep 25, 2026
Frontal Triceratops Face Pumpkin with Frill Dot OpeningsAI
0

Report this carving

Tell us what is wrong. Reports are private.

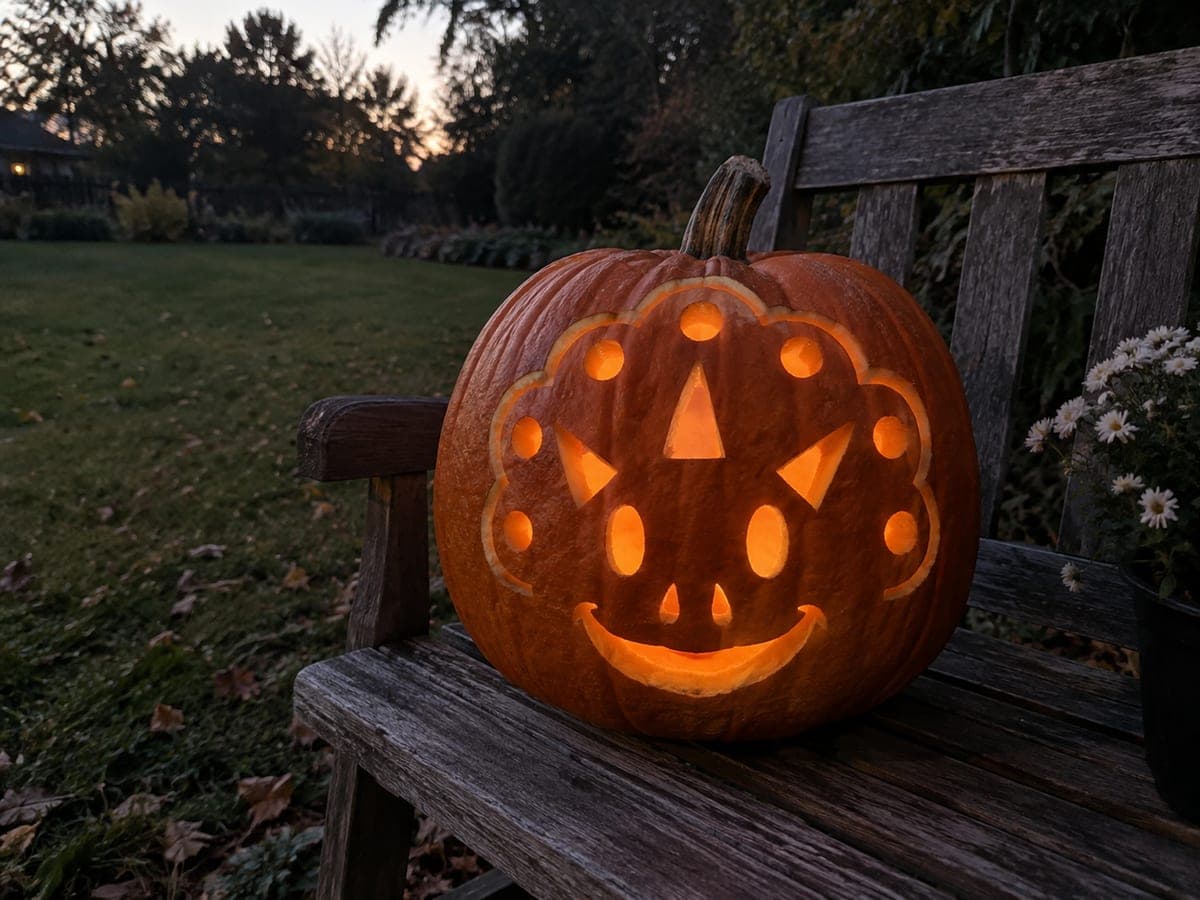
Frontal Triceratops Face Pumpkin with Frill Dot Openings

Six round holes arranged along a scalloped frill, two oval eyes, two teardrop nostrils, a broad smile, and three triangular horn holes build a friendly frontal triceratops face for this triceratops pumpkin stencil idea. All openings are separate cuts so wide rind bridges remain between each one, giving the whole design structural stability. Start with the smallest holes (nostrils and frill dots) before tackling the larger eye and smile openings, which reduces flex in the shell as you work. This design glows beautifully at dusk against a garden bench backdrop.

No ratings yet · Sign in to rate

Comments (0)

  • No comments yet — be the first.

Save without an account. Sign in to like or comment.

Our tips for carving a similar design

The entire triceratops face is built from separate cut-through holes: two oval eyes, two teardrop nostrils, a broad smile, three triangular horn holes, and six round frill dots, with a shallow-backed scalloped frill outline. Wide rind bridges between every opening keep the structure solid. Starting with the smallest holes and working up to the largest reduces flex in the shell as material is removed.

From pumpkin to porch

  1. Prep and mark the face layout

    Scoop the pumpkin to one inch of wall thickness. Sketch the full frontal face layout in pencil before any pin-transfer, placing the frill dots at the top, the three horn holes above center, the two oval eyes in the upper face, the nostrils in the center, and the smile below.

  2. Transfer all aperture positions

    Pin-punch the perimeter of every opening in sequence: frill dots, horn holes, nostrils, eyes, then smile. Trace each group before moving to the next. Confirm that every opening has at least an inch of rind between it and its nearest neighbor.

  3. Cut nostrils and frill dots first

    Use a small drill bit or apple corer for the nostrils and frill dots. Cutting the smallest holes first while the rind is at full strength reduces flex and keeps the transfer marks on the remaining uncut areas accurate.

  4. Cut the triangular horn holes

    Saw the three short triangular horn holes above the face with a thin blade. Keep each triangle broad at its base rather than tapering to a sharp point at the top.

  5. Cut the oval eyes and broad smile

    Saw the two oval eye openings, then the broad smile. Work slowly around the smile's curve. The broad connected shell between all these openings provides the structural integrity that keeps the whole face together.

  6. Shallow-back the frill outline and light

    Use a linoleum cutter to shallow back-carve the scalloped frill outline so it glows softly as a halo. Place a bright LED inside and display on a garden bench at dusk. Apply petroleum jelly to all cut and scooped edges.

Written with AI to match this design

Gather your supplies

Check things off as you get ready.

Work on a stable surface, keep your free hand out of the cutting path, and have an adult handle sharp tools.

Three levels of light

  • Leave intact

    All connected rind bridges between the separate openings stay dark and structural

  • Peel & shade

    The shallow-backed scalloped frill outline glows softly as a mid-tone halo

  • Cut through

    All separate eye, nostril, smile, horn, and frill dot apertures glow at full brightness

Learn the carving basics

Before you start cutting

How do I space the six frill dots evenly along the scalloped frill without a ruler?

Mark the center dot first, then place the two outer dots equidistant from the center. Fill in the two remaining gaps with one dot each. Stepping back and checking the spacing from arm's length is more reliable than trying to measure on a curved surface.

Will cutting all these separate holes weaken the rind too much?

The design is specifically built with wide rind bridges between every opening so the shell retains its strength throughout. As long as no two holes share an edge and each bridge remains at least an inch wide, the structure holds well even with many separate cuts.

Can I skip the shallow-backed frill outline and still have the design look complete?

Yes, the design reads clearly as a triceratops face even without the shallow frill. The six round frill dots already suggest the frill shape strongly. The shallow backing just adds a soft glowing halo that polishes the overall look. Skip it if you are not comfortable with the back-carving technique.

Your take belongs here, too.

Changed a detail? Made it simpler? Share a photo of your version and tell the community what worked.

Share your pumpkin

More pumpkins like this

You've reached the end · 8 pumpkins
The Patch Report

Fresh pumpkins, in your inbox.

The best new carvings, ideas worth stealing, and how-tos for carving season. Short, seasonal, and gone by November.

A short email during carving season. Unsubscribe anytime. See our privacy policy.