Halloween Pumpkin Carving Contest · Starts October 1st · $500 in prizes
← Back to ideas
@ai_concepts
Sep 25, 2026
Illuminated Triceratops Face Pumpkin with Teardrop Frill PatternAI
0

Report this carving

Tell us what is wrong. Reports are private.

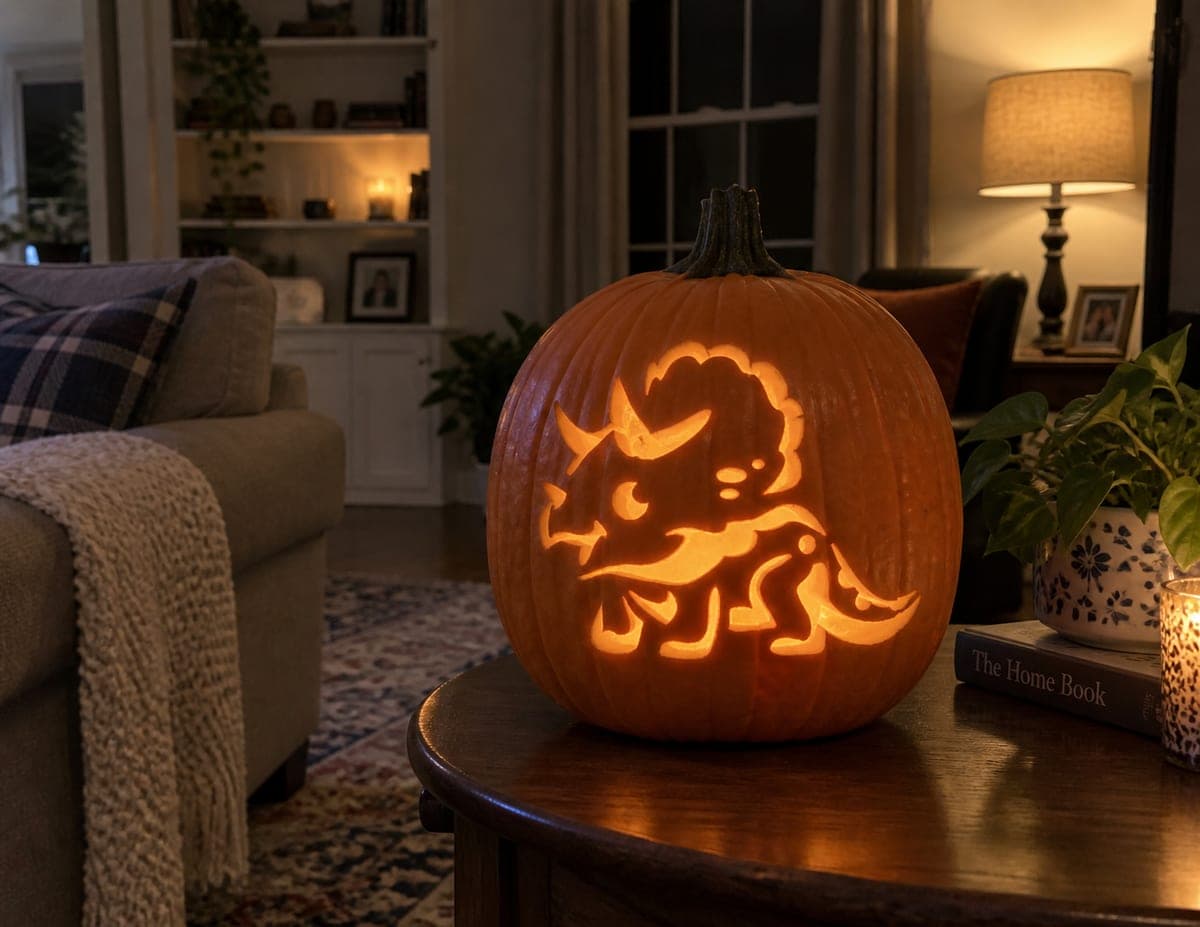
Illuminated Triceratops Face Pumpkin with Teardrop Frill Pattern

Separate horn, eye, and mouth openings combine with two rows of teardrop frill-pattern holes for this expert-level triceratops pumpkin carving, displayed against a stone wall at night. All horn shapes are cut-through holes within the solid shell rather than projecting attachments, which keeps them from breaking off over time. Work outward from the center face openings toward the frill rows so the shell stays rigid while you complete the detailed edge work. The layered frill pattern creates a stained-glass quality when lit from inside.

No ratings yet · Sign in to rate

Comments (0)

  • No comments yet — be the first.

Save without an account. Sign in to like or comment.

Our tips for carving a similar design

Separate horn, eye, and mouth openings sit within a solid face panel, while two rows of teardrop frill-pattern holes frame the face at the sides and top. All horn shapes are cut-through holes within the solid shell rather than projecting attachments, which prevents them from breaking off. Working outward from the central face openings toward the frill rows keeps the shell rigid while the detailed edge work is completed.

From pumpkin to porch

  1. Prepare a large, thick pumpkin

    Walls of at least one and a quarter inches thick are needed for the many small frill holes. Scoop carefully and dry the surface. A wider pumpkin face provides more room to space the frill rows comfortably away from the face features.

  2. Transfer the full stencil precisely

    Pin-punch every element: the face boundary, eye holes, nostril holes, mouth opening, horn holes, and every teardrop in both frill rows. Mark clearly which areas are cut-through and which are retained broad rind. This step requires patience; do not rush it.

  3. Cut the central face features first

    Working outward from center, saw the eye holes, nostril holes, and mouth opening in the face panel. Keep wide rind bridges between each facial opening. Adults must handle all cutting. Use a detail blade for the smaller holes.

  4. Cut the horn holes

    Saw the horn-shaped holes above and within the face panel. Because these are cut-through holes within the shell rather than projecting attachments, there is no structural risk of them snapping off. Keep each horn hole broad at its base.

  5. Cut the inner frill row

    Cut the inner row of teardrop frill holes, working around the face from one side to the other. Confirm the rind bridge between each teardrop and the face panel stays at least half an inch wide.

  6. Cut the outer frill row and light

    Complete the outer teardrop frill row, then apply petroleum jelly to every cut edge. Place a bright LED inside and display on a stone wall at night. The layered frill pattern casts a stained-glass quality glow and the two rows of holes create depth.

Written with AI to match this design

Gather your supplies

Check things off as you get ready.

Work on a stable surface, keep your free hand out of the cutting path, and have an adult handle sharp tools.

Three levels of light

  • Leave intact

    The solid face panel, the rind bridges between all holes, and the outer rind border stay dark and structural

  • Peel & shade

    None on this design

  • Cut through

    All eye, nostril, mouth, horn, and teardrop frill holes glow at full brightness to create the layered mosaic effect

Learn the carving basics

Before you start cutting

How do I keep the two frill rows aligned evenly around the face?

Mark a center axis on the pumpkin face in pencil and mirror the frill hole positions across it before pin-transferring. Check alignment from the front, stepping back a few feet, before cutting any frill holes. Minor asymmetry is less noticeable in the finished lit result than it looks on the raw rind.

What is the difference between a horn as a cut-through hole versus a projecting attachment?

A projecting attachment extends beyond the pumpkin surface and would snap off under its own weight within a day or two. A cut-through hole in the shape of a horn is entirely within the shell, so it is anchored on all sides and cannot fall off. This design uses holes, which is the structurally correct approach.

How do I light this so both frill rows read clearly?

A single bright LED centered inside the pumpkin lights both frill rows evenly. If one row is noticeably dimmer than the other, reposition the LED slightly toward the dimmer side. Avoid using a candle for a design with many small holes, as uneven heat can damage fine rind sections over time.

Your take belongs here, too.

Changed a detail? Made it simpler? Share a photo of your version and tell the community what worked.

Share your pumpkin

More pumpkins like this

You've reached the end · 8 pumpkins
The Patch Report

Fresh pumpkins, in your inbox.

The best new carvings, ideas worth stealing, and how-tos for carving season. Short, seasonal, and gone by November.

A short email during carving season. Unsubscribe anytime. See our privacy policy.