Halloween Pumpkin Carving Contest · Starts October 1st · $500 in prizes
← Back to ideas
@ai_concepts
Sep 25, 2026
Single Empty Triceratops Silhouette Pumpkin CarvingAI
0

Report this carving

Tell us what is wrong. Reports are private.

Single Empty Triceratops Silhouette Pumpkin Carving

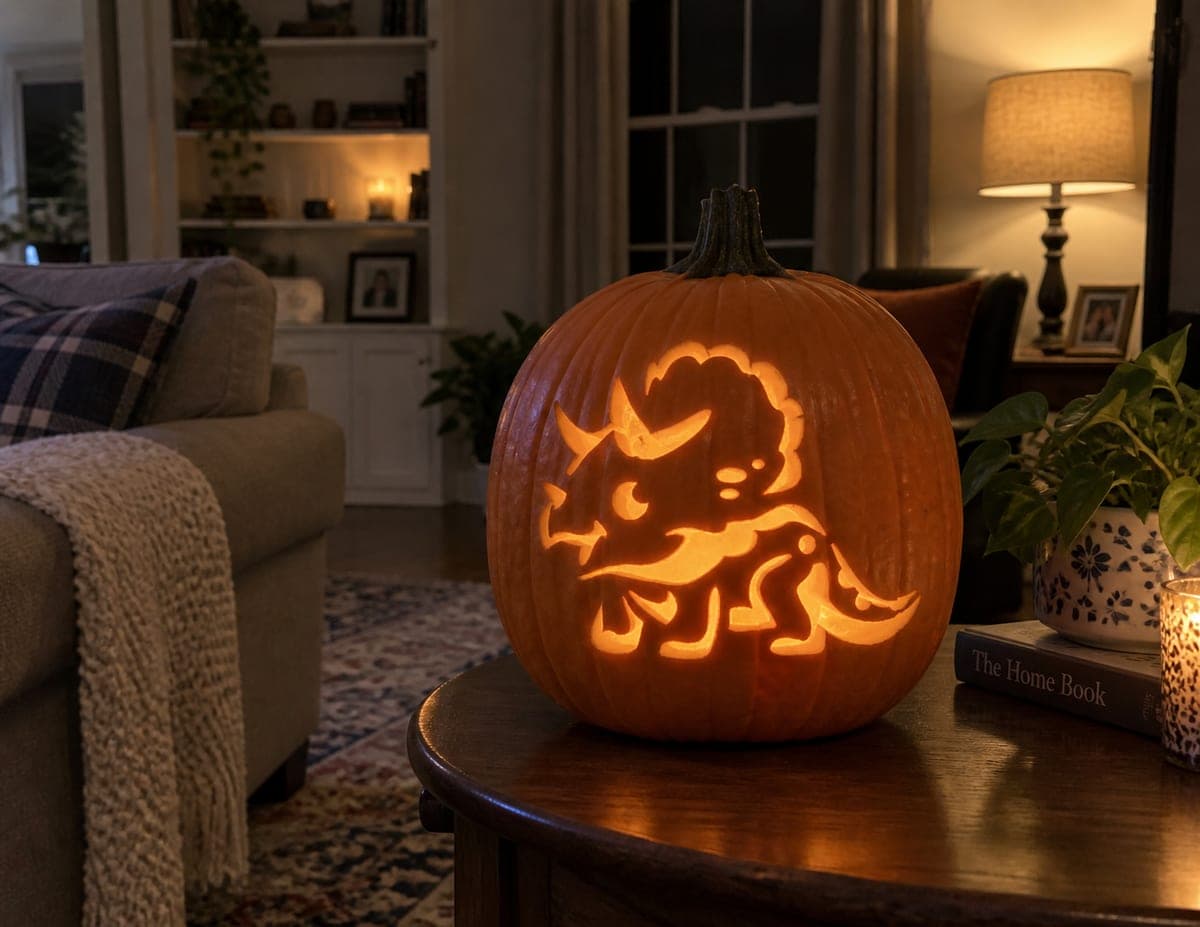
A side-view triceratops, broad body, four stout legs, short tail, rounded frill, and three blunt horns, is removed as one complete hole for this easy triceratops pumpkin carving. Because the entire shape comes out as one piece, there are no islands to worry about, making it one of the more forgiving dinosaur pumpkin stencil projects. Print the template at the right scale for your pumpkin, secure it with tape, and saw along the outer contour smoothly. A faint cool sky fill from behind makes the silhouette pop on a slate front step.

No ratings yet · Sign in to rate

Comments (0)

  • No comments yet — be the first.

Save without an account. Sign in to like or comment.

Our tips for carving a similar design

The entire triceratops, broad body, four stout legs, short tail, rounded frill, and three blunt horns, is removed as one complete hole from the shell, leaving no internal islands. A faint cool sky fill from behind makes the silhouette pop clearly against the surrounding orange rind. Printing the template at the right scale and securing it firmly with tape are the two most important steps before cutting.

From pumpkin to porch

  1. Prep the pumpkin

    Cut a lid from the back of the pumpkin to keep the display face clean. Scoop out seeds and stringy pulp until the walls are about one inch thick. Wipe the face dry.

  2. Scale the template correctly

    Print the triceratops silhouette at a size that leaves at least two inches of rind on all sides. Hold the printed template against the pumpkin to confirm it fits before taping. Adjust the print scale and reprint if needed.

  3. Secure and transfer the outline

    Tape the template flat against the pumpkin face and pin-punch every quarter inch along the full perimeter, including the horn tips and the frill curve. Remove the paper and trace the dots with a fine-tip marker.

  4. Saw the full silhouette

    Follow the outline in one smooth, continuous pass using a thin pumpkin saw blade. Move slowly through the frill curve and around the three blunt horn tips. Keep the blade upright for clean, vertical edges.

  5. Remove and clean

    Push the triceratops piece out from inside gently. Trim rough spots with a craft knife and coat all cut edges with petroleum jelly immediately.

  6. Display on a slate front step

    Place a battery-powered LED puck inside and set on a slate step at night. Position it so any available cool ambient light comes from behind, which creates a subtle two-tone glow: warm amber from the LED, cool from the background. The silhouette is readable from the street.

Written with AI to match this design

Gather your supplies

Check things off as you get ready.

Work on a stable surface, keep your free hand out of the cutting path, and have an adult handle sharp tools.

Three levels of light

  • Leave intact

    All surrounding orange rind outside the triceratops shape stays dark

  • Peel & shade

    None on this design

  • Cut through

    The entire triceratops silhouette aperture is cut through for complete glow

Learn the carving basics

Before you start cutting

How do I prevent the three blunt horns from snapping when I remove the cutout piece?

Support the head and frill section from inside with one hand as you push the piece out with the other. The horns are the most vulnerable extension. If a horn tip snaps, push it gently back into place and apply a thin dab of wood glue from inside to hold it in position for display.

My pumpkin face is quite curved. Will the template still transfer accurately?

On a curved surface, the template will buckle slightly. Make small relief cuts around the edges of the paper template so it can lie flatter against the curve. The slight distortion is usually minor enough to correct with freehand marker adjustments after removing the paper.

Is this suitable as a group carving activity with multiple people?

Yes, this is one of the best beginner designs for a group setting. One person can pin-transfer, one can mark the dots, and one adult handles the saw. The single-hole design keeps the activity quick and the result is immediately satisfying for everyone involved.

Your take belongs here, too.

Changed a detail? Made it simpler? Share a photo of your version and tell the community what worked.

Share your pumpkin

More pumpkins like this

You've reached the end · 8 pumpkins
The Patch Report

Fresh pumpkins, in your inbox.

The best new carvings, ideas worth stealing, and how-tos for carving season. Short, seasonal, and gone by November.

A short email during carving season. Unsubscribe anytime. See our privacy policy.