Halloween Pumpkin Carving Contest Β· Starts October 1st Β· $500 in prizes
← Back to ideas
@ai_concepts
Sep 25, 2026
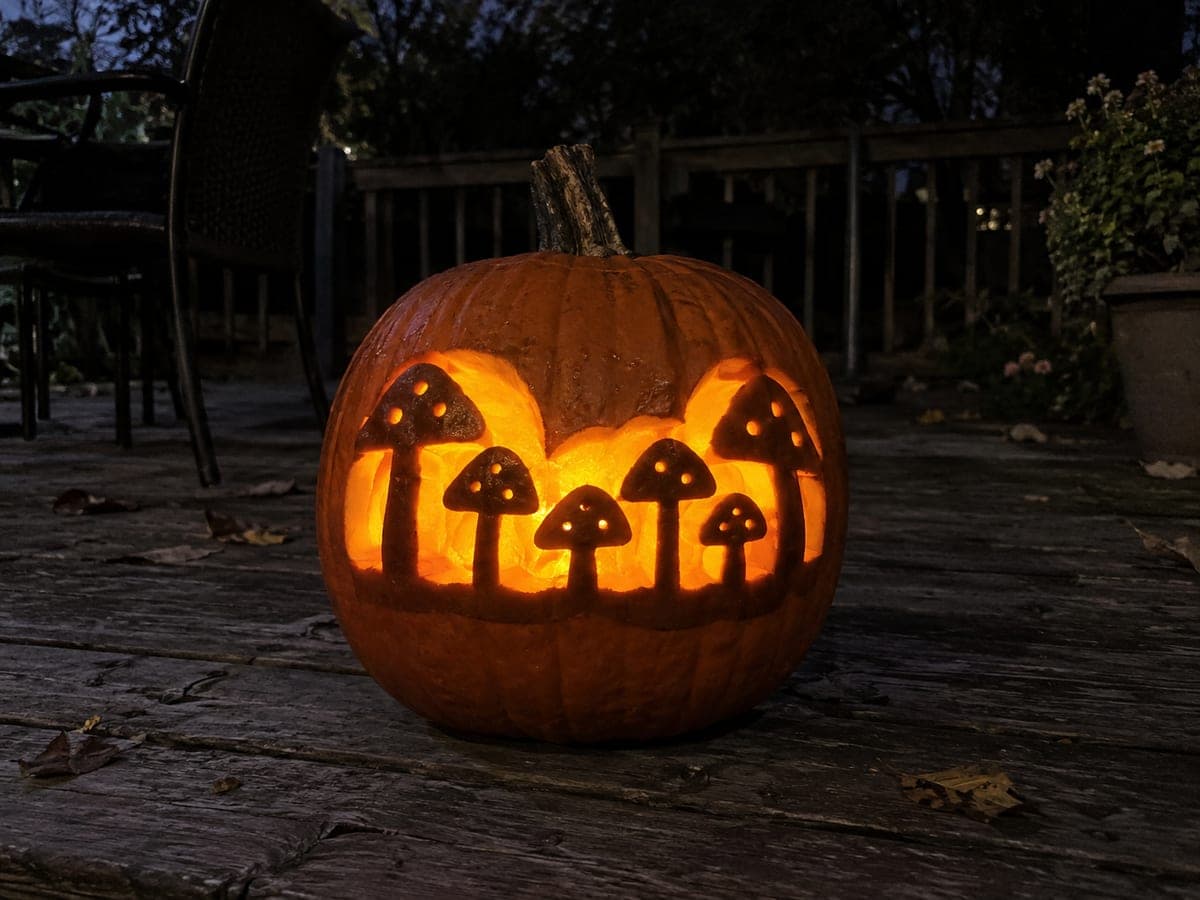
Detailed Mushroom Cluster Pumpkin in a Circular WindowAI
0

Report this carving

Tell us what is wrong. Reports are private.

Detailed Mushroom Cluster Pumpkin in a Circular Window

Three retained mushrooms fill a circular window on this expert mushroom pumpkin carving, with broad stems anchored to the bottom frame, neighboring caps touching through wide rind bridges, and outer cap tips joined to the frame. Small spot holes and curved gill slots divided by stout ribs add texture without creating floating pieces. Begin by cutting the gill slots in each cap before removing the large background apertures, so the caps remain rigid while you work on the finer details. Viewing from slightly below on a dark brick patio amplifies the dramatic glow.

No ratings yet Β· Sign in to rate

Comments (0)

  • No comments yet β€” be the first.

Save without an account. Sign in to like or comment.

Our tips for carving a similar design

Three mushrooms fill a circular window, with their broad stems anchored to the bottom frame and neighboring caps touching through wide rind bridges while outer cap tips join the circular frame. Small spot holes and curved gill slots divided by stout ribs add texture without creating floating pieces. The critical rule is to cut the gill slots inside each cap before removing the large background apertures, keeping the caps rigid while the detail work is done.

From pumpkin to porch

  1. Select a large round pumpkin

    A large round pumpkin with thick, even walls gives the circular window frame and the detailed mushroom caps room to exist without competing for space. Cut the lid from the back and scrape interior walls to a consistent inch and a half. Thin spots in the wall will be exposed when you cut the gill slots.

  2. Transfer all detail lines

    Tape the template flat and use a fine stylus to transfer every line including the outer circle, all three mushroom outlines, stem bases, cap bridge contacts, spot hole positions, and gill slot positions. Remove the paper and trace retained structures in one marker color and apertures in another. The gill slots are particularly important to mark clearly before any cutting begins.

  3. Cut gill slots in each cap first

    Before removing any background material, use a fine linoleum V-tool or a detail knife to cut the curved gill slots in each solid cap. Work from the outer cap edge toward the stem, keeping each slot separated by a stout rind rib as marked. Cutting these now while the caps are still fully braced by surrounding rind prevents vibration-related chipping.

  4. Cut the circular outer window

    Use a fine-toothed saw to cut the circular outer frame, working in short arcs and rotating the pumpkin for a consistent angle. The outer circle defines the entire design boundary and must be cleanly cut before internal background sections are removed.

  5. Remove large background apertures

    Cut the large background sections between and around the mushrooms, starting from the largest open areas and working toward smaller ones. Confirm after each removal that all three stem-to-frame and cap-to-cap bridges are intact. Pause if any bridge develops a micro-crack and apply a stabilizing coat of petroleum jelly.

  6. Add spot holes and final display

    Finish by punching the small spot holes in each cap using a circular cutter or a narrow jab saw. Position the battery LED to light the circular window from the center of the pumpkin floor. View from slightly below on a dark surface to maximize the dramatic glow effect.

Written with AI to match this design

Gather your supplies

Check things off as you get ready.

Work on a stable surface, keep your free hand out of the cutting path, and have an adult handle sharp tools.

Three levels of light

  • Leave intact

    All three solid mushroom bodies, caps, stems, circular frame, and stout gill ribs stay dark as retained rind

  • Peel & shade

    None on this design

  • Cut through

    Curved gill slots, small spot holes, outer circular window, and all large background apertures cut fully through

Learn the carving basics

Before you start cutting

Why do the gill slots need to be cut before the background apertures?

While the caps are still surrounded by uncut background rind, they cannot flex or shift under the pressure of the detail tool. Once the background is removed, each cap is held only by its bridge connections and has more give. Cutting gill slots in a flexing cap is much harder to control and increases the risk of cracking a bridge.

How stout should the ribs between gill slots be?

Each rib should be at least a quarter inch wide to remain structurally sound. Thinner ribs are at risk of snapping when the pumpkin dries and contracts slightly. If your template has ribs narrower than a quarter inch, widen the slots slightly to give the ribs more material.

Two of my three mushrooms fit fine but the third cap is very close to the circular frame edge. How should I handle the bridge?

Widen the bridge by reducing the sky aperture on that side rather than thinning the cap edge. A slightly smaller sky opening is nearly invisible against the overall design but a broken cap-to-frame bridge will collapse the entire right side of the mushroom. Accept the slightly asymmetric background gap as a necessary structural trade-off.

Your take belongs here, too.

Changed a detail? Made it simpler? Share a photo of your version and tell the community what worked.

Share your pumpkin

More pumpkins like this

You've reached the end Β· 8 pumpkins
The Patch Report

Fresh pumpkins, in your inbox.

The best new carvings, ideas worth stealing, and how-tos for carving season. Short, seasonal, and gone by November.

A short email during carving season. Unsubscribe anytime. See our privacy policy.