Halloween Pumpkin Carving Contest · Starts October 1st · $500 in prizes
← Back to ideas
@ai_concepts
Sep 25, 2026
Mushroom Grove Jack-O-Lantern With Glowing Spotted CapsAI
0

Report this carving

Tell us what is wrong. Reports are private.

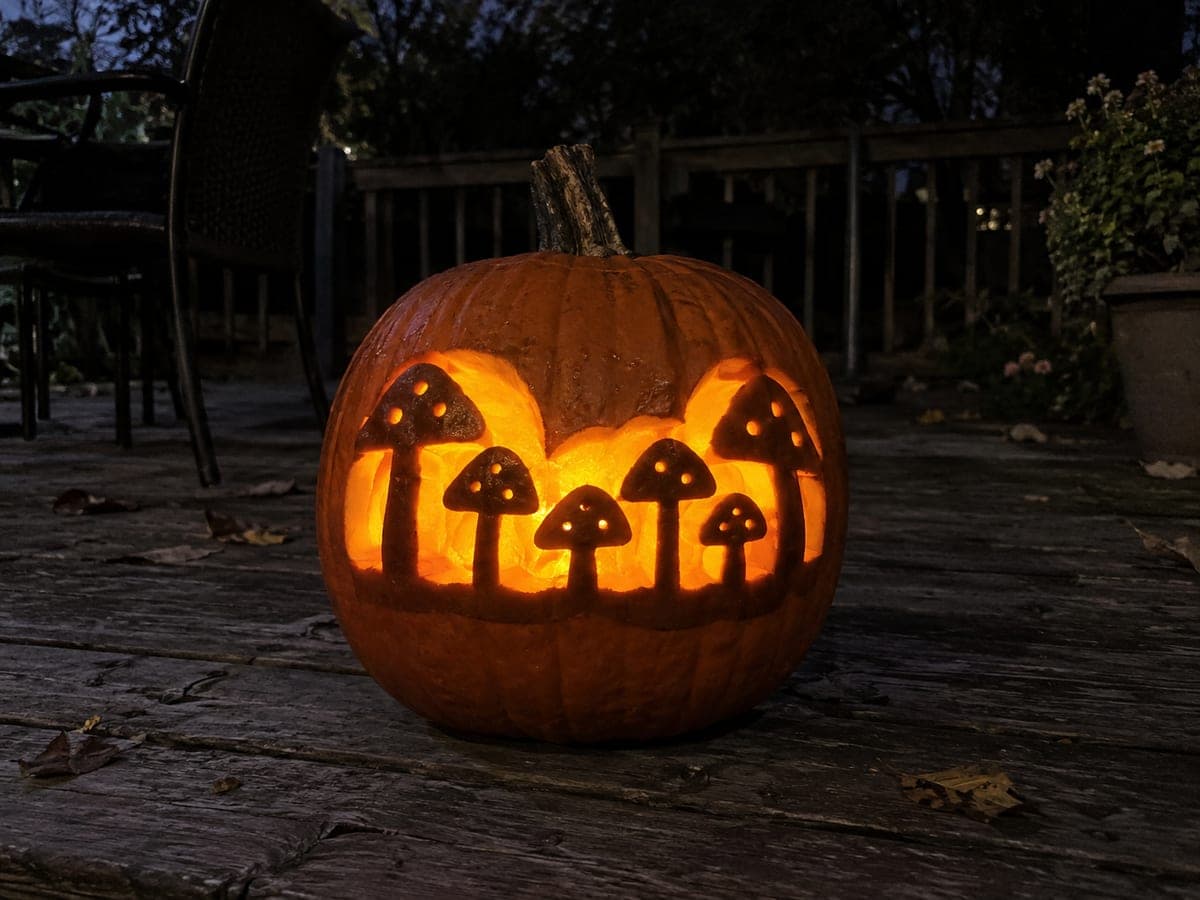
Mushroom Grove Jack-O-Lantern With Glowing Spotted Caps

A cluster of mushrooms with solid stems, glowing background gaps, and drilled polka-dot spots on each cap makes this mushroom-grove jack-o-lantern one of the most inventive unique pumpkin carving ideas at the expert level. Preserve the full ground strip along the bottom border first, then ensure every mushroom stem is fused to both the ground strip and the cap above it before removing the background sections between them. Drill the spot holes through the caps with a small spade bit after all structural cuts are complete. Backlit with a warm bulb, the spotted caps resemble glowing fairy-tale toadstools.

No ratings yet · Sign in to rate

Comments (0)

  • No comments yet — be the first.

Save without an account. Sign in to like or comment.

Our tips for carving a similar design

The design is held together by a continuous ground strip along the bottom border, which every stem must connect to, and by cap-to-border connections at the top of the composition. Removing the background between mushrooms before drilling the cap spots is the correct sequence because the drill can cause vibration that dislodges loose rind. The result is a glowing grove where the spotted caps look like miniature fairy-tale toadstools.

From pumpkin to porch

  1. Hollow thoroughly

    Cut the lid, scoop completely, and scrape the front wall to a consistent inch. This design involves both saw cuts and drill work on the same face, so the wall needs to be even and free of thin patches before any cutting starts.

  2. Transfer the full template

    Tape the mushroom grove template to the face and trace every outline: the ground strip boundary, each stem, cap outline, cap-to-border connections, and all spot positions. Label the background cells between mushrooms with an x and label each spot position with a dot.

  3. Confirm all structural connections

    Before cutting, trace each mushroom from its cap through its stem down to the ground strip. Every stem must connect to the ground strip at the bottom and to its cap at the top. Confirm that cap edges touch the outer border or are bridged to it. Mark any disconnected element and revise the plan before cutting.

  4. Remove the background between mushrooms

    Cut the background cells between and around the mushrooms, working from the largest gaps outward. Stay at least a quarter inch from any stem or cap edge. The goal is to reveal the mushroom shapes as solid rind silhouettes without detaching any connection.

  5. Drill the cap spots

    With a small spade bit and a power drill, drill each marked spot hole through the caps. Press straight through the wall in one controlled motion per hole. Work from the cap that is farthest from the structural connections first in case any drill vibration loosens a weak area.

  6. Light and display

    Insert a warm LED bulb for a fairy-tale amber glow and display on a level surface. The backlit spotted caps cast circular light patterns across any nearby surface. Photograph close up to capture the detail of the glowing polka dots.

Written with AI to match this design

Gather your supplies

Check things off as you get ready.

Work on a stable surface, keep your free hand out of the cutting path, and have an adult handle sharp tools.

Three levels of light

  • Leave intact

    The entire ground strip, every mushroom stem, and all cap-to-border connections stay as solid dark rind

  • Peel & shade

    None, this is a pure cutout and drill design

  • Cut through

    All background cells between mushrooms and all small drilled spot holes in the caps

Learn the carving basics

Before you start cutting

What if a stem is very narrow and I accidentally cut through it?

A fully severed stem cannot be reattached structurally. The best recovery is to remove that mushroom entirely by cutting its cap free and treating it as part of the background. The remaining mushrooms still form a grove and the design reads cohesively with fewer elements.

How many spot holes per cap looks right?

Three to five spots per cap is a recognizable toadstool pattern. More than seven holes per cap can weaken the cap rind enough to cause cracking between adjacent holes. Distribute the spots unevenly for a natural rather than a grid-like look.

Can I use a manual awl instead of a power drill for the spots?

A metal awl pushed by hand through the rind creates a small round hole without a drill. The holes will be smaller and less uniform than drilled holes but still let light through visibly. An awl is also less likely to cause vibration damage to nearby thin rind strips.

Your take belongs here, too.

Changed a detail? Made it simpler? Share a photo of your version and tell the community what worked.

Share your pumpkin

More pumpkins like this

You've reached the end · 8 pumpkins
The Patch Report

Fresh pumpkins, in your inbox.

The best new carvings, ideas worth stealing, and how-tos for carving season. Short, seasonal, and gone by November.

A short email during carving season. Unsubscribe anytime. See our privacy policy.