Halloween Pumpkin Carving Contest · Starts October 1st · $500 in prizes
← Back to ideas
@ai_concepts
Sep 25, 2026
Twin Retained Mushrooms Pumpkin Within an Arch OpeningAI
0

Report this carving

Tell us what is wrong. Reports are private.

Twin Retained Mushrooms Pumpkin Within an Arch Opening

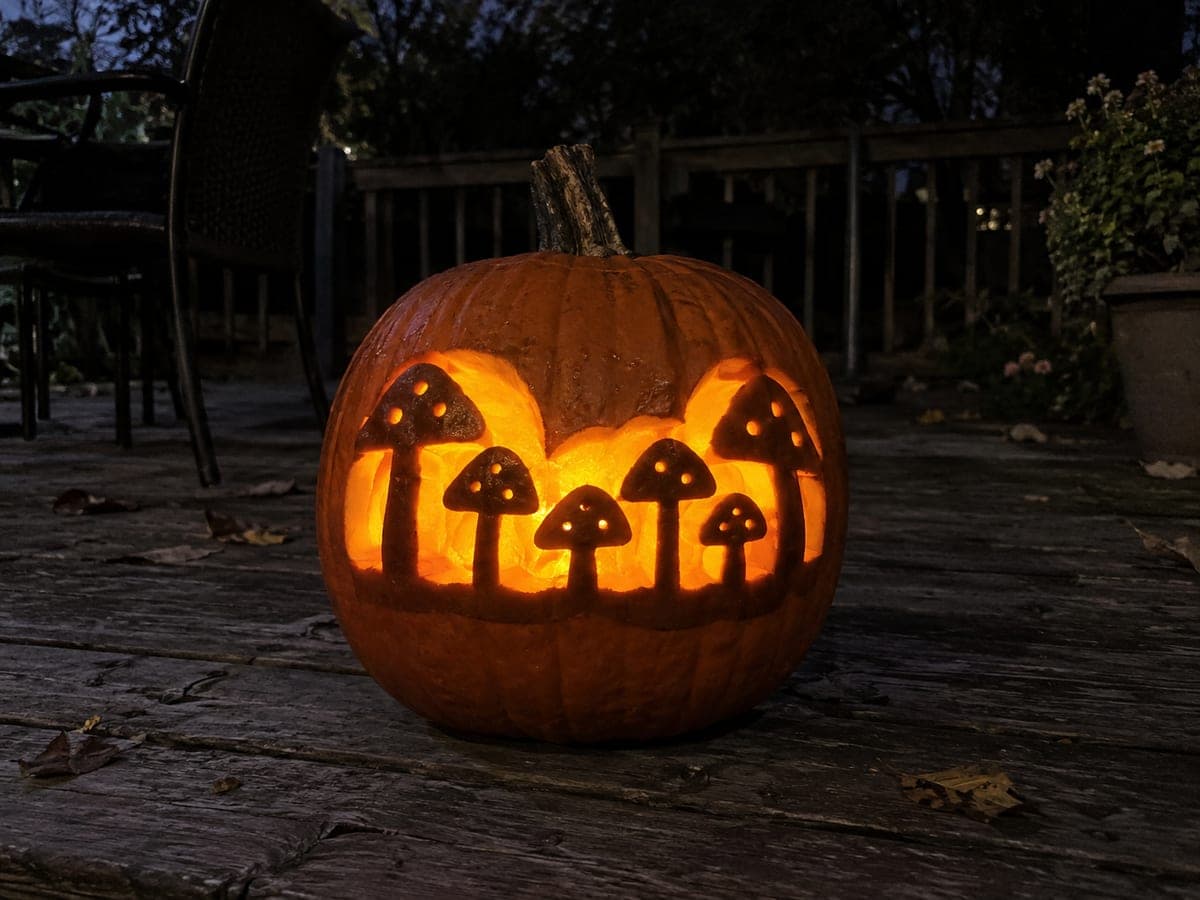
Two solid mushrooms are retained within a broad arch on this hard mushroom pumpkin carving idea, with each stem rooted into the base frame and each cap edge connected to the outer arch through wide rind bridges. Three small circular through-holes in each solid cap add detail without weakening the structure, and wide open sky spaces between the mushrooms let plenty of light through. Cut the large sky spaces first to confirm the arch holds, then add the small cap holes last. A close-up view on gravel near a garden wall shows off every carved detail.

No ratings yet · Sign in to rate

Comments (0)

  • No comments yet — be the first.

Save without an account. Sign in to like or comment.

Our tips for carving a similar design

The core technique here is retention: both mushrooms stay as solid rind within the arch opening rather than being cut away, which means the open sky spaces between and around them carry all the light. Wide rind bridges connecting each stem base to the bottom frame and each cap edge to the outer arch prevent collapse. Three small circular through-holes in each solid cap add visual interest without weakening the structure.

From pumpkin to porch

  1. Prep and mark the arch boundary

    Hollow the pumpkin from the back and scrape walls to an even inch thick. Transfer the complete arch outline plus both mushroom positions with a stylus, then mark arch interior in one marker color and the mushroom shapes to be retained in another color. This two-color system prevents accidental cuts on the retained pieces.

  2. Cut the large sky spaces first

    The wide open areas of sky between the two mushrooms and above their caps are your first cuts. Use a detail saw to follow the outer arch and inner mushroom outlines that bound each sky space. Cutting these large sections removes the most material early and confirms the arch frame is holding solidly before you add the fine detail.

  3. Check bridge integrity

    After removing the sky sections, press gently on each mushroom body to confirm both stems are firmly rooted to the base frame and both cap edges connect securely to the arch sides. Any flex here means a bridge is thinner than planned and needs careful attention on subsequent steps.

  4. Cut remaining background sections

    Remove any remaining background apertures around the outer arch edges or below the stem bases, always cutting from the larger sections toward the smaller. Keep the saw away from the bridge contact points. The arch frame should feel rigid throughout.

  5. Add the small cap holes

    Use a small circular cutter or a detail saw to punch three evenly spaced holes into each solid mushroom cap. Position them within the widest part of the cap, well clear of the cap-to-arch bridge contacts. These holes glow brightly inside the otherwise solid cap, giving the design a classic spotted-mushroom look.

  6. Light and display

    Center an LED candle inside so light floods through both the sky openings and the small cap holes equally. The retained mushrooms read as solid dark silhouettes surrounded by glow. A garden wall backdrop at night shows off the arch geometry cleanly.

Written with AI to match this design

Gather your supplies

Check things off as you get ready.

Work on a stable surface, keep your free hand out of the cutting path, and have an adult handle sharp tools.

Three levels of light

  • Leave intact

    Both solid mushroom bodies including caps and stems stay dark as retained rind

  • Peel & shade

    None on this design

  • Cut through

    Wide sky spaces within the arch and three small cap holes per mushroom cut fully through for full glow

Learn the carving basics

Before you start cutting

How wide should the rind bridge between each cap edge and the arch be?

Aim for at least three quarters of an inch of rind at each cap-to-arch contact point. Narrower bridges are prone to cracking as the pumpkin dries and loses moisture. If the template places caps very close to the arch, widen the bridge by trimming the sky space slightly smaller rather than thinning the cap edge.

Can I add gill lines to the underside of the caps instead of spots?

Gill lines are possible but require shallow relief carving rather than through-cuts, since the cap is a retained solid piece. Score thin parallel grooves into the cap surface from the outer edge toward the stem junction using a V-tool or detail knife. The grooves will catch light differently from the spots and give the caps a more naturalistic look.

The sky section between the two mushrooms is quite narrow. Should I cut it as one piece or in sections?

Cut it in sections working from the widest point inward. Start at the widest part of the gap, remove that waste, then gradually widen toward the narrower end. Attempting one long continuous cut through a narrow gap risks the saw blade jumping sideways and nicking a mushroom stem.

Your take belongs here, too.

Changed a detail? Made it simpler? Share a photo of your version and tell the community what worked.

Share your pumpkin

More pumpkins like this

You've reached the end · 8 pumpkins
The Patch Report

Fresh pumpkins, in your inbox.

The best new carvings, ideas worth stealing, and how-tos for carving season. Short, seasonal, and gone by November.

A short email during carving season. Unsubscribe anytime. See our privacy policy.