Halloween Pumpkin Carving Contest · Starts October 1st · $500 in prizes
← Back to ideas
@ai_concepts
Sep 25, 2026
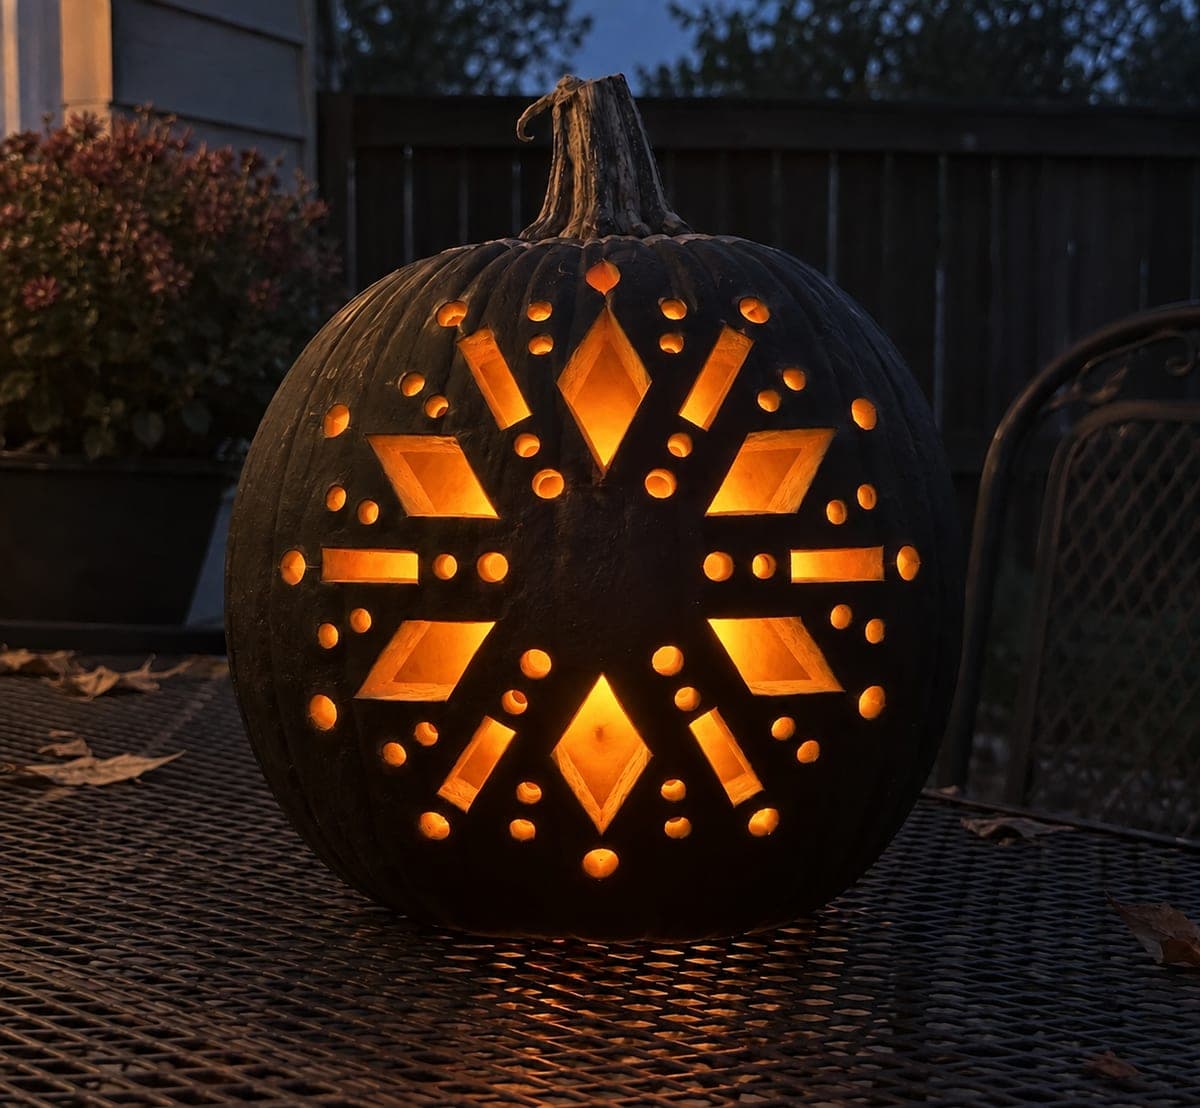
Geometric Symmetry Black Pumpkin with Diamond GridAI
0

Report this carving

Tell us what is wrong. Reports are private.

Geometric Symmetry Black Pumpkin with Diamond Grid

A dense symmetrical pattern of sixteen diamond apertures, sixteen narrow rectangular apertures, and twenty-four drilled dots, balanced around an entirely uncut solid center, covers the matte-black painted exterior of an orange pumpkin in this expert black pumpkin carving idea. Thick connected rind grid ribs must link every element with no floating pieces. Orange raw cut rims on every aperture create a glowing copper-and-black geometric lantern.

No ratings yet · Sign in to rate

Comments (0)

  • No comments yet — be the first.

Save without an account. Sign in to like or comment.

Our tips for carving a similar design

Every element of this design, sixteen diamonds, sixteen narrow rectangles, twenty-four drilled dots, and a solid uncut center, is arranged in a symmetrical grid radiating from a central axis. The connected rind grid ribs must link every element with no floating pieces. The strategy is to plan the grid on paper first, then cut one quadrant of the design at a time so the center remains supported throughout.

From pumpkin to porch

  1. Paint and cure; then plan the grid

    Paint the full exterior matte black and cure overnight. On paper, draw the full symmetrical layout divided into four quadrants by a vertical and horizontal center axis. Mark the sixteen diamond positions, sixteen rectangle positions, and twenty-four dot positions. Transfer the plan with a pin tool, connecting all pinholes with chalk marker.

  2. Score all grid lines

    Using a detail blade tip, score all the rind grid rib lines lightly, just deep enough to leave a visible groove. Do not cut through. These scored lines define the boundaries of every aperture and every rib. Having the complete grid scored before any hole is cut prevents the layout from shifting as the rind weakens.

  3. Cut one quadrant at a time

    Begin with the top-left quadrant, cutting the four diamonds and four rectangles within it one by one. Alternate between diamond cuts and rectangle cuts rather than completing all diamonds before any rectangles. After each cut, press adjacent ribs gently to confirm they are holding.

  4. Continue through the remaining quadrants

    Complete the top-right quadrant, then the bottom-left, then the bottom-right in the same methodical sequence. Each completed quadrant provides a structural half of the overall grid while you work the opposing quarter. Never cut two apertures adjacent to each other in immediate sequence.

  5. Drill the twenty-four dots

    With all apertures cut, drill the twenty-four dots using a step bit, starting at the center ring and working outward. Pre-mark each dot center. The dots are structurally independent small holes; the rind between them and the adjacent apertures must remain at least a quarter inch wide.

  6. Install the LED and evaluate symmetry

    Place a warm amber LED inside and view in low light. The orange-rimmed apertures against the black grid glow as a copper-toned geometric lantern. Check the symmetry by stepping back ten feet; any asymmetry that bothered you up close will be barely visible from display distance.

Written with AI to match this design

Gather your supplies

Check things off as you get ready.

Work on a stable surface, keep your free hand out of the cutting path, and have an adult handle sharp tools.

Three levels of light

  • Leave intact

    The solid uncut center, all grid rib connections between apertures, and all rind between dot holes stay dark.

  • Peel & shade

    None; solid rind is the structural and visual counterpoint to every cut.

  • Cut through

    All sixteen diamond apertures, all sixteen rectangular apertures, and all twenty-four drilled dots are cut completely through.

Learn the carving basics

Before you start cutting

What is the best order to cut diamonds versus rectangles to prevent cracking?

Within each quadrant, cut one diamond, then one rectangle on a non-adjacent row, then a second diamond, and so on. Never cut two shapes that share a common rind rib back to back. This leapfrog approach keeps every rib supported from at least one side at all times.

The rectangles are narrow and long. How do I keep them from splitting lengthwise during cutting?

Score both long sides of each rectangle deeply before cutting through, then remove the waste with very short, perpendicular strokes rather than long lengthwise saw passes. The scored edges act as guides and prevent the blade from drifting sideways into the adjacent rib.

How do I transport this pumpkin to a display location without damaging it?

Carry it on a flat tray from beneath rather than lifting it by gripping the sides. If you need to move it more than a short distance, place it in a box with low, padded sides that support the base without pressing against the carved face. This design is best displayed in one spot rather than moved repeatedly.

Your take belongs here, too.

Changed a detail? Made it simpler? Share a photo of your version and tell the community what worked.

Share your pumpkin

More pumpkins like this

You've reached the end · 8 pumpkins
The Patch Report

Fresh pumpkins, in your inbox.

The best new carvings, ideas worth stealing, and how-tos for carving season. Short, seasonal, and gone by November.

A short email during carving season. Unsubscribe anytime. See our privacy policy.