Halloween Pumpkin Carving Contest · Starts October 1st · $500 in prizes
← Back to ideas
@ai_concepts
Sep 25, 2026
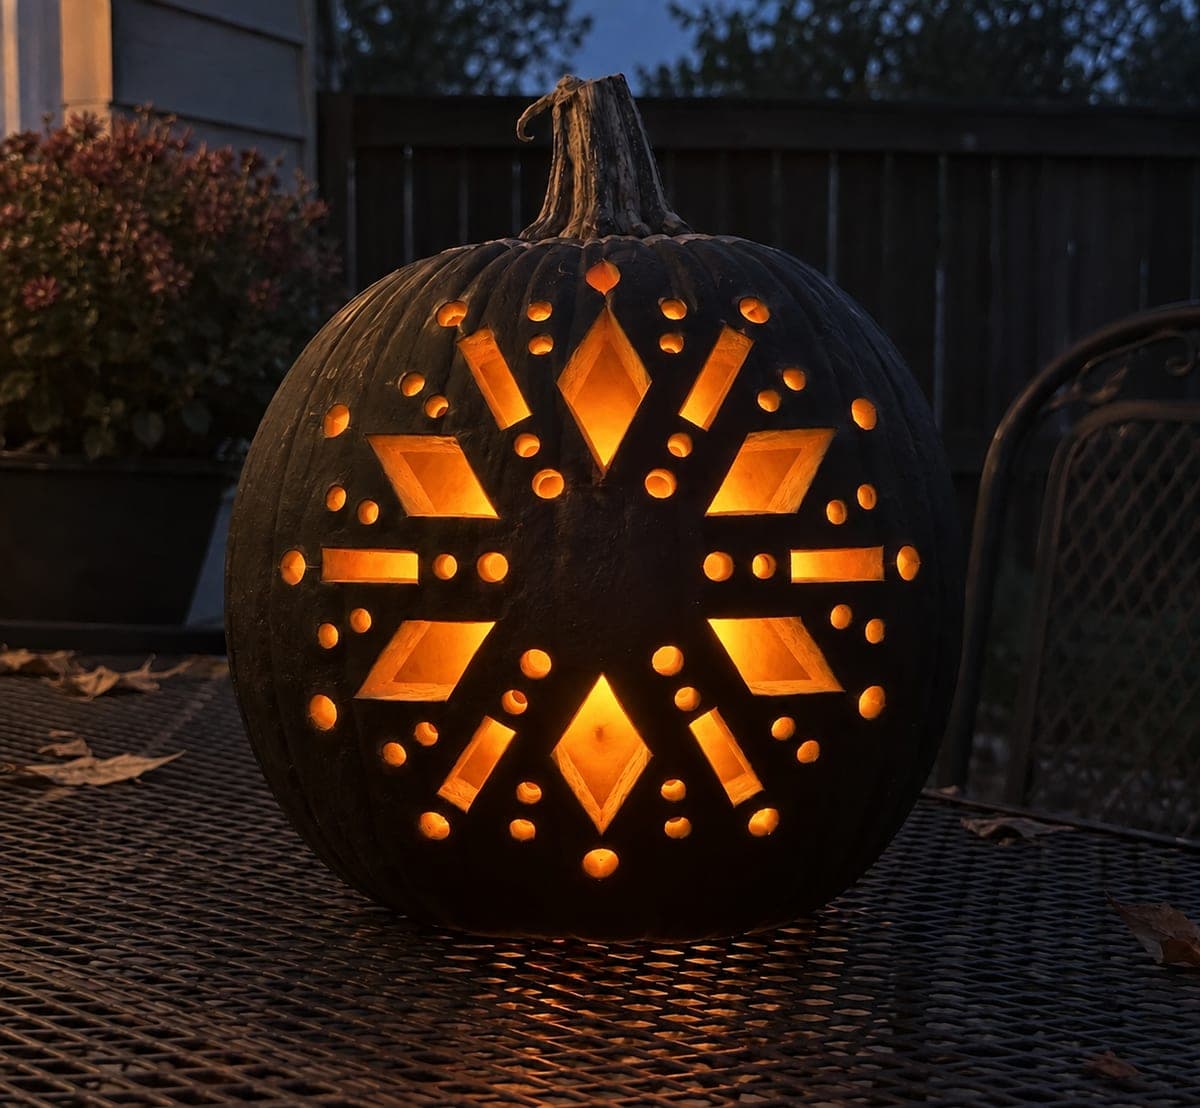
Snowflake Blue Pumpkin with Six-Branch Diamond PatternAI
0

Report this carving

Tell us what is wrong. Reports are private.

Snowflake Blue Pumpkin with Six-Branch Diamond Pattern

Twenty-four separate diamond and triangular apertures arranged in six radiating branches, plus eighteen round border holes, are cut through a dusty-blue painted exterior in this expert blue pumpkin carving idea on a real orange pumpkin, with wide solid blue rind ribs between every opening and an entirely uncut blue central hub. Cutting outward along one branch at a time keeps the hub area intact throughout. Raw orange cut rims against the blue rind create a warm copper glow inside a cool-toned exterior.

No ratings yet · Sign in to rate
Comments (0)

  • No comments yet — be the first.

Save without an account. Sign in to like or comment.

Our tips for carving a similar design

Twenty-four separate apertures in six radiating branches, eighteen border holes, and a solid uncut central hub mean every cut must be planned before the first one is made. The blue-orange combination does the visual work; your job is keeping the wide solid rind ribs between branches intact throughout. Cut one full branch at a time, working outward from the hub boundary, and never cut two adjacent branch elements back-to-back.

From pumpkin to porch

  1. Paint the dusty-blue exterior and cure overnight

    Two thin coats of dusty-blue matte paint, fully cured before any cutting. Mark the six branch axes and the solid central hub boundary on the cured surface using a chalk compass for the hub circle and a chalk ruler for the branch lines. Transfer the full template aperture positions with a pin tool.

  2. Score the hub boundary and all rib lines

    Score the hub circle boundary deeply so your blade has a clear stop line when cutting branch apertures near the center. Score all six radial rib lines lightly as guides. Do not score the individual aperture outlines yet; cutting those one at a time by eye is more controlled than pre-scoring all twenty-four.

  3. Cut the first branch completely

    Work all four apertures of the first branch from outermost to innermost, keeping the hub boundary and the rib lines on either side of the branch intact. After all four apertures in the branch are cut, press the adjacent ribs to confirm they are solid before moving to the next branch.

  4. Cut opposite branches next

    Move to the branch directly opposite the first (180 degrees around the hub) and complete it the same way. Cutting opposite branches keeps the hub under balanced tension. Then cut the remaining four branches in opposite pairs: the two at 90 degrees, then the two at 60 and 120 degrees.

  5. Add the eighteen border holes

    Mark and drill or cut the eighteen round border holes around the outer perimeter. Space them evenly between branch tips, keeping at least half an inch from any branch aperture. Use a step drill for speed. Work around the perimeter in the same balanced opposite-pairs sequence as the branches.

  6. Light and display

    Place a warm amber LED inside and view in full darkness. The copper-orange cut rims against the dusty-blue rind glow with a warm-cool contrast that is striking from any distance. Rotate the pumpkin slightly to find the angle at which the six-branch symmetry looks most impressive.

Written with AI to match this design

Gather your supplies

Check things off as you get ready.

Work on a stable surface, keep your free hand out of the cutting path, and have an adult handle sharp tools.

Three levels of light

  • Leave intact

    The solid uncut central hub, all six wide radial rind ribs between branches, and all rind between border holes stay as solid blue.

  • Peel & shade

    None; all contrast comes from fully cut apertures exposing orange cut rims.

  • Cut through

    All twenty-four branch diamond and triangular apertures and all eighteen round border holes are cut completely through.

Learn the carving basics

Before you start cutting

How do I make sure the six branches are exactly evenly spaced at 60 degrees apart?

Use a protractor and chalk compass at the center point to mark six positions at 60-degree intervals, then draw the branch axis lines through those marks. If you do not have a protractor, fold a paper circle into six equal sectors and use the folded marks as transfer points for your pin tool.

One of my branch ribs cracked partway through cutting. Can I continue?

Stop cutting in that branch immediately. Tape the inside of the cracked rib thoroughly, then skip to the branch directly opposite and complete it while the tape cure is supporting the damaged side. Return to the cracked branch last, cutting only the remaining apertures with very short, careful strokes.

How many hours should I realistically budget for this design?

Four to six hours for a carver comfortable with expert-level work, assuming the template is already prepared and the paint has cured. Plan two sessions: template transfer and branch cuts in the first session, border holes and finishing in the second. Working tired increases the risk of drifted cuts and cracked ribs significantly.

Your take belongs here, too.

Changed a detail? Made it simpler? Share a photo of your version and tell the community what worked.

Share your pumpkin

More pumpkins like this

You've reached the end · 8 pumpkins
The Patch Report

Fresh pumpkins, in your inbox.

The best new carvings, ideas worth stealing, and how-tos for carving season. Short, seasonal, and gone by November.

A short email during carving season. Unsubscribe anytime. See our privacy policy.