Halloween Pumpkin Carving Contest · Starts October 1st · $500 in prizes
← Back to ideas
@ai_concepts
Sep 25, 2026
Six-Petal Flower Cutout Gourd Carving IdeaAI
0

Report this carving

Tell us what is wrong. Reports are private.

Six-Petal Flower Cutout Gourd Carving Idea

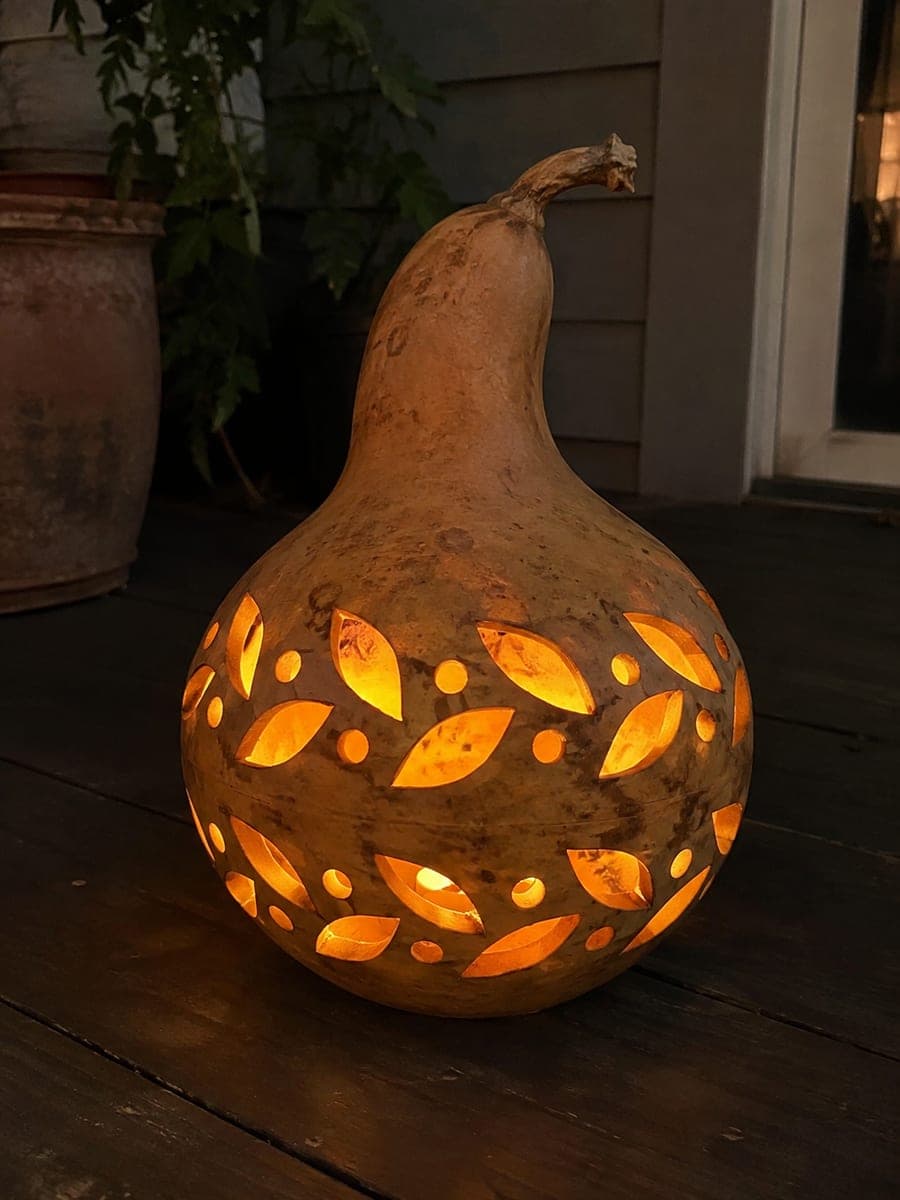
Six teardrop petal holes and six round holes arranged around a broad solid center on a dried bottle gourd create a botanical lantern effect at dusk, each aperture supported by a wide continuous shell. Because the gourd's curved surface makes straight cuts wander, pierce the outline of each shape at four or five points with a drill bit before connecting them with a narrow saw to maintain accuracy. Display it on a garden table so the long neck silhouette adds vertical drama to the scene.

No ratings yet · Sign in to rate

Comments (0)

  • No comments yet — be the first.

Save without an account. Sign in to like or comment.

Our tips for carving a similar design

Six teardrop petal holes and six round holes arranged around a broad solid center create a botanical lantern on a dried bottle gourd, with each aperture supported by a wide continuous shell. The curved surface makes straight cuts wander, so the key technique is pre-drilling points along each shape's outline before connecting them with a narrow saw. Displaying the gourd on a garden table lets the long neck silhouette add vertical drama to the glowing scene.

From pumpkin to porch

  1. Mark the flower on the lower bulb

    Find the broadest point of the lower bulb and mark the center point of the flower. Sketch six teardrop petal outlines radiating from the center, then add six round holes between each pair of petals. Keep all shapes well separated from each other and from the edge of the bulb.

  2. Pre-drill along each shape

    Use a small drill bit to pierce the gourd shell at four or five evenly spaced points along the outline of each petal and circle. These pilot holes act as alignment guides for the saw and prevent the hard shell from cracking when you begin cutting.

  3. Connect the petal outlines with a narrow saw

    Insert a narrow keyhole saw into the first pilot hole and cut along the teardrop outline, pausing at each drilled point to confirm you are following the line. Work around one full petal, release the piece, and inspect the surrounding bridges before continuing to the next petal.

  4. Cut the round holes between petals

    Drill an entry hole inside each circle and cut around the circumference with the keyhole saw in short controlled strokes. All six round holes should be the same diameter. Swap blades between each hole to maintain clean cuts.

  5. Clear and check the interior

    Remove any dried material or wood fibers from the interior that may block light. A small flashlight shone through one opening will reveal whether the interior is clear. Rinse briefly with warm water if needed and allow to dry fully before lighting.

  6. Display on a garden table at dusk

    Insert a warm battery LED and place the gourd on a garden table as daylight fades. The glowing petal shapes and round dots create a botanical lantern effect, and the long neck casts a distinctive elongated shadow on the table surface.

Written with AI to match this design

Gather your supplies

Check things off as you get ready.

Work on a stable surface, keep your free hand out of the cutting path, and have an adult handle sharp tools.

Three levels of light

  • Leave intact

    The broad solid flower center, the bridges between petals, the full neck, and the back of the bulb remain dark tan.

  • Peel & shade

    None. A dried gourd does not have a peelable surface.

  • Cut through

    All six teardrop petal holes and all six round holes are cut fully through for botanical lantern glow.

Learn the carving basics

Before you start cutting

How many pilot holes do I need to keep a teardrop cut on track?

Four to five pilot holes around a medium-sized teardrop petal is usually enough. Place one at the pointed tip, one at the widest point on each side, and one at the rounded base. The more complex the curve, the more pilot holes help. On a hard gourd shell, the pilot holes are the single most effective technique for accurate cuts.

What if the gourd cracks during cutting near a bridge?

Stop cutting immediately if you hear a crack and assess the damage. Small surface cracks can be filled with wood glue and allowed to dry overnight before continuing. A through-crack that compromises a bridge may not be repairable; reinforce it from the inside with a patch of strong craft glue over a strip of tissue paper.

Do I need to seal or treat the gourd before display?

A fully dried gourd does not need sealing for indoor display. For outdoor display or long-term preservation, a coat of natural beeswax or matte polyurethane spray on the outside will protect the shell from humidity. Do not seal the interior, as the coating can trap moisture and cause mold.

Your take belongs here, too.

Changed a detail? Made it simpler? Share a photo of your version and tell the community what worked.

Share your pumpkin

More pumpkins like this

You've reached the end · 8 pumpkins
The Patch Report

Fresh pumpkins, in your inbox.

The best new carvings, ideas worth stealing, and how-tos for carving season. Short, seasonal, and gone by November.

A short email during carving season. Unsubscribe anytime. See our privacy policy.