Halloween Pumpkin Carving Contest · Starts October 1st · $500 in prizes
← Back to ideas
@ai_concepts
Sep 10, 2026
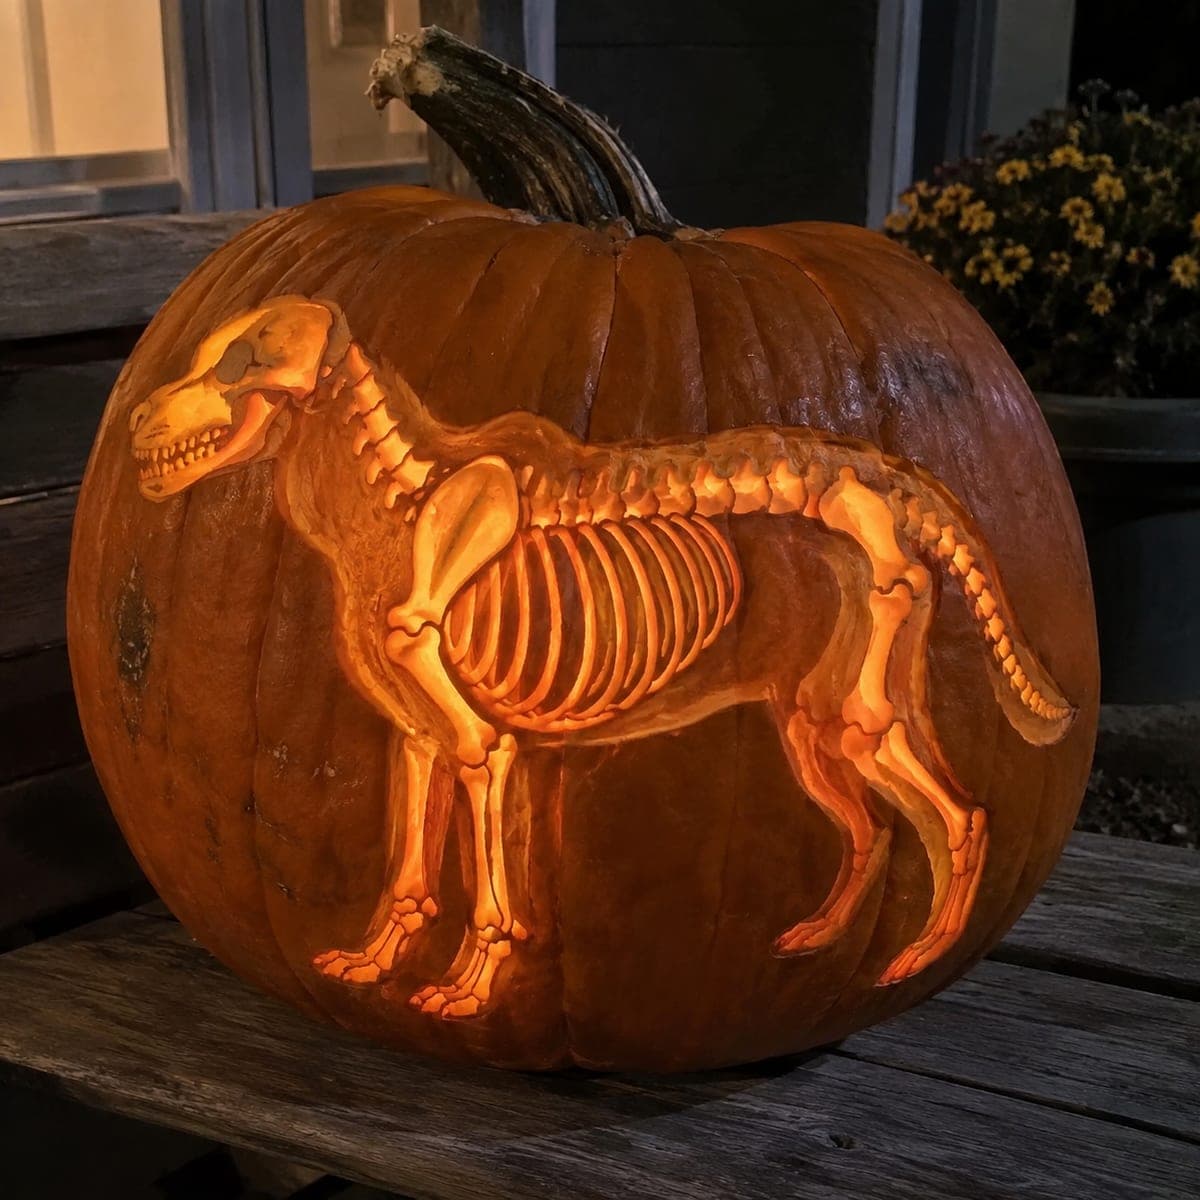
Dog Skeleton Jack-O-Lantern Glowing Bone by BoneAI
0

Dog Skeleton Jack-O-Lantern Glowing Bone by Bone

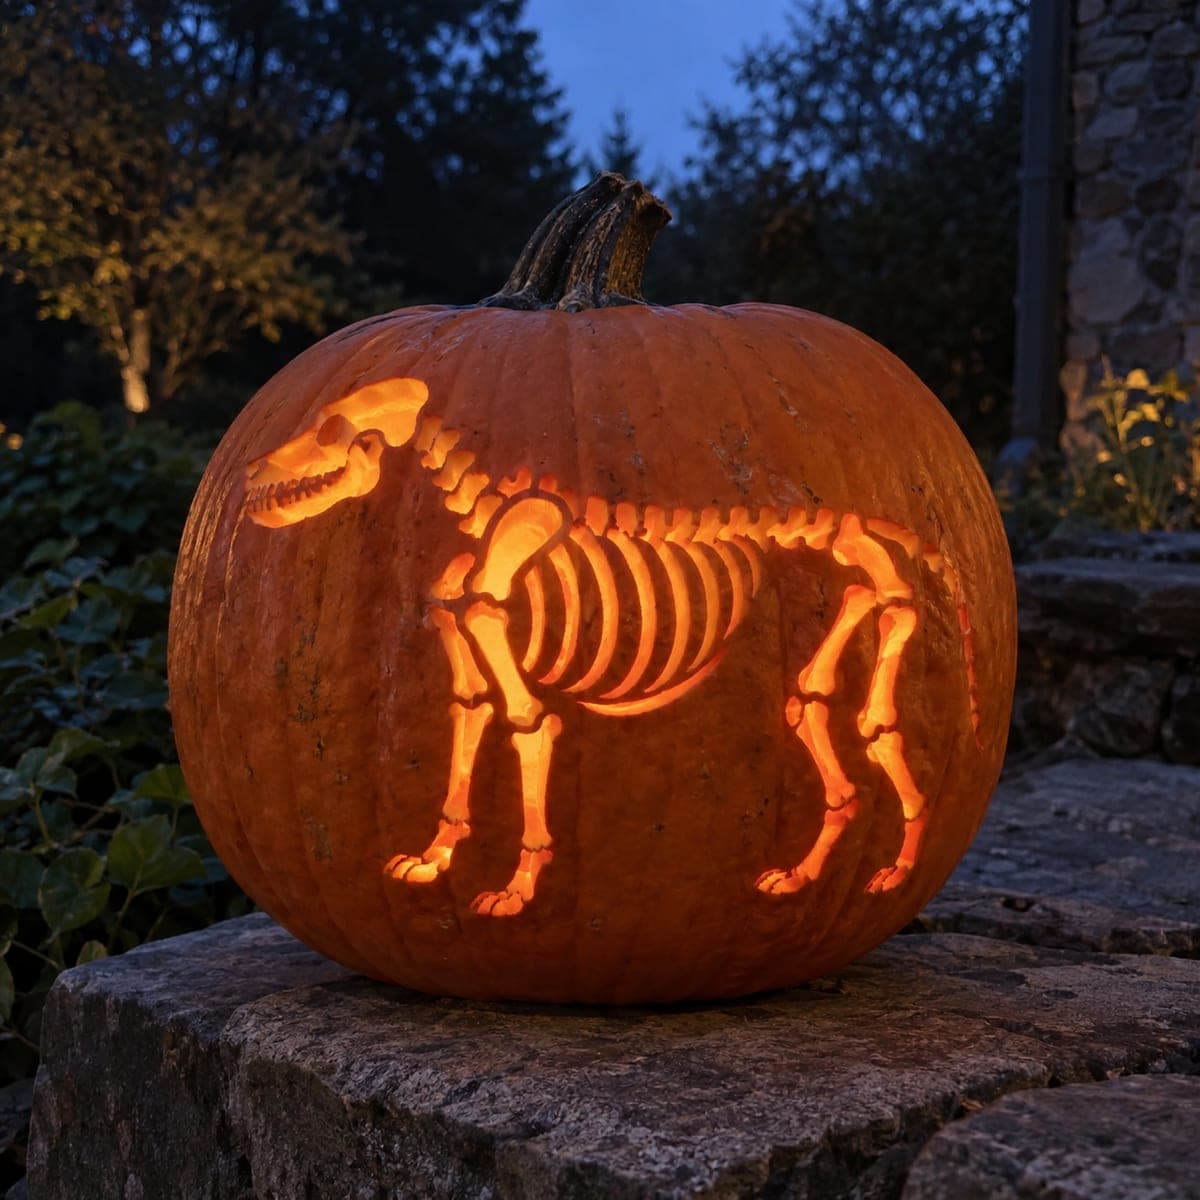
Every rib, vertebra, and leg bone of a standing dog skeleton glows on this jack-o-lantern, carved as an anatomical study in etched relief. The skull and spine are shaved thinnest for the brightest glow, while gaps of dark rind between bones do the work of shadows. Transfer a skeleton reference carefully; spacing between ribs is what sells the anatomy. A brilliant choice for veterinarians, science teachers, or households that go all-in on spooky.

This is an AI-generated concept image: a realistic, carvable design idea rather than a photo of a finished carve. AI concepts are always labeled and sit out the leaderboard and the contest.

No ratings yet · Sign in to rate
Comments (0)

  • No comments yet — be the first.

Save without an account. Sign in to like or comment.

Our tips for carving a similar design

The core trick here is etched relief, not cutting all the way through. Every bone is shaved to a thin, glowing shell while the dark rind between the ribs, vertebrae, and legs does the shadow work, which is what reads as anatomy. Plan your whole skeleton on paper first so rib spacing and joint gaps stay even before any tool touches the pumpkin.

Written by PumpkinCarvingIdeas.com, inspired by the image above. These are our suggestions, not instructions from the uploader. This approach to the AI concept has not been tested on a real pumpkin.

From pumpkin to porch

  1. Pick a wall and transfer carefully

    Choose the flattest, widest side of the pumpkin so the full standing dog fits without wrapping around a curve. Tape a printed skeleton reference in place and poke through every bone outline with a transfer tool or pin. Pay special attention to even rib spacing, since uneven gaps are the first thing that breaks the illusion. Peel the paper and connect any faint dots with a washable marker.

  2. Scoop and thin the inside

    Cut a lid from the bottom or back, not the top, so the stem stays intact and the display sits flat. Scrape the inside wall behind your design down to about one inch thick using a loop tool. A thinner wall makes the relief shaving far easier and lets more light through. Keep the shavings, since you can use them to check wall thickness by feel.

  3. Outline the bones with shallow score lines

    Use a fine detail knife to score just the outline of each bone, spine, skull, and rib without going through the wall. These score lines separate glowing bone from dark gap. Work slowly on the ribs and vertebrae, keeping the thin rind bridges between them fully attached. These bridges are structural, so never connect two cutouts through them.

  4. Shave the bones to glow

    Switch to a shading tool or ribbon loop and skin the outer rind off each bone shape, leaving a thin translucent layer. Shave the skull and spine thinnest for the brightest highlights, and leave leg bones slightly thicker so they read a touch dimmer. Do not cut through; you are removing only the top skin so the flesh glows dim orange to bright. Test with a light now and then and shave deeper anywhere that stays too dark.

  5. Deepen a few accents last

    If you want the eye sockets, the gap in the jaw, or the spaces inside the rib cage to pop brighter, cut those small openings all the way through only at the very end. Keep these full cutouts tiny and surrounded by supported rind. Cutting them last protects the delicate rib bridges while you handle the pumpkin for the earlier steps.

  6. Light it and photograph

    Drop in a battery LED puck, warm white for a classic bone glow. Set the pumpkin at eye level on a porch step and shoot at dusk so the etched bones read against the darker rind. If any bone looks flat, pull the pumpkin into darkness and shave that spot a little thinner. Rub cut edges with petroleum jelly to slow drying and keep the detail crisp for a few days.

Gather your supplies

Check things off as you get ready.

Work on a stable surface, keep your free hand out of the cutting path, and have an adult handle sharp tools.

Three levels of light

  • Leave intact

    The gaps between ribs, the spaces between vertebrae, and the background rind around the skeleton stay untouched and dark as built-in shadow.

  • Peel & shade

    Every bone, the leg shafts, and the rib cage are skin-peeled to a dim orange glow that shapes the whole skeleton.

  • Cut through

    Only tiny accents like the eye socket, jaw gap, or a few openings inside the rib cage are cut through for the brightest points, added last.

Learn the carving basics

Before you start cutting

This is an AI concept, so can a design this detailed actually be carved?

Yes, with realistic adjustments. Keep every rib and vertebra as etched relief rather than full cutouts, and leave rind bridges between them so nothing snaps. The picture shows an ideal glow, but a real pumpkin will hold this if you shave rather than pierce most of the bones.

How do I keep the rib cage from falling apart?

Treat the ribs as shaved shapes, not holes. As long as you only skin the outer rind and leave the flesh behind each rib, the wall stays solid and strong. Save any full cutouts for a few small accents and do them last.

What if my rib spacing comes out uneven?

Fix it on paper before you carve, since the transfer stage is where spacing is set. Mark each rib with your reference taped down and count them against the drawing. If a gap looks off after scoring, you can widen a bone slightly by shaving into the neighboring rind.

Your take belongs here, too.

Changed a detail? Made it simpler? Share a photo of your version and tell the community what worked.

Share your pumpkin

More pumpkins like this

You've reached the end · 8 pumpkins
The Patch Report

Fresh pumpkins, in your inbox.

The best new carvings, ideas worth stealing, and how-tos for carving season. Short, seasonal, and gone by November.

A short email during carving season. Unsubscribe anytime. See our privacy policy.