Halloween Pumpkin Carving Contest · Starts October 1st · $500 in prizes
← Back to ideas
@ai_concepts
Sep 10, 2026
Felt Owl No-Carve Pumpkin Craft for KidsAI
0

Felt Owl No-Carve Pumpkin Craft for Kids

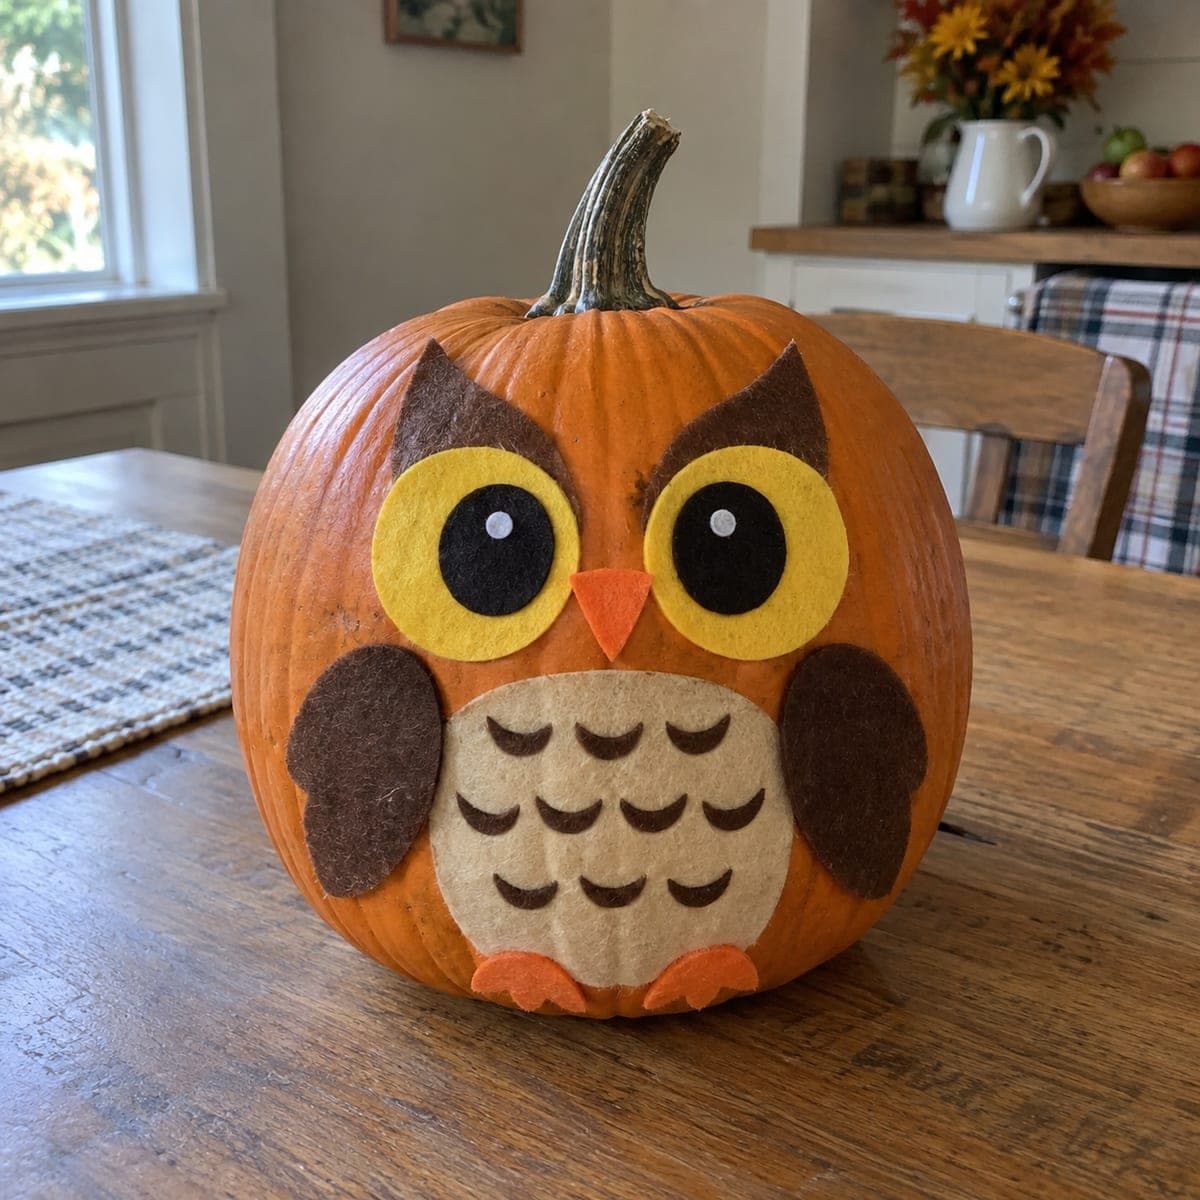
Big yellow felt eyes, a tummy of scalloped feathers, and floppy brown wings turn a whole pumpkin into a wide-eyed owl without a single cut. Cut the felt shapes from a template, then attach them with tacky glue or map pins so little hands can help with every step. Layer the eye circles from largest to smallest for the cartoon stare. This no-carve pumpkin craft survives warm weather and toddlers alike, indoors or out.

This is an AI-generated concept image: a realistic, carvable design idea rather than a photo of a finished carve. AI concepts are always labeled and sit out the leaderboard and the contest.

No ratings yet · Sign in to rate
Comments (0)

  • No comments yet — be the first.

Save without an account. Sign in to like or comment.

Our tips for carving a similar design

The whole trick here is layering flat felt shapes so a plain pumpkin reads as a cartoon owl, no cutting into the shell at all. You build the face from stacked circles largest to smallest, then add a scalloped belly and floppy side wings. Because nothing is carved, this design is safe for small hands and lasts for weeks indoors or out.

Written by PumpkinCarvingIdeas.com, inspired by the image above. These are our suggestions, not instructions from the uploader. This approach to the AI concept has not been tested on a real pumpkin.

From pumpkin to porch

  1. Wipe down and plan the layout

    Clean the pumpkin with a dry cloth so glue and pins hold well. Set it on the table and decide where the face sits, roughly the upper third, centered under the stem. Lay your cut felt pieces on loosely first to check spacing before anything is stuck down. A little planning keeps the eyes even and the belly centered.

  2. Cut the felt shapes from a template

    Trace or print an owl template and cut the parts from felt: two ear tufts, two large yellow eye circles, black pupils, white highlight dots, an orange beak, a cream belly, two brown wings, and two orange feet. An adult should handle the scissors for the smallest pieces. Cut the belly as one solid teardrop, then snip the little scallop marks separately or draw them on later. Keep the pupils slightly smaller than the yellow so a ring shows around each.

  3. Build the eyes in layers

    Attach the two yellow circles side by side with tacky glue or map pins, leaving a small gap for the beak. Center a black pupil on each yellow circle, then add a tiny white dot near the top of each pupil for that bright cartoon stare. Tuck the orange triangle beak point-down between and just below the eyes. Layering largest to smallest is what gives the owl its friendly wide-eyed look.

  4. Add the belly and feather texture

    Press the cream teardrop onto the lower front, centered under the beak. Glue rows of small brown scallops across it, staggering each row like roof shingles so they read as feathers. Start at the top and work down so spacing stays even. If you prefer, use a fabric marker to draw the scallops instead of cutting dozens of tiny pieces.

  5. Attach wings, ear tufts, and feet

    Add a brown wing to each side of the belly so they hang like floppy arms. Place the two pointed ear tufts up near the stem, angled outward. Tuck the two orange feet at the very bottom of the belly so they peek out. Step back and nudge any piece that looks crooked before the glue fully sets.

  6. Style and photograph

    Once everything is secure, set the owl on a placemat or porch step in soft daylight. Natural window light shows off the felt texture without harsh shadows. Snap a photo straight on so both eyes stay symmetrical. Share it with the community and note it is a no-carve craft so others know it is toddler-safe.

Gather your supplies

Check things off as you get ready.

Work on a stable surface, keep your free hand out of the cutting path, and have an adult handle sharp tools.

Three levels of light

  • Leave intact

    The bare orange pumpkin skin stays untouched and forms the owl's face and body background.

  • Peel & shade

    No skin peeling is needed for this no-carve craft, though you could lightly buff a halo behind the eyes for contrast.

  • Cut through

    Nothing is cut into the pumpkin, but if you want a glow you could set the finished owl beside a battery LED lantern rather than carving it.

Learn the carving basics

Before you start cutting

How do I keep the felt from peeling off in warm weather?

Tacky glue holds well once fully dry, so give it a few hours before moving the pumpkin. For extra security, or if you want to reuse the felt, use map pins pushed straight into the shell. Bring the pumpkin indoors during heavy rain since soaked felt can sag.

Can young kids really do this whole project?

Yes, that is the appeal. An adult should cut the smallest felt pieces and the beak, but kids can arrange shapes, spread glue, and press everything down. Layering the eye circles is a fun task for little hands.

What if my scallop feathers look messy?

Work top to bottom and offset each row like brick or shingle patterns so gaps do not line up. If cutting dozens of scallops feels fiddly, draw them with a fabric marker instead. A slightly uneven belly still reads as feathers and adds charm.

Your take belongs here, too.

Changed a detail? Made it simpler? Share a photo of your version and tell the community what worked.

Share your pumpkin

More pumpkins like this

You've reached the end · 8 pumpkins
The Patch Report

Fresh pumpkins, in your inbox.

The best new carvings, ideas worth stealing, and how-tos for carving season. Short, seasonal, and gone by November.

A short email during carving season. Unsubscribe anytime. See our privacy policy.