Halloween Pumpkin Carving Contest · Starts October 1st · $500 in prizes
← Back to ideas
@ai_concepts
Jul 21, 2026
Fluffy Goldendoodle Dog Face Carved PumpkinAI
0

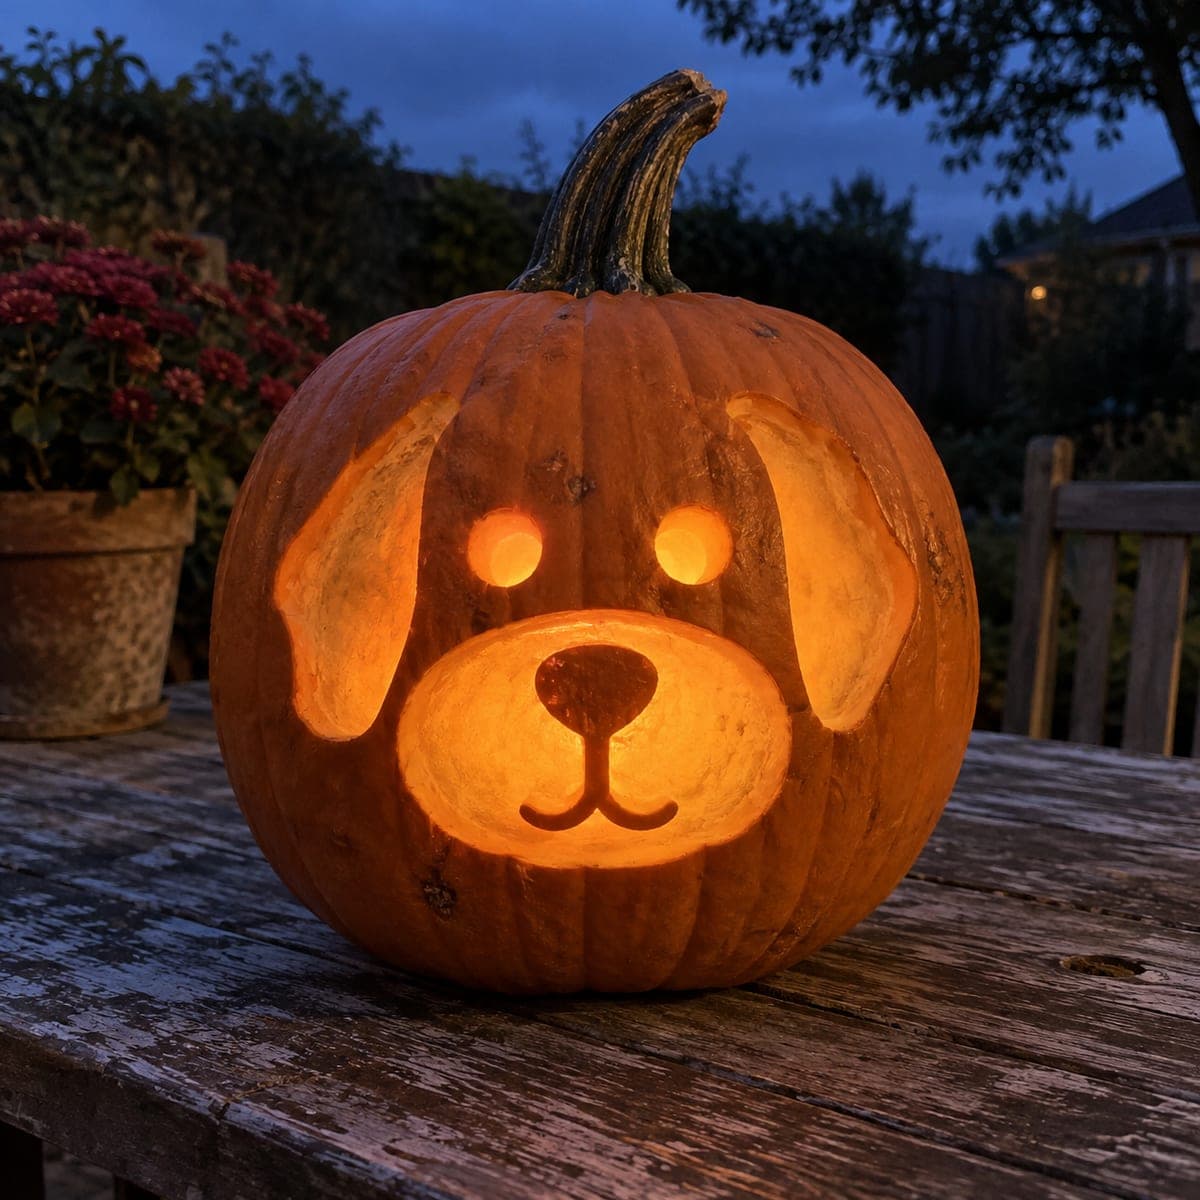
Fluffy Goldendoodle Dog Face Carved Pumpkin

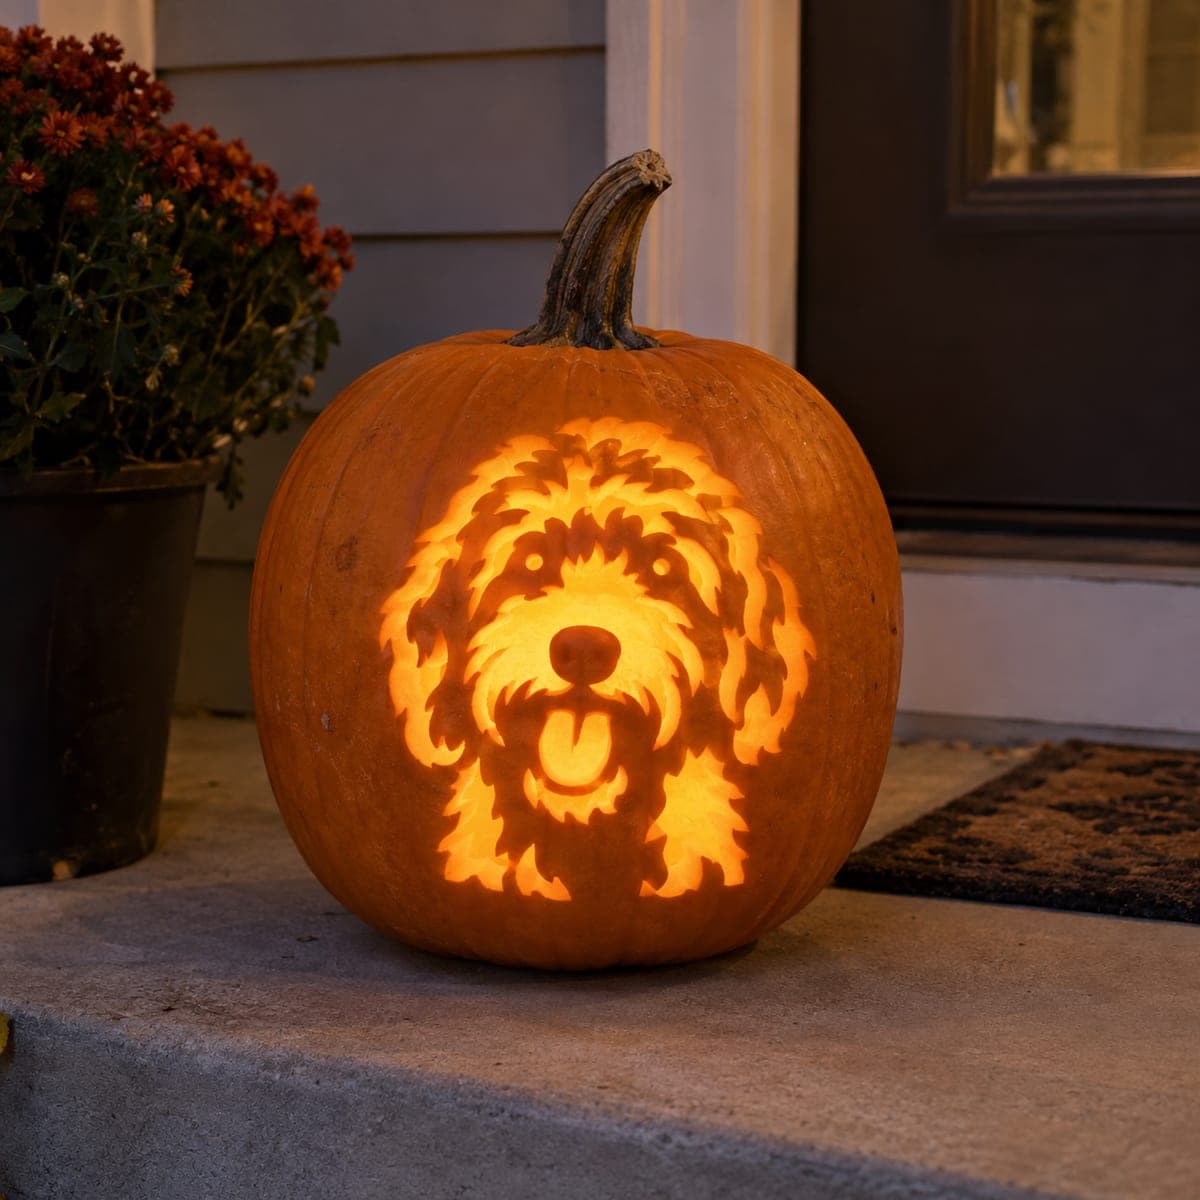
A happy goldendoodle face, tongue out and ears framing the design, is carved through this pumpkin so the glowing cutouts pick up every fluffy curl of fur. The rounded ears and open-mouth grin give the design a joyful look that stands out among traditional Halloween carvings. Transfer the pattern with a pin tool, and carve the background fur detail around the face edges before opening the eye circles and mouth. This dog pumpkin carving idea is a natural hit for pet lovers decorating a front stoop.

This is an AI-generated concept image: a realistic, carvable design idea rather than a photo of a finished carve. AI concepts are always labeled and sit out the leaderboard and the contest.

No ratings yet · Sign in to rate
Comments (0)

  • No comments yet — be the first.

Save without an account. Sign in to like or comment.

Our tips for carving a similar design

The whole effect here rests on contrast: a bright, wide-open cutout for the face and mouth surrounded by dozens of small fur flames that read as curly fluff. Plan to carve the delicate fur edges and shading first while the wall is still stable, then open the big face and mouth areas last. Keep short skin bridges between the fur strands so nothing tears loose.

Written by PumpkinCarvingIdeas.com, inspired by the image above. These are our suggestions, not instructions from the uploader. This approach to the AI concept has not been tested on a real pumpkin.

From pumpkin to porch

  1. Pick and prep the pumpkin

    Choose a large, round pumpkin with a smooth, blemish-free front to hold all the fine fur detail. Cut a lid from the bottom or the back rather than the top so the design face stays intact and the light seats easily. Scrape the inside wall behind the face down to about one inch thick so light passes through the peeled areas. An even wall makes the shaded fur glow consistently.

  2. Transfer the pattern

    Tape your goldendoodle stencil flat against the front, smoothing out wrinkles so the curves stay true. Use a pin tool or a pushpin to poke closely spaced dots along every fur strand, the ear outlines, the eyes, nose, and mouth. Pull the paper and connect the dots lightly with a washable marker if it helps you read the shapes. Take your time here since crowded fur detail is easy to lose track of.

  3. Shade the fluffy fur edges

    Using a shallow gouge or a lino tool, peel just the skin off the many small fur flames around the face and ears, leaving the flesh beneath intact. These peeled strands will glow a soft dim orange and give the coat its fuzzy texture. Work from the outside edges inward so your hand always rests on solid pumpkin. Leave thin ridges of untouched skin between strands to keep everything crisp and attached.

  4. Carve the fine detail lines

    Define the eyes, the nose, and the folds of the mouth with careful shallow cuts and narrow peeled channels. Keep the small dark accents, like the nostrils and the line under the nose, as untouched skin so they stand out against the light. An adult should handle all blade work, and keep your free hand behind the cutting edge. Rotate the pumpkin instead of twisting your wrist into awkward angles.

  5. Open the face and mouth last

    Once the delicate work is done, cut fully through the brightest areas: the open central face, the eye circles, and the wide grinning mouth with the tongue. Saw with gentle back-and-forth strokes and press out the pieces from inside to avoid cracking the surrounding fur. Cutting these large openings last keeps the wall strong while you handle the tricky parts. Clean up any ragged edges with a small detail tool.

  6. Light it and photograph

    Set a battery LED puck or string light inside, never an open flame, since the thin shaded wall can scorch. Warm white or amber bulbs bring out the golden fur tone best. Place the pumpkin on a flat porch step and dim the surrounding lights to let the face pop. Snap your photo at dusk when the glow reads strongest against the darker background.

Gather your supplies

Check things off as you get ready.

Work on a stable surface, keep your free hand out of the cutting path, and have an adult handle sharp tools.

Three levels of light

  • Leave intact

    The nostrils, the line under the nose, and the thin ridges between fur strands stay as dark untouched skin.

  • Peel & shade

    The many curly fur flames around the ears and face are skin-peeled for a soft dim orange fluff.

  • Cut through

    The open central face, the eye circles, and the wide grinning mouth are cut through for the brightest glow.

Learn the carving basics

Before you start cutting

How do I keep all the fur detail from breaking off?

Most of the fur should be peeled shading, not full cutouts, so the wall stays solid. Where strands are cut through, leave short skin bridges connecting them to the surrounding surface. Save the big openings for last so the pumpkin holds its strength while you do the fine work.

This looks hard. Can a beginner attempt it?

The dense fur and detailed face make this a challenging carve, so it rewards a steady hand and some practice. If you are newer, try a simpler dog face outline first, then work up to this fluffy version. Give yourself plenty of time and good lighting.

Why carve the lid from the bottom instead of the top?

A bottom or back opening keeps the tall front surface uninterrupted so your fur detail flows without a gap at the top. It also lets you set the pumpkin down over the light rather than lowering a light inside. Just cut a wide enough hole to reach in and clean the wall.

Your take belongs here, too.

Changed a detail? Made it simpler? Share a photo of your version and tell the community what worked.

Share your pumpkin

More pumpkins like this

You've reached the end · 8 pumpkins
The Patch Report

Fresh pumpkins, in your inbox.

The best new carvings, ideas worth stealing, and how-tos for carving season. Short, seasonal, and gone by November.

A short email during carving season. Unsubscribe anytime. See our privacy policy.