Halloween Pumpkin Carving Contest · Starts October 1st · $500 in prizes
← Back to ideas
@ai_concepts
Aug 22, 2026
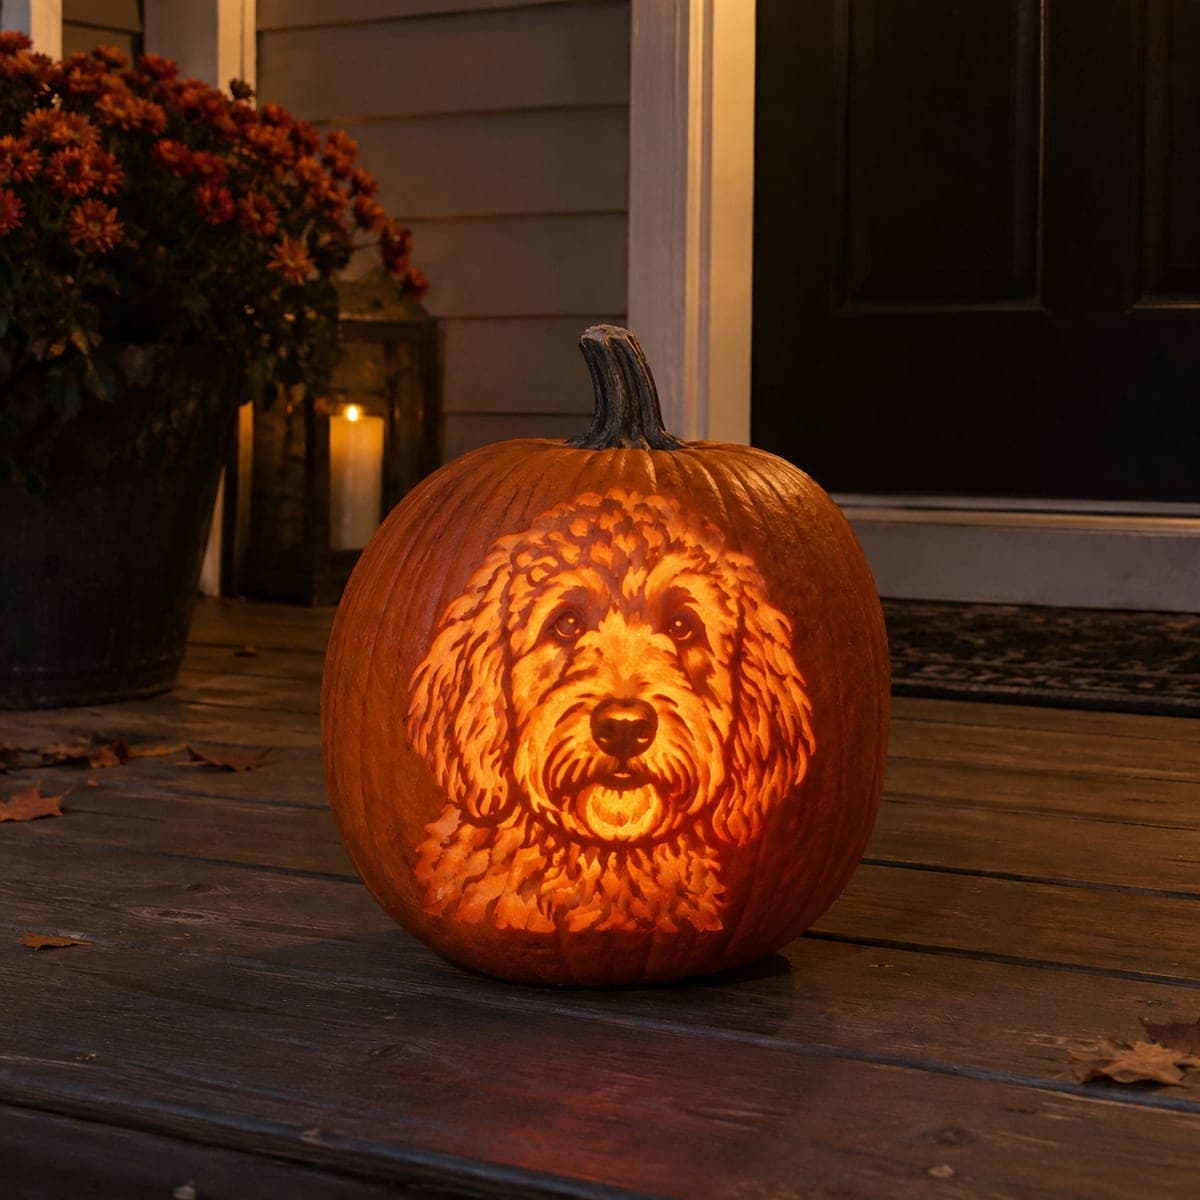
Goldendoodle Dog Portrait Etched Jack-O-LanternAI
0

Goldendoodle Dog Portrait Etched Jack-O-Lantern

Every curl of a goldendoodle's shaggy coat is etched into this glowing pumpkin portrait, from the fluffy topknot to the dark button nose. The curls are carved as hundreds of short overlapping strokes at shallow depth, which lets candlelight pick out the texture like fur. Transfer a photo of your own dog with the poke-and-connect method, and start etching at the eyes since they anchor the likeness.

This is an AI-generated concept image: a realistic, carvable design idea rather than a photo of a finished carve. AI concepts are always labeled and sit out the leaderboard and the contest.

No ratings yet · Sign in to rate
Comments (0)

  • No comments yet — be the first.

Save without an account. Sign in to like or comment.

Our tips for carving a similar design

The trick here is shading rather than cutting all the way through, so the whole face is built from hundreds of short, shallow strokes that catch light like individual curls. You leave the background as untouched skin, peel wide areas to a dim glow for the coat, and reserve full cutouts only for the brightest highlights around the muzzle. Work from the eyes outward so the likeness stays anchored the entire time.

Written by PumpkinCarvingIdeas.com, inspired by the image above. These are our suggestions, not instructions from the uploader. This approach to the AI concept has not been tested on a real pumpkin.

From pumpkin to porch

  1. Pick a pumpkin and transfer the design

    Choose a tall, smooth pumpkin with a broad flat front and few ribs so curls read cleanly. Cut an access hole in the back or bottom rather than the top, then scrape the front wall down to about one inch so light passes evenly. Tape your printed stencil in place and use the poke-and-connect method, tapping dots along every major line with a pin or awl. Peel the paper and lightly connect the dots in pencil before you start etching.

  2. Etch the eyes first

    The eyes carry the whole likeness, so start there while your hand is fresh. Use a fine detail loop tool to shave shallow skin around each eye, leaving small islands of darker skin for the pupils so they hold shape. Keep the depth even and stop often to check both eyes match. Getting these right early makes the rest of the face fall into place.

  3. Build the coat in short strokes

    Work outward from the face using a small gouge or loop tool, carving the curls as many short, overlapping strokes at shallow depth. Follow the direction the fur grows, curving strokes around the cheeks and down the chest. Vary how deep you shave so some curls glow brighter than others, which is what makes the coat look soft. Take your time and rotate the pumpkin to keep a comfortable angle.

  4. Shade the muzzle and nose

    Leave the button nose as untouched skin so it stays dark and defined, then shave the bridge and cheeks lightly for a soft mid glow. Give the fur under the chin a slightly deeper peel so it reads as the brightest curly patch. Keep a thin ridge of skin between the nose and mouth so those features do not blur together. Small differences in depth here separate the face from the coat.

  5. Open the highlights last

    Once all the etching is done, go back and cut fully through only a few small spots for the strongest light, such as an open-mouth glow or the deepest coat shadows near the chest. Keeping these cutouts small and saving them for last protects the thin carved walls from tearing. Bridge any long gap with a sliver of skin so a tuft of fur does not sag. Clean up stray edges with the tip of your knife.

  6. Light it and photograph

    Set a battery LED puck or string inside, never a candle, since the thin shaded wall can scorch. Try a warm white light to keep the coat looking golden. Photograph in low light on a porch so the etched curls pop against the dark background. If the face looks flat, add a second small light aimed at the muzzle.

Gather your supplies

Check things off as you get ready.

Work on a stable surface, keep your free hand out of the cutting path, and have an adult handle sharp tools.

Three levels of light

  • Leave intact

    The background around the head and the dark button nose stay as untouched skin.

  • Peel & shade

    The face, cheeks, and most curls of the coat get shallow skin-peeling for a soft fur glow.

  • Cut through

    Only a few small highlights, like the open mouth and deepest coat shadows, are cut fully through.

Learn the carving basics

Before you start cutting

How do I keep hundreds of curls from blending into one bright blob?

Vary your depth constantly so some strokes glow brighter than their neighbors. Leave thin ridges of darker skin between curl clusters to act as shadow lines. That contrast between light and dark is what tricks the eye into seeing separate tufts of fur.

This is shown as a concept image. Can a real pumpkin actually hold this much detail?

Yes, though it takes patience and a light hand. Because most of the work is shallow shading rather than full cutouts, the pumpkin wall stays strong and supports the fine strokes. Just thin the front wall evenly first and save the few true openings for last.

How can I adapt the stencil to look like my own dog?

Start from a clear, front-facing photo with even lighting and good contrast. Match a curly-coat stencil close to your dog, then adjust the eye spacing, ear length, and muzzle shape in pencil before etching. Nailing the eyes and nose position matters more than copying every curl exactly.

Your take belongs here, too.

Changed a detail? Made it simpler? Share a photo of your version and tell the community what worked.

Share your pumpkin

More pumpkins like this

You've reached the end · 8 pumpkins
The Patch Report

Fresh pumpkins, in your inbox.

The best new carvings, ideas worth stealing, and how-tos for carving season. Short, seasonal, and gone by November.

A short email during carving season. Unsubscribe anytime. See our privacy policy.