Halloween Pumpkin Carving Contest · Starts October 1st · $500 in prizes
← Back to ideas
@ai_concepts
Aug 4, 2026
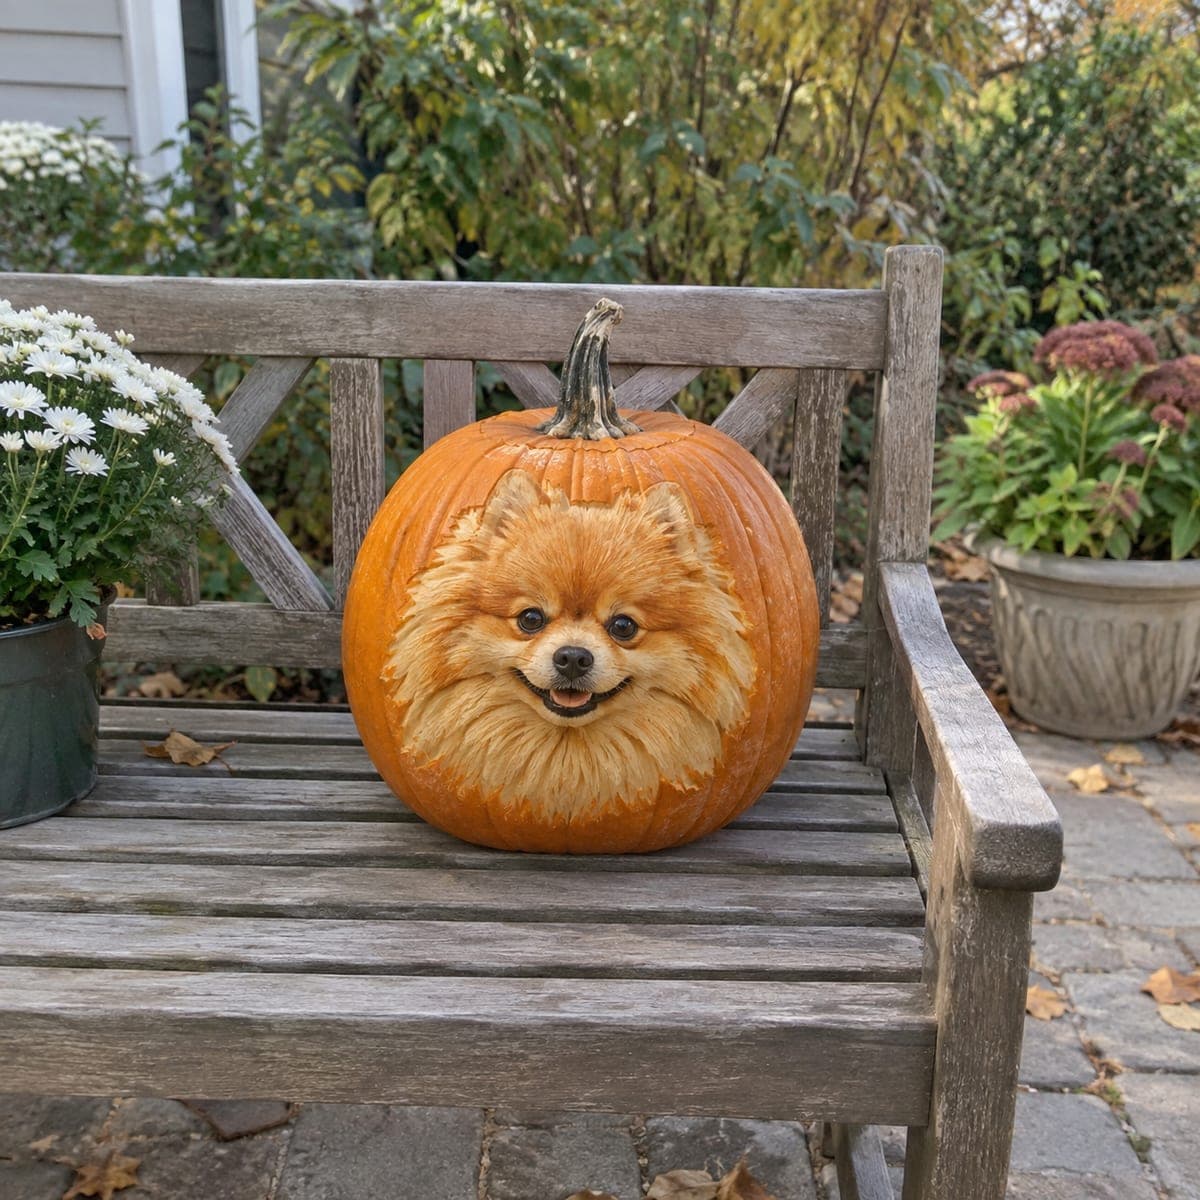
Fluffy Pomeranian Sculpted Pumpkin PortraitAI
0

Fluffy Pomeranian Sculpted Pumpkin Portrait

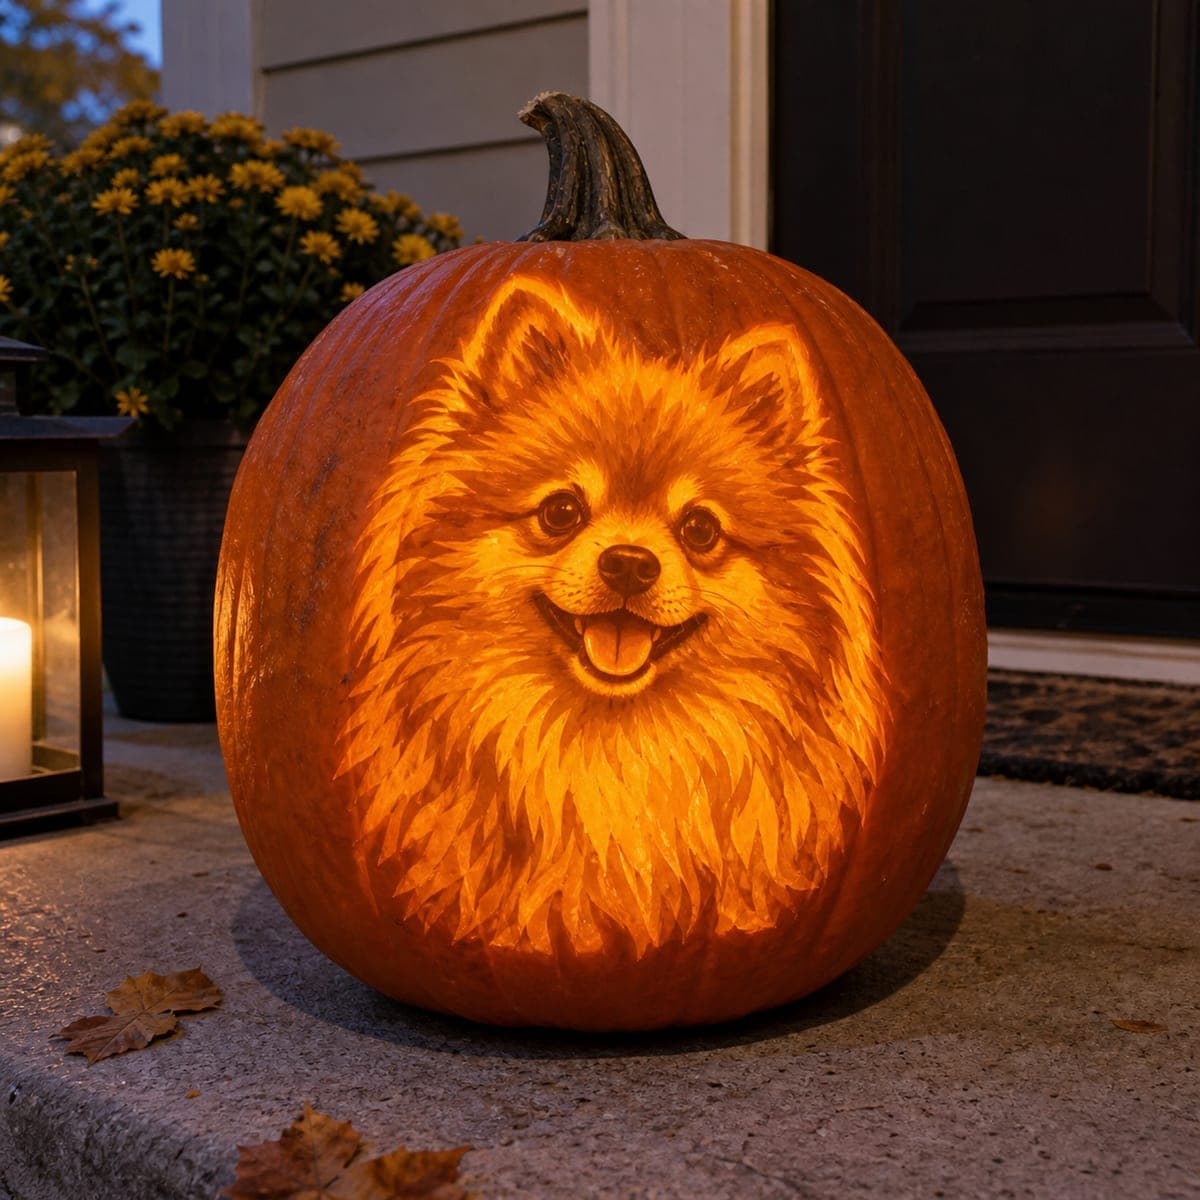
A Pomeranian's fox-like face pops from this pumpkin in dimensional sculpture, every tuft of the fluffy ruff shaved outward in layered fans of carved flesh. Sculptural fur like this needs a thick-walled pumpkin and loop tools: establish the eyes, nose, and grin first, then work outward in overlapping strokes so the coat radiates from the face. Displayed in daylight on a bench, it looks like the dog is peeking out of the pumpkin.

This is an AI-generated concept image: a realistic, carvable design idea rather than a photo of a finished carve. AI concepts are always labeled and sit out the leaderboard and the contest.

No ratings yet · Sign in to rate
Comments (0)

  • No comments yet — be the first.

Save without an account. Sign in to like or comment.

Our tips for carving a similar design

This design is a low relief sculpture, not a cut-through lantern, so almost all the work is shaving the pumpkin skin at different depths rather than opening windows. The core trick is layering: set the eyes, nose, and grin first as your deepest anchors, then carve the ruff outward in overlapping fan strokes so each tuft casts a small shadow over the one below. Since this is an AI concept and no real pumpkin exists, treat it as a plan you could follow on a thick-walled pumpkin with loop tools.

Written by PumpkinCarvingIdeas.com, inspired by the image above. These are our suggestions, not instructions from the uploader. This approach to the AI concept has not been tested on a real pumpkin.

From pumpkin to porch

  1. Pick a thick wall and prep the skin

    Choose a large, heavy pumpkin with a smooth front face and walls at least an inch thick, since you will be sculpting into the flesh rather than through it. Wipe the surface clean and dry it. Instead of cutting a top lid, plan a small access hole in the back or bottom so the front stays intact for the portrait. Sketch a rough outline of the dog's head and ruff in washable marker.

  2. Transfer the face and set your anchors

    Tape a Pomeranian stencil over the front and poke through the key features: the two eyes, the nose, and the open smiling mouth. Remove the paper and use a small loop tool to carve these deepest points first, because everything else radiates from them. Keep the eyes rounded and slightly recessed so they catch shadow and read as glossy. Leave a thin bridge of flesh at the corners of the mouth so the grin does not tear.

  3. Rough out the head volume

    With a medium loop tool, shave down the areas around the muzzle to make the nose and cheeks stand proud. Work in broad passes to establish where the face bulges forward and where the fur recedes. Do not chase detail yet, just build the big high and low zones. Step back often to check that the muzzle sits lower and the fluffy cheeks puff outward.

  4. Carve the ruff in overlapping fans

    Switch to a fine loop or a V gouge and pull short, curved strokes outward from the face, following the direction the fur grows. Overlap each row slightly over the one before so every tuft has a lip that throws a shadow. Vary the depth and length so the coat looks layered rather than combed flat. Take your time here, this radiating texture is what sells the whole piece.

  5. Add depth with skin peeling

    Peel the outer skin off the raised fur tips to make them glow a lighter orange while leaving the valleys between tufts darker. Scrape the muzzle and the fur around the eyes thinner still for the palest highlights. Keep the nose and eye centers as untouched dark skin for contrast. This shading contrast, not any big hole, is what gives the face its dimension.

  6. Light it and shoot in daylight

    This carving reads best by day, exactly like the bench photo, because the sculpted shadows do the work. For evening display, set a warm LED puck inside and aim it low so it grazes the fur and deepens the tuft shadows. Never use a candle, since the thin peeled areas and enclosed flesh dry and scorch fast. Mist the surface and bag it in the fridge overnight between showings to slow shrinking.

Gather your supplies

Check things off as you get ready.

Work on a stable surface, keep your free hand out of the cutting path, and have an adult handle sharp tools.

Three levels of light

  • Leave intact

    The nose, the eye centers, and the deep valleys between fur tufts stay as untouched dark skin.

  • Peel & shade

    The raised ruff tips and the muzzle get skin-peeled to a soft mid orange glow.

  • Cut through

    Keep full cutouts minimal, at most tiny slivers at the mouth opening, since this is a sculpted portrait rather than a lantern.

Learn the carving basics

Before you start cutting

Do I need to cut all the way through the pumpkin?

No, this is a relief sculpture, so most of the piece is shaved to varying depths and nothing pierces the far wall. The dimension comes from shadow and skin peeling, not from open windows. Reserve any full cut for a tiny hint of the mouth if you want a spark of light there.

How do I keep the fluffy fur from looking flat?

Always pull your strokes in the direction the coat grows and overlap each row over the one below so every tuft has a raised edge. That little lip catches side light and casts a shadow, which is what makes the ruff look layered. Vary the length and depth of your strokes so no two tufts match exactly.

Since this is an AI concept, can a real pumpkin hold this much detail?

Yes, if you start with a heavy pumpkin that has a thick, smooth wall to carve into. Sculpted fur survives well because you are removing surface flesh, not leaving fragile floating pieces. Just work in a cool room, mist the carved areas, and expect the fine texture to soften after a couple of days.

Your take belongs here, too.

Changed a detail? Made it simpler? Share a photo of your version and tell the community what worked.

Share your pumpkin

More pumpkins like this

You've reached the end · 8 pumpkins
The Patch Report

Fresh pumpkins, in your inbox.

The best new carvings, ideas worth stealing, and how-tos for carving season. Short, seasonal, and gone by November.

A short email during carving season. Unsubscribe anytime. See our privacy policy.