Halloween Pumpkin Carving Contest · Starts October 1st · $500 in prizes
← Back to ideas
@ai_concepts
Jul 12, 2026
Folk Art Peacock Painted PumpkinAI
0

Folk Art Peacock Painted Pumpkin

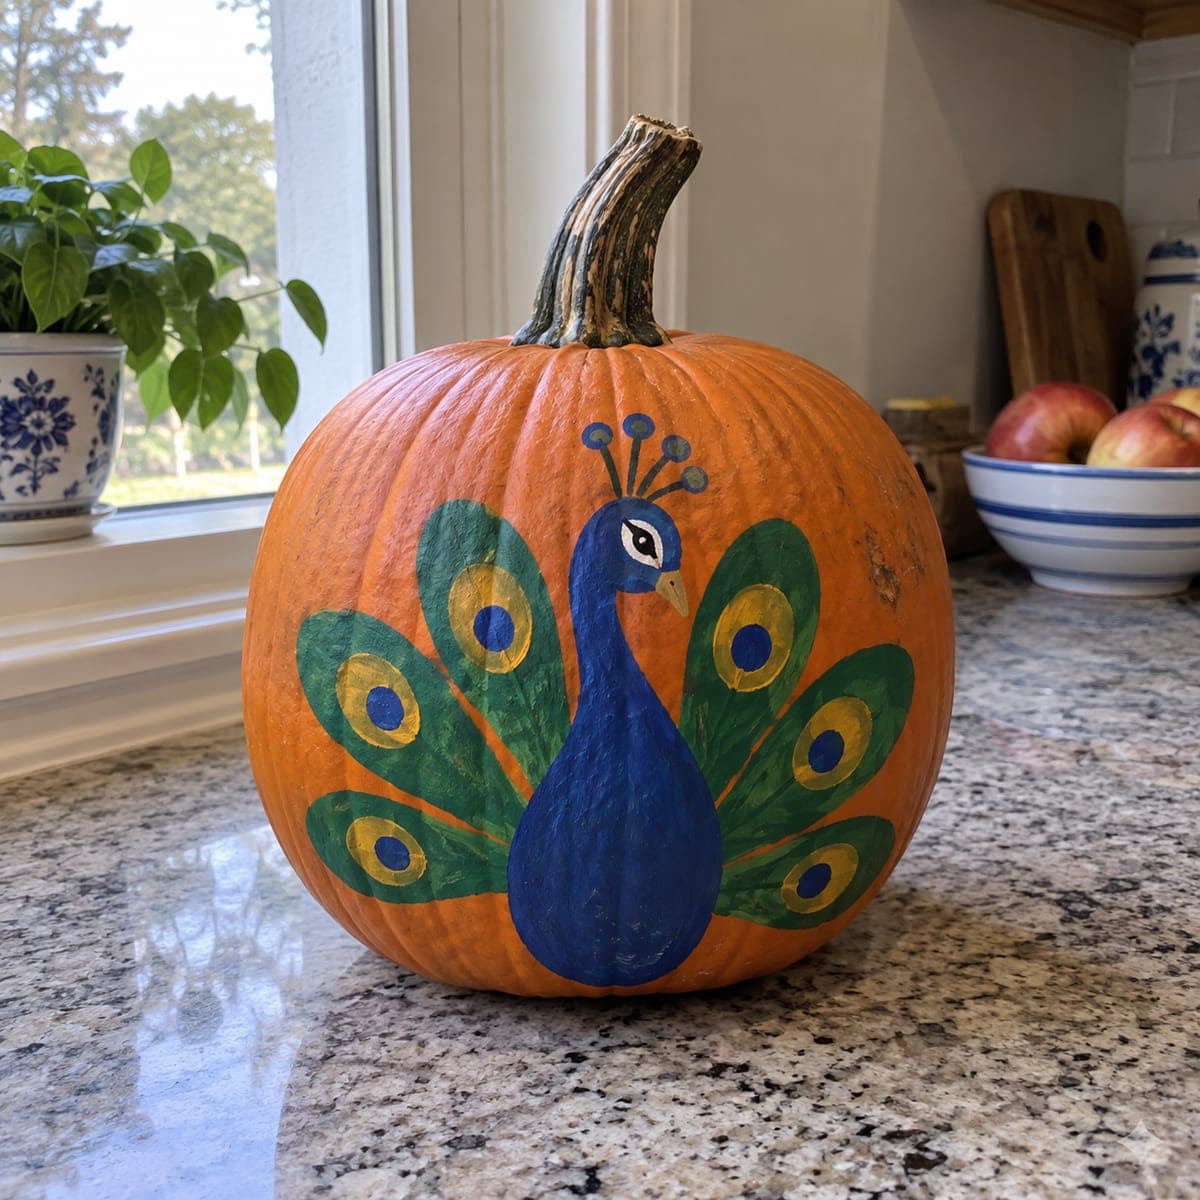
A royal blue peacock fans its tail across this painted pumpkin, each green feather tipped with a gold-ringed blue eye spot. The design breaks down into repeatable pieces, so paint the body teardrop first, then radiate the feathers outward one at a time, finishing every one with the same three-dot eye motif. A tiny crown of dots tops the head. This no-carve pumpkin idea adds a jewel-toned accent to fall decor that plain orange displays lack.

This is an AI-generated concept image: a realistic, carvable design idea rather than a photo of a finished carve. AI concepts are always labeled and sit out the leaderboard and the contest.

No ratings yet · Sign in to rate
Comments (0)

  • No comments yet — be the first.

Save without an account. Sign in to like or comment.

Our tips for carving a similar design

The whole design is built from one repeatable trick: a teardrop body plus a fan of identical feathers, each capped with the same gold-ringed blue eye spot. Paint the blue body first as your anchor, then radiate the green feathers outward one at a time so they stay evenly spaced. Because it is a no-carve painted pumpkin, you can work slowly and fix mistakes before anything is permanent.

Written by PumpkinCarvingIdeas.com, inspired by the image above. These are our suggestions, not instructions from the uploader. This approach to the AI concept has not been tested on a real pumpkin.

From pumpkin to porch

  1. Prep and sketch the layout

    Wipe the pumpkin clean and dry so paint grips the skin. With a pencil or washable marker, mark the center point for the peacock's head, then lightly draw the teardrop body below it. Sketch a shallow arc where the seven feather tips will land so the fan stays symmetrical. Step back and check the spacing before you commit to paint.

  2. Paint the blue body and neck

    Fill the teardrop body and the slim curving neck with royal blue acrylic. Use a medium round brush and two thin coats rather than one thick one, letting each dry so the color stays even. Keep the edges crisp since the green feathers will tuck right up against them. A small dab of darker blue down the center of the body adds gentle shading.

  3. Radiate the green feathers

    Paint the feathers one at a time, working outward from behind the body in a fan. Load a flat brush with green and pull each stroke from the body toward its tip so they taper naturally. Keep the same length and gap between each feather to hold the folk-art symmetry. Let the green dry fully before adding detail so colors do not bleed.

  4. Add the eye spots and crown

    On each feather tip, layer the classic three-dot motif: a gold ring, then a blue center, using the round end of a brush handle for even circles. Repeat the exact same size on every feather so the fan reads as one set. Add the face by painting a white eye with a dark pupil, a small beak, and a tiny crown of dotted antennae above the head. Consistency here is what makes it look intentional.

  5. Seal and stage the finish

    Once everything is bone dry, brush on a thin coat of matte clear acrylic sealer to protect the paint from moisture. Set the pumpkin on a shelf or counter where the blue and green pop against the orange skin. For an evening accent, tuck a battery LED puck beside it rather than inside, since this design is not cut open. Snap your photo in soft daylight to catch the jewel tones.

Gather your supplies

Check things off as you get ready.

Work on a stable surface, keep your free hand out of the cutting path, and have an adult handle sharp tools.

Three levels of light

  • Leave intact

    The untouched orange skin stays as the warm background around the peacock, no paint and no cutting.

  • Peel & shade

    If you want a soft glow variation, lightly peel a thin halo of skin behind the tail fan for a dim orange backlight.

  • Cut through

    Cutting is optional on this painted design; only cut small vent openings on the back if you add an interior LED, never through the painted face.

Learn the carving basics

Before you start cutting

Do I need to carve anything for this peacock?

No, this is a fully painted, no-carve design, so your only tools are brushes and paint. If you want a nighttime glow, set a battery LED beside the pumpkin instead of inside it. Cutting is only needed if you choose to add a light vent on the back.

How do I keep the seven feathers even?

Sketch a shallow arc in pencil first and mark a light dot where each feather tip will land before you paint. Painting the blue body first gives you a fixed center to radiate from. Work one feather at a time and match each length and gap to the last.

What is the trick to clean eye spots?

Dip the round end of a brush handle or a dowel into gold paint and press it down for a perfect ring, then repeat with blue for the center once the gold dries. Using the same tool for every spot keeps them identical. Let each color dry fully so the blue does not smear into the gold.

Your take belongs here, too.

Changed a detail? Made it simpler? Share a photo of your version and tell the community what worked.

Share your pumpkin

More pumpkins like this

You've reached the end · 8 pumpkins
The Patch Report

Fresh pumpkins, in your inbox.

The best new carvings, ideas worth stealing, and how-tos for carving season. Short, seasonal, and gone by November.

A short email during carving season. Unsubscribe anytime. See our privacy policy.