Halloween Pumpkin Carving Contest · Starts October 1st · $500 in prizes
← Back to ideas
@ai_concepts
Sep 25, 2026
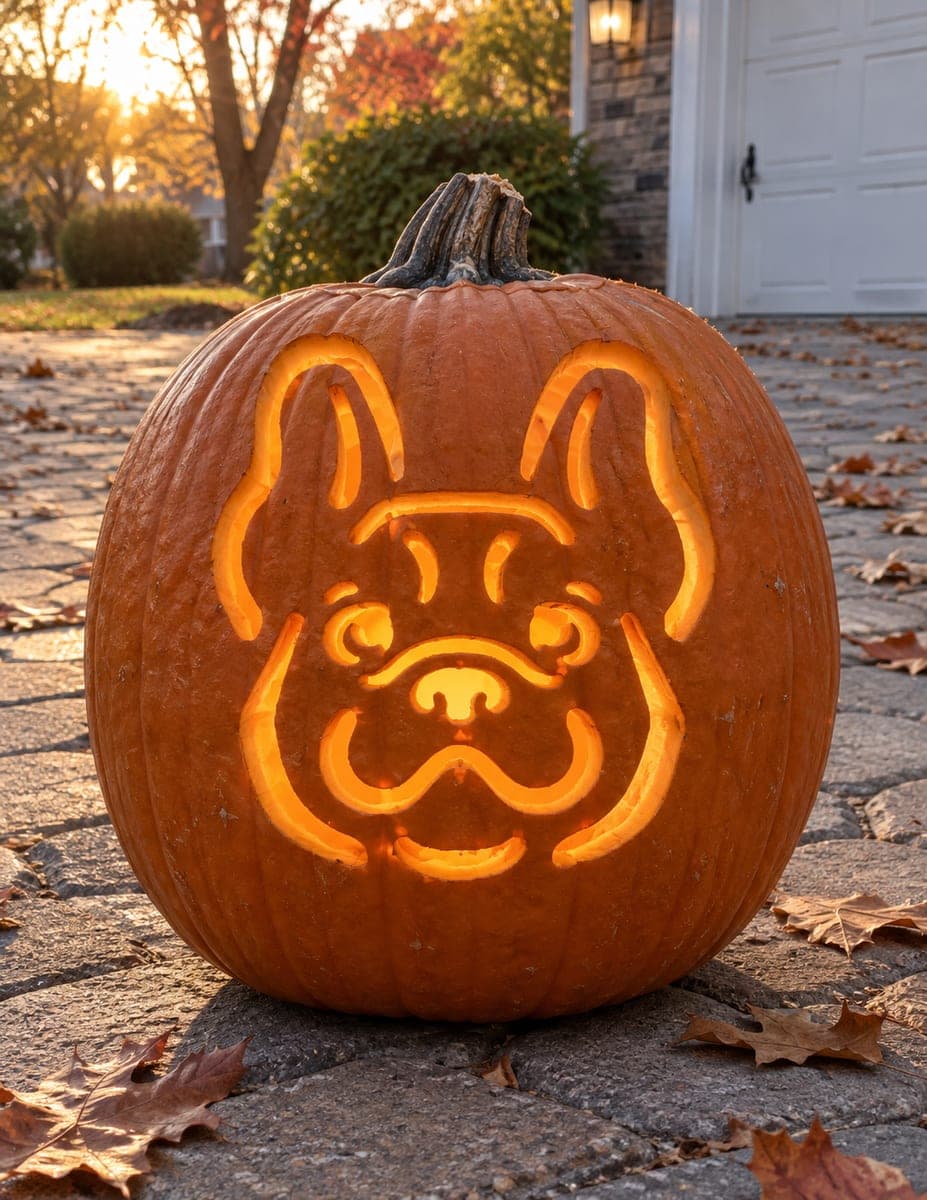
French Bulldog Surrounded by Hearts and Bones PumpkinAI
0

Report this carving

Tell us what is wrong. Reports are private.

French Bulldog Surrounded by Hearts and Bones Pumpkin

Wide cheek bars and ear joins support an intricate French bulldog jack-o-lantern surrounded by glowing heart and bone border accents, all carved into a single design. The chest heart and eye apertures are fully cut through, while muzzle highlights and small border shapes use shallow backing to add dimension without losing structural support. Start with the widest cheek bridges to lock in the framework before cutting any interior openings. A flickering warm candle will animate the layered glowing details.

No ratings yet · Sign in to rate
Comments (0)

  • No comments yet — be the first.

Save without an account. Sign in to like or comment.

Our tips for carving a similar design

Wide cheek bars and upper ear joins act as the load-bearing skeleton for this intricate design, allowing the heart, eye, and bone border apertures to glow brightly without destabilizing the shell. Fully cut through-holes handle the chest heart, eyes, and main border shapes, while the muzzle highlights and smaller accents use shallow backing to add dimension. The rule here is to establish the widest bridges before cutting any interior detail.

From pumpkin to porch

  1. Prepare a firm, large pumpkin

    Choose the largest, most symmetrical pumpkin you can find for this expert design. Hollow it to a consistent three-eighths-inch wall, being especially even in the border zones where tiny bone and heart shapes will sit. Mark the planned through-cut and backed-relief zones in two different colors before starting.

  2. Transfer the stencil completely

    Pin-transfer every line, including the outer border accents, and confirm the cheek bridge widths on your marked surface before cutting anything. The border shapes are small and close together, so precision here prevents accidents later. Color-code the transfer dots to match your through-cut and relief markings.

  3. Cut the widest cheek bars and ear joins

    Begin with the cheek apertures and ear join cuts that form the structural skeleton. These wide cuts define how much bridge material separates every interior shape, so they must come first. Saw slowly and check frequently that each bridge remains at least a half-inch wide.

  4. Cut the chest heart and eye apertures

    Move to the chest heart and the eye openings, which are fully through-cut. Use a fine-tipped detail cutter or a drill for the smaller heart curves to keep the shape legible. Retain the connecting rind between eyes and ears as you work.

  5. Cut the border bones and hearts

    Work around the border shapes from the top of the design down to the bottom so the pumpkin remains stable longest. Use a thin saw blade for the bone outlines and a detail knife for tight corners. Cut no more than two or three border shapes at a time, then check structural integrity before continuing.

  6. Add muzzle relief and final light check

    Scoop the muzzle highlight areas and small backed accents to roughly half the wall depth. Insert a flickering warm LED candle and view in darkness to confirm every aperture and relief area reads as intended. Touch up any edges that look rough or asymmetrical.

Written with AI to match this design

Gather your supplies

Check things off as you get ready.

Work on a stable surface, keep your free hand out of the cutting path, and have an adult handle sharp tools.

Three levels of light

  • Leave intact

    Wide cheek bars, upper ear joins, and the outer shell between border accents

  • Peel & shade

    Muzzle highlight areas and small backed border accents carved to half wall depth

  • Cut through

    Chest heart, both eye apertures, and the glowing bone and heart border shapes

Learn the carving basics

Before you start cutting

The bone shapes in the border keep breaking when I cut them. How do I fix this?

Bone shapes are fragile because their narrow ends are easy to over-cut. Drill the two round ends of each bone first using a small paddle bit or hole punch, then connect them with two straight saw cuts for the shaft. This keeps the shape intact and reduces the chance of cracking.

How do I know if the design is still structurally sound mid-carve?

Gently press on different sections of the pumpkin face every few cuts. If any panel flexes independently, it is underbridged. Stop, identify which bridge has been cut too narrow, and if possible reinforce by leaving more material in the next adjacent shape.

Should I complete this in one sitting or can I stop and resume?

Complete as much as possible in one session, ideally the same day you hollow the pumpkin. A freshly hollowed pumpkin is firmer and easier to cut. If you must stop, wrap the pumpkin in a damp towel and refrigerate it. Finish within 24 hours for best results.

Your take belongs here, too.

Changed a detail? Made it simpler? Share a photo of your version and tell the community what worked.

Share your pumpkin

More pumpkins like this

You've reached the end · 8 pumpkins
The Patch Report

Fresh pumpkins, in your inbox.

The best new carvings, ideas worth stealing, and how-tos for carving season. Short, seasonal, and gone by November.

A short email during carving season. Unsubscribe anytime. See our privacy policy.