Halloween Pumpkin Carving Contest Β· Starts October 1st Β· $500 in prizes
← Back to ideas
@ai_concepts
Jul 31, 2026
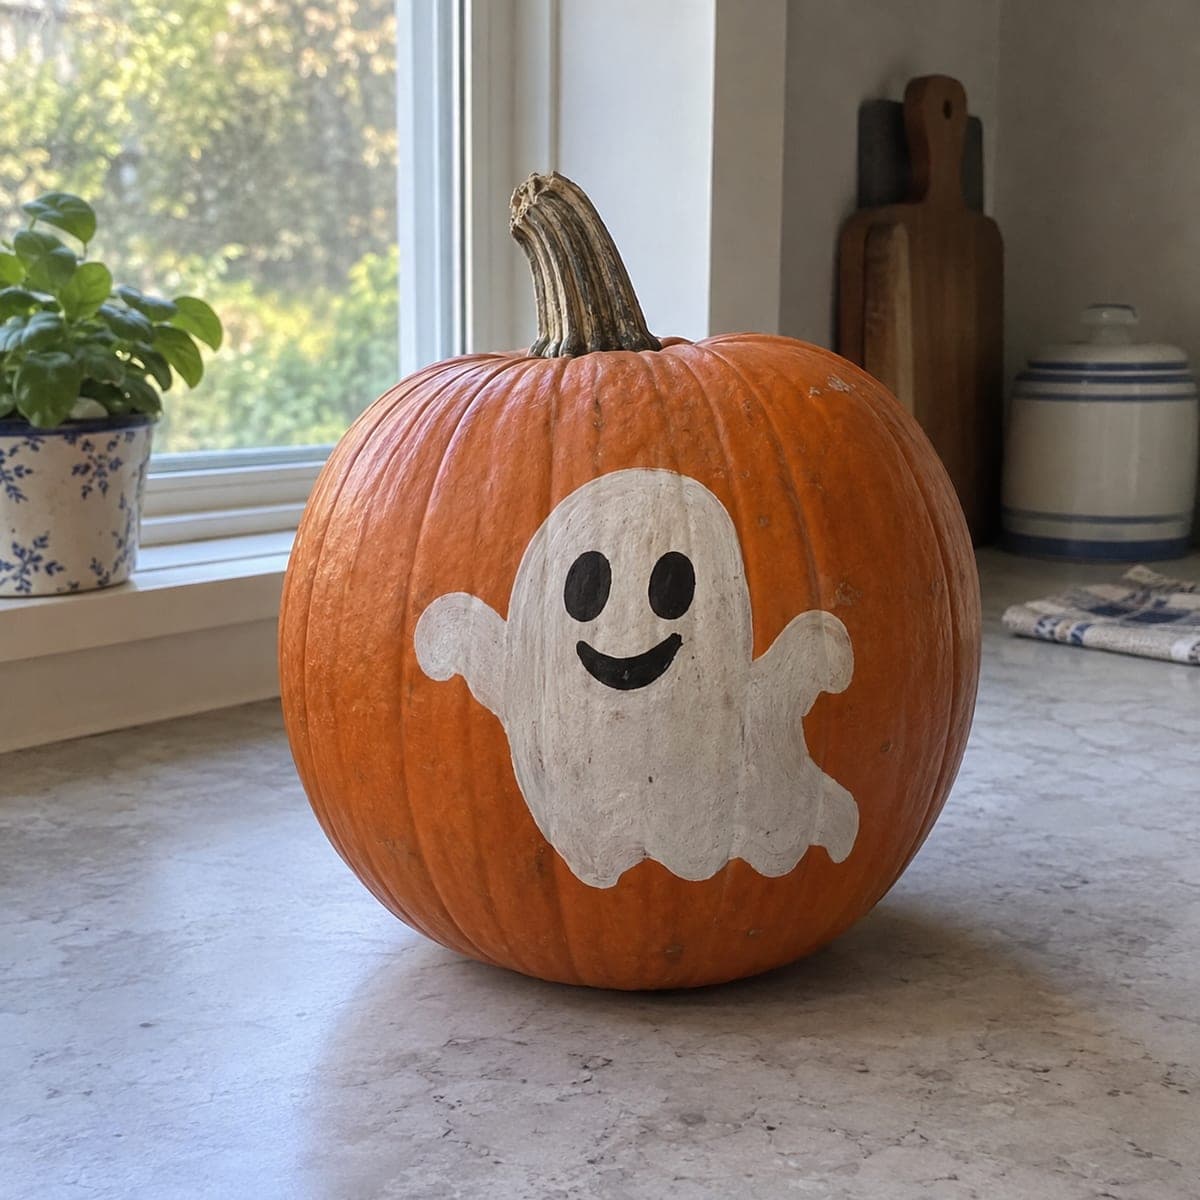
Friendly Waving Ghost No-Carve PumpkinAI
0

Friendly Waving Ghost No-Carve Pumpkin

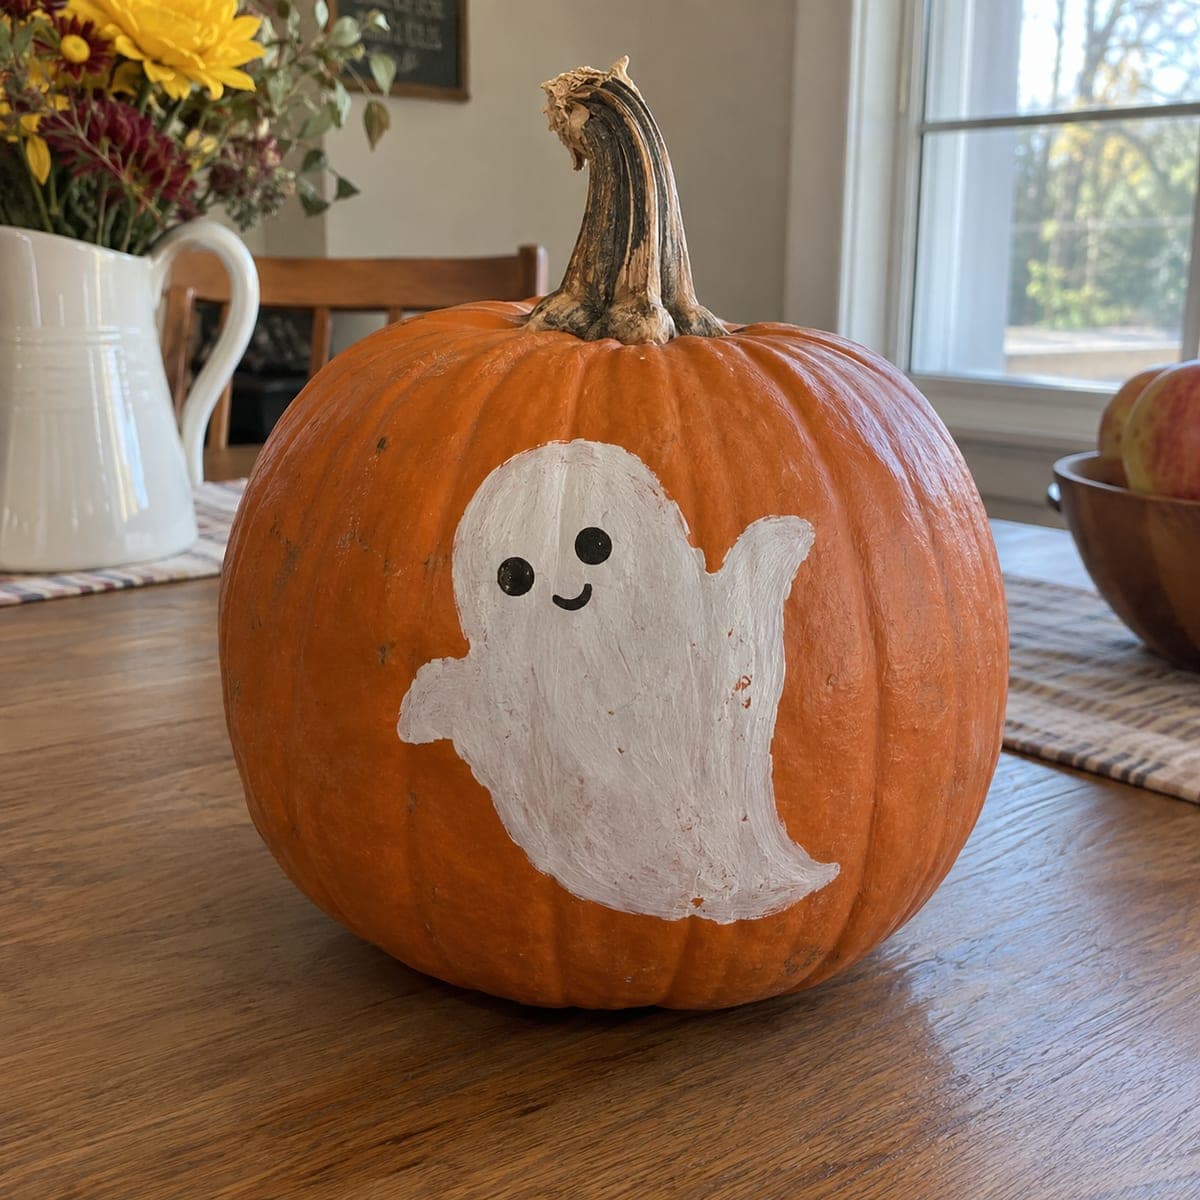
A smiling white ghost with little waving arms floats across this pumpkin, about as unscary as Halloween gets. The whole design is paint, which makes it a great first pumpkin project for toddlers and preschoolers with an adult on outline duty. Chalk the wavy-bottomed ghost shape, fill it with two coats of white, and finish with the black oval eyes and smile. Set it in a kitchen window where the ghost seems to float at night.

This is an AI-generated concept image: a realistic, carvable design idea rather than a photo of a finished carve. AI concepts are always labeled and sit out the leaderboard and the contest.

No ratings yet Β· Sign in to rate

Comments (0)

  • No comments yet β€” be the first.

Save without an account. Sign in to like or comment.

Our tips for carving a similar design

The whole charm here is a soft, rounded ghost with little waving arms and a wavy hem, done entirely in paint instead of blades. Start by chalking the shape so you can adjust it freely, then fill it with white and add crisp black features last. Because nothing is cut, this is one of the safest pumpkin projects you can hand to a young helper.

Written by PumpkinCarvingIdeas.com, inspired by the image above. These are our suggestions, not instructions from the uploader. This approach to the AI concept has not been tested on a real pumpkin.

From pumpkin to porch

  1. Prep and position the pumpkin

    Wipe the pumpkin with a damp cloth and let it dry so paint grips the skin. Turn the smoothest, flattest face toward you and place the pumpkin on a towel so it does not roll. Pick a spot slightly below center for the ghost so the waving arms have room to spread. Keep the pretty curved stem as part of the display.

  2. Chalk the ghost shape

    Use white or light chalk to sketch a tall rounded body with a domed head. Add two short stubby arms lifting out to the sides like a wave, and give the bottom edge three or four soft bumps for that floating-sheet look. Step back and check that the shape sits straight before you commit. Chalk wipes off easily, so redraw until you are happy.

  3. Fill with white paint

    An adult or steady hand should outline the chalk shape first with white acrylic or craft paint, then fill the inside. Use a flat brush for the body and a smaller round brush for the arm tips. Let the first coat dry fully, then add a second coat so the white reads bright against the orange. Two thin coats look cleaner than one thick one.

  4. Add the face

    Once the white is completely dry, draw two tall black ovals for eyes and a wide curved smile in chalk first. Fill them with black paint or a paint pen, keeping edges smooth and rounded to hold that cheerful look. Leave a little white space between the eyes and the mouth so the features stay distinct. Small hands can help dab the eyes while an adult handles the smile.

  5. Seal and touch up

    Check for chalk lines peeking out and wipe them away with a barely damp cotton swab. If any white edge looks ragged, touch it up once the black is dry. A light coat of clear acrylic sealer helps the paint last and resist smudging. Let everything cure before moving the pumpkin.

  6. Style and photograph

    Set the finished ghost in a kitchen or entry window where it can be seen from outside. Tuck a battery LED tealight or a small string of warm lights beside it so the white ghost glows softly at night. Snap your photo at dusk when indoor light balances the sky outside. Share it with the community when you are done.

Gather your supplies

Check things off as you get ready.

Work on a stable surface, keep your free hand out of the cutting path, and have an adult handle sharp tools.

Three levels of light

  • Leave intact

    The orange skin all around the ghost stays untouched and dark, which frames the white body.

  • Peel & shade

    For extra depth you could lightly scrape the skin just inside the ghost outline so a faint halo glows when lit from behind.

  • Cut through

    This is a no-carve design, so nothing is cut through; if you want real glow, an adult could later carve small oval eyes and a smile as a separate variation.

Learn the carving basics

Before you start cutting

Do I have to carve anything for this ghost?

No, this is a fully painted design with no cutting required. That makes it ideal for toddlers and preschoolers working alongside an adult. If you want light to shine through later, an adult can carve the eyes and mouth as an optional upgrade.

What paint holds up best on pumpkin skin?

Acrylic or standard craft paint sticks well to clean, dry pumpkin skin and dries fairly fast. Apply two thin coats of white rather than one heavy one for even coverage. A light clear sealer at the end helps it resist smudging and moisture.

How do I keep the black features crisp?

Sketch the eyes and smile in chalk first so you can adjust the spacing before painting. Wait until the white base is fully dry, then use a paint pen or small round brush for clean edges. Keep the shapes rounded and leave white space between them so the face stays cheerful.

Your take belongs here, too.

Changed a detail? Made it simpler? Share a photo of your version and tell the community what worked.

Share your pumpkin

More pumpkins like this

You've reached the end Β· 8 pumpkins
The Patch Report

Fresh pumpkins, in your inbox.

The best new carvings, ideas worth stealing, and how-tos for carving season. Short, seasonal, and gone by November.

A short email during carving season. Unsubscribe anytime. See our privacy policy.