Halloween Pumpkin Carving Contest · Starts October 1st · $500 in prizes
← Back to ideas
@ai_concepts
Sep 25, 2026
Funny Hard-Level Pumpkin With Intricate Glowing DetailsAI
0

Report this carving

Tell us what is wrong. Reports are private.

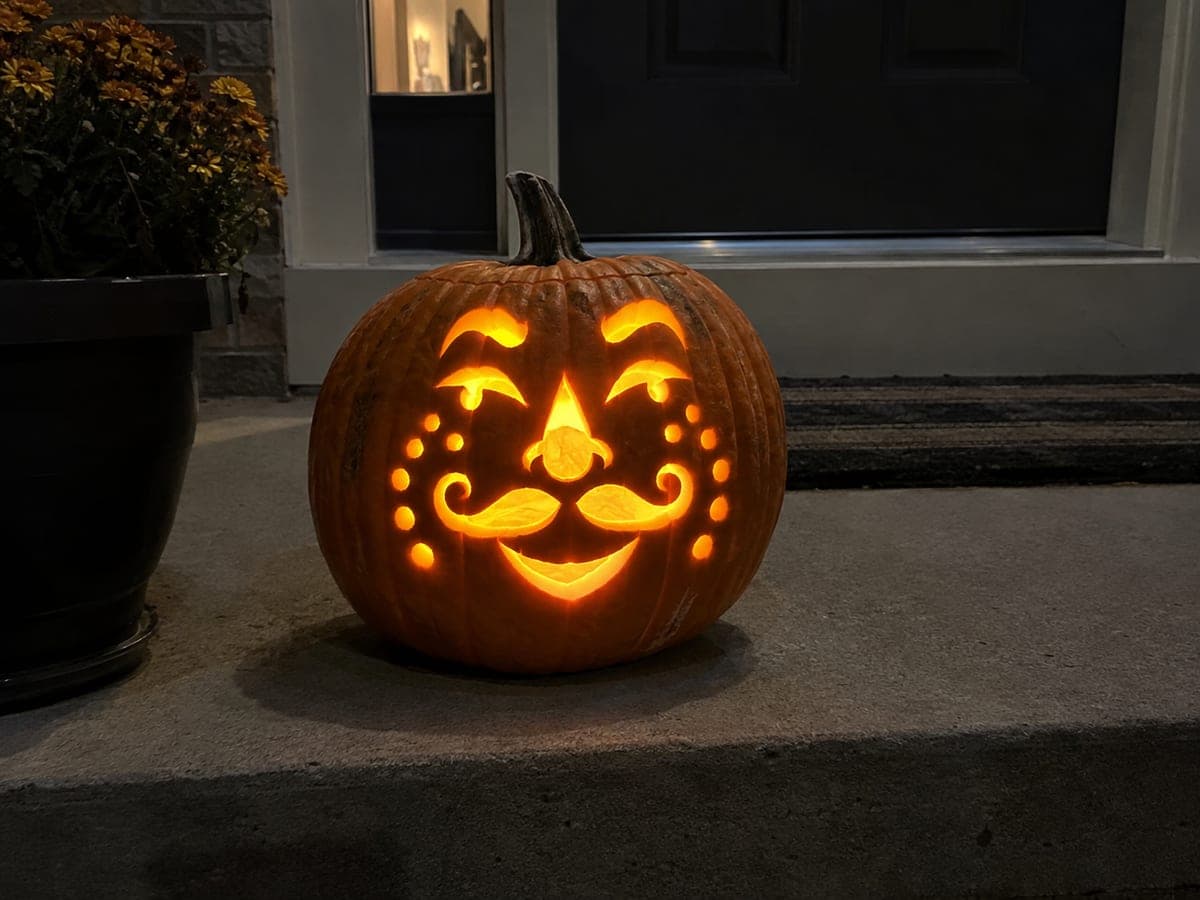
Funny Hard-Level Pumpkin With Intricate Glowing Details

More detailed cut-through shapes packed closer together give this hard-level funny pumpkin carving idea its complexity, requiring steady hands and a quality detail saw. Identify all structural bridges before cutting and mark them clearly so none are removed by mistake. Work from the largest openings outward to the smallest accent shapes, and pause between cuts to verify the wall remains solid. A bright interior LED ensures every intricate detail glows clearly in the dark.

No ratings yet · Sign in to rate

Comments (0)

  • No comments yet — be the first.

Save without an account. Sign in to like or comment.

Our tips for carving a similar design

The complexity here comes from having more individual openings than a standard funny face, packed close enough together that the rind between them forms a structured web. Mapping every structural bridge before the first cut and marking them visibly is essential. Working from the largest openings inward to the smallest accent shapes keeps the wall from flexing while the most critical structural decisions are still being made.

From pumpkin to porch

  1. Select and hollow the pumpkin

    Choose a pumpkin with a broad, relatively flat carving face so the intricate openings have room. Cut the bottom lid and scoop the cavity to a consistent inch-thick wall. A consistent wall means the saw meets the same resistance on every cut, which makes controlling detail cuts much easier.

  2. Transfer the full design and mark bridges

    Transfer all outlines with a stylus, then go through the design with a marker and clearly mark every connecting strip that must stay intact. Highlight or shade these bridges lightly so they are unmistakable during the carving session. The time spent on this step directly reduces the risk of accidentally removing a critical strip.

  3. Cut from the largest openings inward

    Begin with the widest apertures in the design and work progressively toward the smallest details. This order maintains structural stability as each additional cut removes more material. Keep the saw perpendicular to the rind at all times and use a fine-tooth blade for any opening smaller than a thumbnail.

  4. Pause frequently to test stability

    After every three or four cuts, press gently on the carved area and the surrounding rind. Any flexing or softness means a bridge is under stress and the adjacent openings should be deferred until you have reinforced the design by cutting other areas farther away first.

  5. Finish with the border accents

    Cut any small openings near the outer border of the design last, since those reduce the structural margin the most. Work at reduced speed for these final cuts and support every offcut as it releases so it does not catch on a nearby bridge on its way out.

  6. Light with a bright LED

    A bright, high-output LED is worth the extra cost for a detailed design: it illuminates every small opening fully rather than leaving the outer edges dim. Place the pumpkin against a dark wall so the glowing rind web reads with maximum contrast after dark.

Written with AI to match this design

Gather your supplies

Check things off as you get ready.

Work on a stable surface, keep your free hand out of the cutting path, and have an adult handle sharp tools.

Three levels of light

  • Leave intact

    All narrow rind bridges between openings remain dark, forming the visible structural web

  • Peel & shade

    None, every element is either fully cut or fully intact

  • Cut through

    Every opening in the intricate funny face is cut completely through for full interior glow

Learn the carving basics

Before you start cutting

My saw keeps catching on the rind instead of cutting cleanly. What am I doing wrong?

The most common cause is a dull blade or one with teeth that are too coarse for the opening size. Switch to a finer-tooth blade for small cuts. Also, make sure you are cutting on the pull stroke and letting the blade move at its own pace rather than forcing it through. A pumpkin chilled in the refrigerator overnight is also firmer and cuts more cleanly.

Is there a way to test the structural integrity before I finish carving?

After cutting about half the openings, remove the bottom lid and gently press on the carved section from outside. It should feel firm with no give. If it flexes, stop carving new openings nearby and work on the opposite side of the design until you have a more balanced distribution of cuts.

How do I photograph the finished carving to show all the detail?

Shoot in a darkened room with the LED on its highest setting. Use a camera or phone set to a slightly longer exposure so the internal glow has time to register without overexposing. Place a piece of dark cardboard or fabric directly behind the pumpkin to increase the contrast between the glowing openings and the dark rind.

Your take belongs here, too.

Changed a detail? Made it simpler? Share a photo of your version and tell the community what worked.

Share your pumpkin

More pumpkins like this

You've reached the end · 8 pumpkins
The Patch Report

Fresh pumpkins, in your inbox.

The best new carvings, ideas worth stealing, and how-tos for carving season. Short, seasonal, and gone by November.

A short email during carving season. Unsubscribe anytime. See our privacy policy.