Halloween Pumpkin Carving Contest · Starts October 1st · $500 in prizes
← Back to ideas
@ai_concepts
Sep 25, 2026
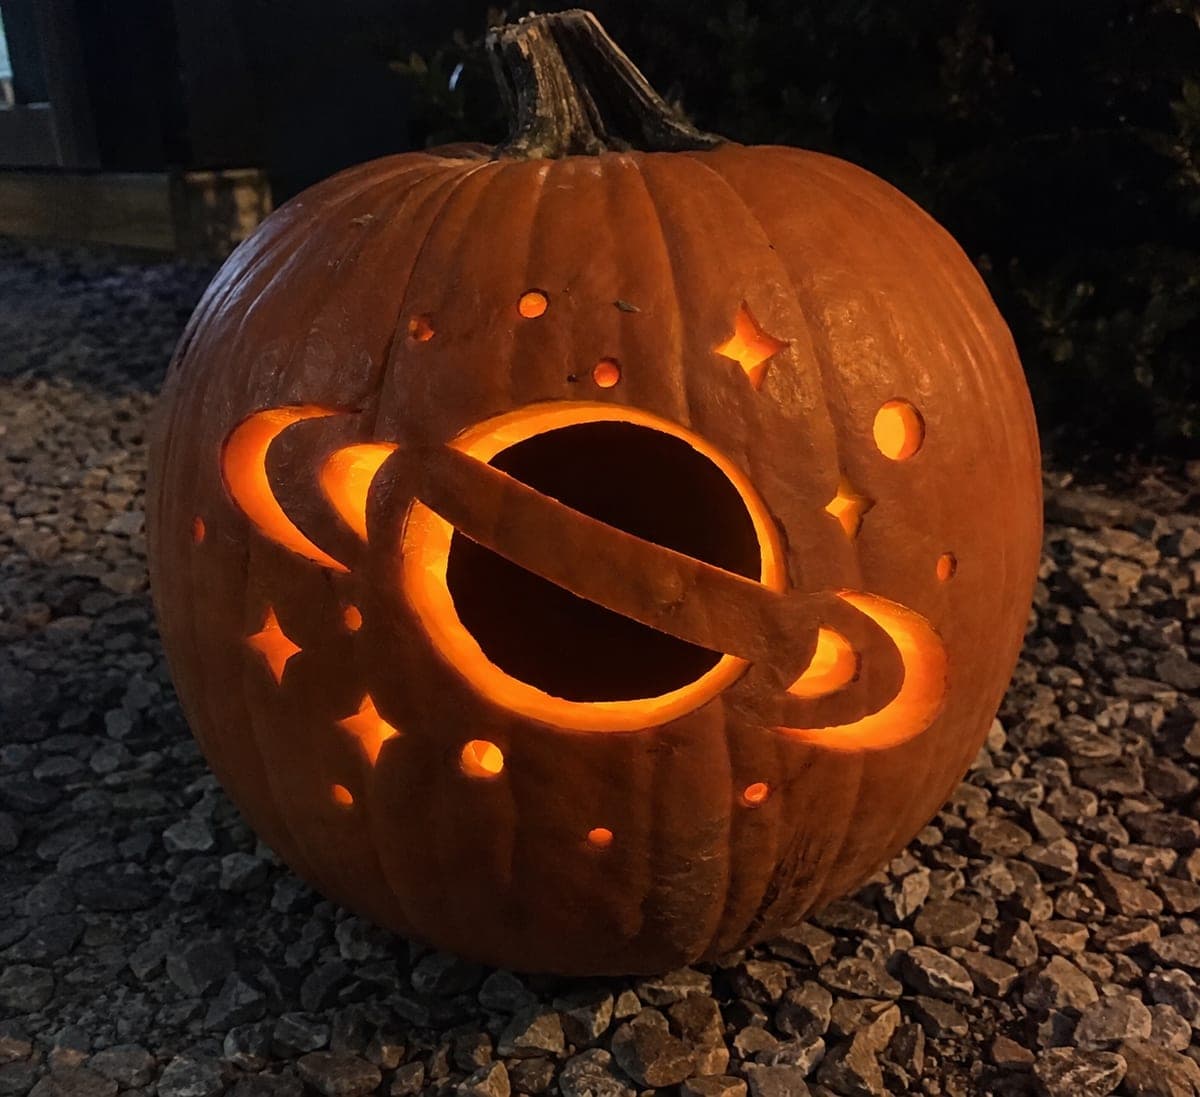
Glowing Ringed Planet Galaxy Pumpkin on a Gravel PathAI
0

Report this carving

Tell us what is wrong. Reports are private.

Glowing Ringed Planet Galaxy Pumpkin on a Gravel Path

A large planet opening divided by a bold diagonal rind bridge anchors this hard galaxy pumpkin idea, with separate ring crescent apertures and surrounding star accents completing the cosmic scene. The diagonal bridge is the most critical structural element: it must be wide enough to hold both halves of the planet opening without flexing. Cut the planet opening in two halves, leaving the bridge intact, then add the ring crescents and finish with the small star accents, some of which can remain as shallow backed carving. Gravel paths provide excellent nighttime display spots where the ambient light stays low.

No ratings yet · Sign in to rate
Comments (0)

  • No comments yet — be the first.

Save without an account. Sign in to like or comment.

Our tips for carving a similar design

The diagonal rind bridge dividing the planet opening is both the most structurally important element and the design's signature visual detail. Both halves of the planet opening are cut on either side of this bridge, leaving it intact throughout. The ring crescents and surrounding star accents are added after the planet opening is complete, when the bridge is confirmed to be solid and secure.

From pumpkin to porch

  1. Prepare and plan the bridge position

    Scoop the interior to a firm, even inch-thick wall and chill the pumpkin before carving. Transfer the template and use a ruler to confirm the diagonal bridge width is at least three-quarters of an inch along its full length. Mark the bridge edges clearly in pencil on the rind before perforating anything else.

  2. Transfer all template elements

    Perforate the two planet-half boundaries on either side of the bridge, the ring crescent positions, and the star accent boundaries. Use a contrasting color to mark which star accents will be through-cuts and which will be back-carved accents.

  3. Cut the first planet half

    Insert the jab saw at the outermost point of one planet-half opening and cut along the boundary, stopping exactly at both ends of the bridge edge. Do not cut across or through the bridge at any point. Pop out the first piece and confirm the bridge is solidly attached on both sides.

  4. Cut the second planet half

    Repeat for the second half of the planet opening on the other side of the bridge. Again, stop exactly at the bridge edges. When both halves are open, the bridge should stand as a clean diagonal band across the glowing planet opening.

  5. Cut the ring crescents and through-cut star accents

    Add the ring crescent apertures around the planet, treating each as a simple elongated arc cutout. Then cut the through-cut star accents using a small punch or jab saw tip, keeping each well separated from adjacent openings by solid rind.

  6. Back-carve the shallow star accents and display

    Use a detail gouge to carve the shallow-backed star accent shapes, removing only the outer skin and a shallow layer. Place an LED tea light inside and display on the gravel path in full darkness for maximum cosmic effect.

Written with AI to match this design

Gather your supplies

Check things off as you get ready.

Work on a stable surface, keep your free hand out of the cutting path, and have an adult handle sharp tools.

Three levels of light

  • Leave intact

    The diagonal bridge band and the surrounding outer rind remain solid and dark.

  • Peel & shade

    The shallow back-carved star accents glow faintly with diffused interior light.

  • Cut through

    Both halves of the planet opening, the ring crescent apertures, and the through-cut star accents glow at full brightness.

Learn the carving basics

Before you start cutting

What if the bridge is not perfectly straight?

A slightly curved or angled bridge actually adds a sense of motion and dynamism to the planet that a perfectly straight bridge can lack. As long as the bridge is at least three-quarters of an inch wide throughout its length and both ends are firmly anchored to the outer rind, a gentle curve is fine and even desirable.

How wide should the ring crescent apertures be?

The ring crescents should be narrow enough that the solid rind ring between the crescent and the planet opening is clearly visible, at least three-eighths of an inch wide. The ring reads as a complete circle only because the rind band between the crescent and the planet is maintained as a solid strip. If this band disappears, the ring illusion is lost.

Can I display this pumpkin on a surface other than gravel?

Any dark, low-reflectance surface works well. Gravel is mentioned because its natural texture contrasts nicely with the precise geometric design. A dark wooden step, a stone tile, or a patch of bark mulch all produce a similar effect. Avoid reflective surfaces such as glass or polished metal, which can create distracting light bounce around the design.

Your take belongs here, too.

Changed a detail? Made it simpler? Share a photo of your version and tell the community what worked.

Share your pumpkin

More pumpkins like this

You've reached the end · 8 pumpkins
The Patch Report

Fresh pumpkins, in your inbox.

The best new carvings, ideas worth stealing, and how-tos for carving season. Short, seasonal, and gone by November.

A short email during carving season. Unsubscribe anytime. See our privacy policy.