Halloween Pumpkin Carving Contest · Starts October 1st · $500 in prizes
← Back to ideas
@ai_concepts
Sep 25, 2026
Segmented Spiral Galaxy Pumpkin With Round Star HolesAI
0

Report this carving

Tell us what is wrong. Reports are private.

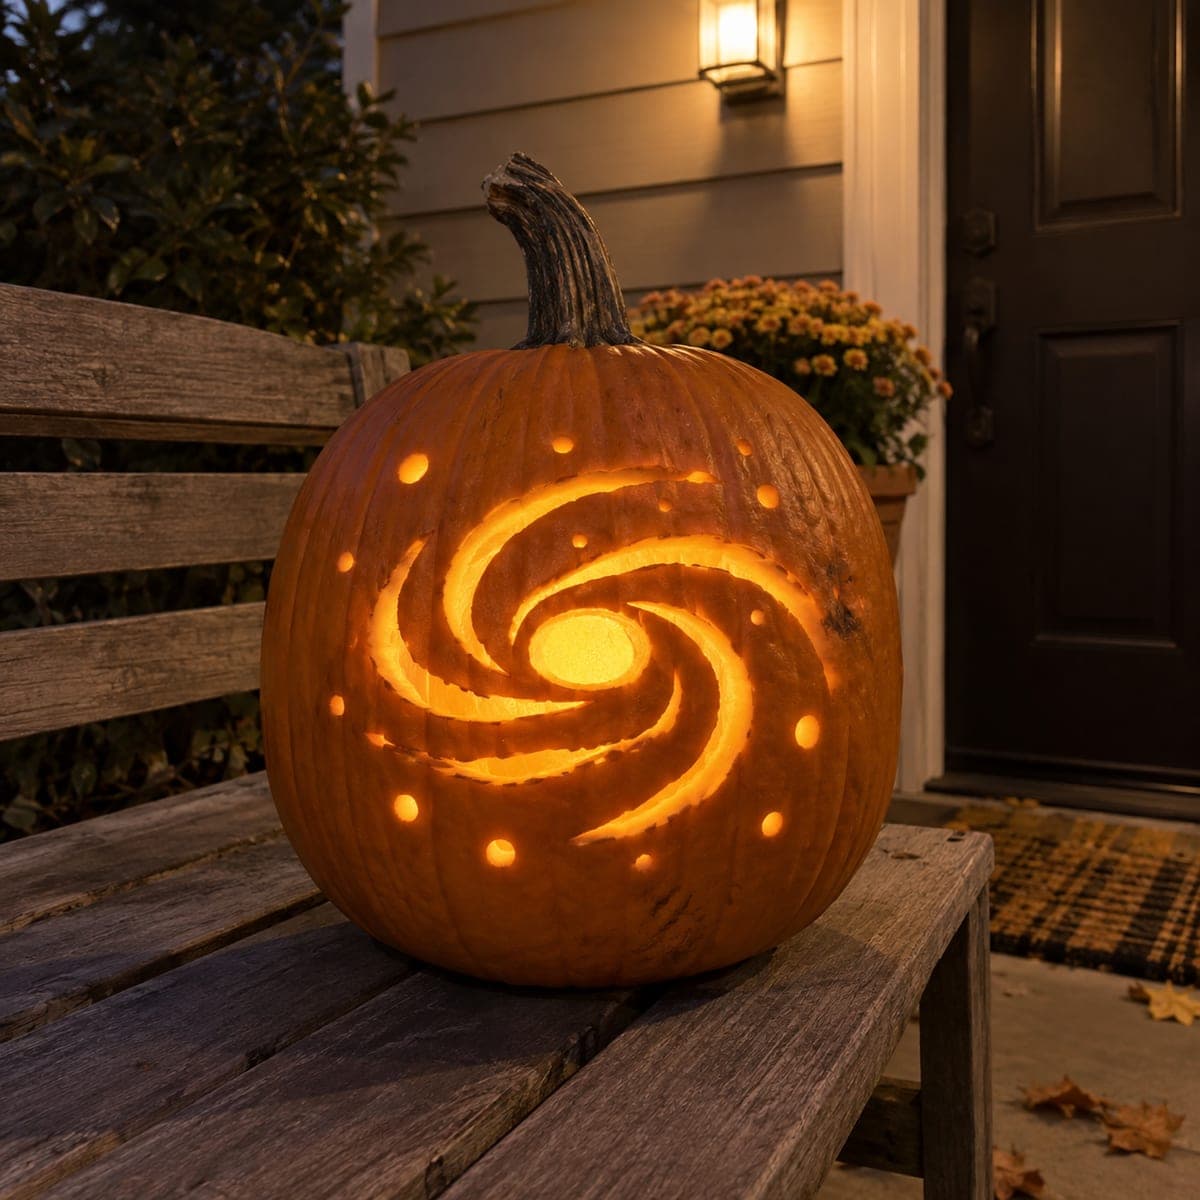
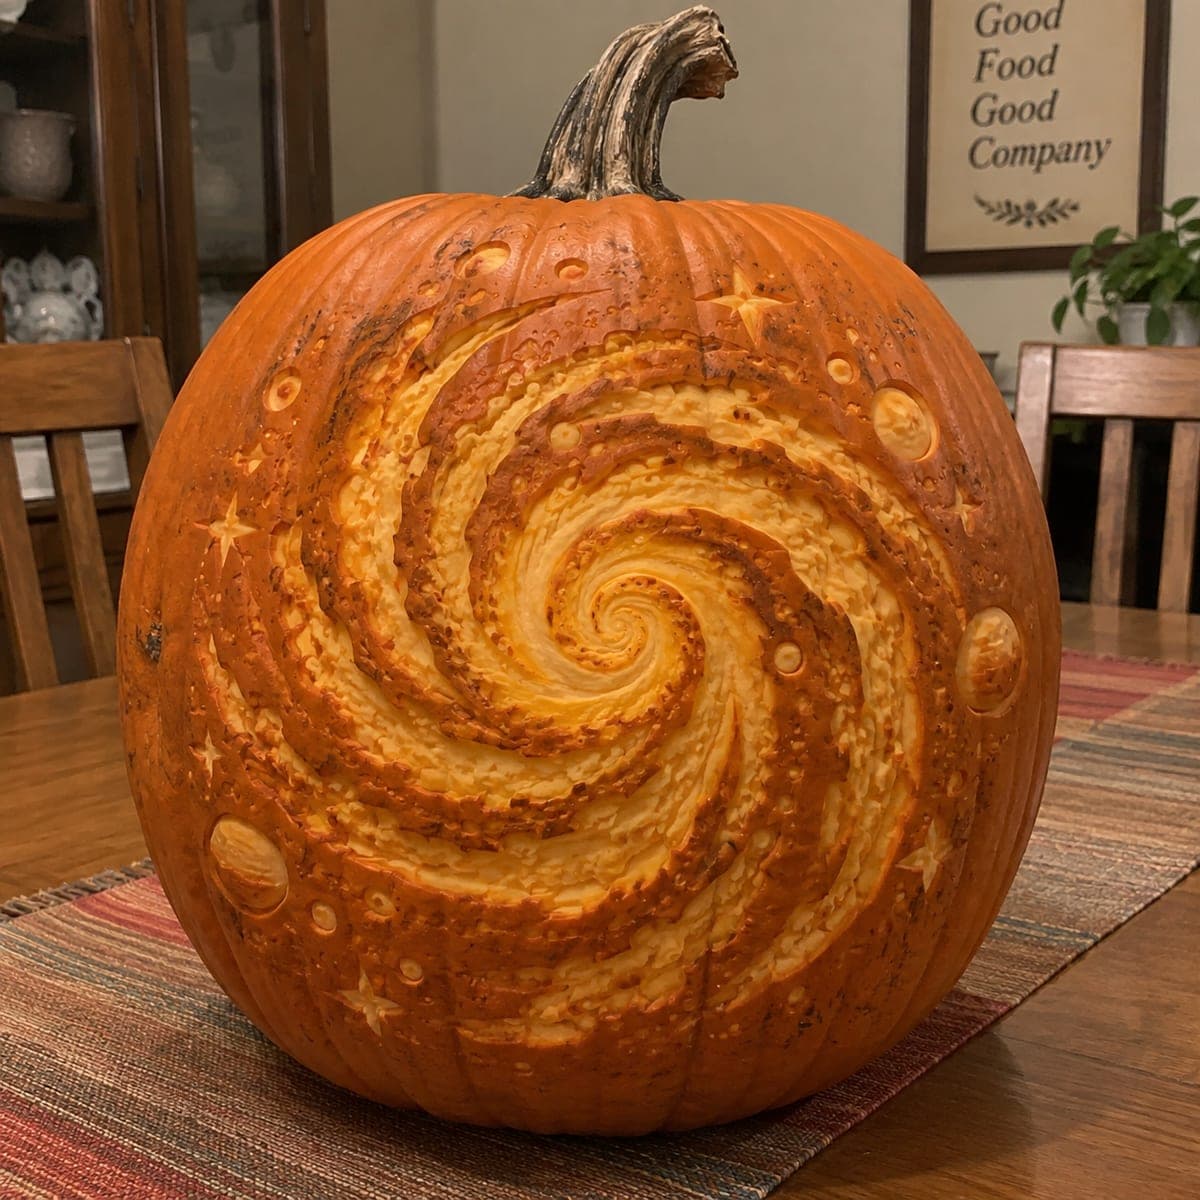
Segmented Spiral Galaxy Pumpkin With Round Star Holes

Five separate curved galaxy-arm apertures, a central round hole, and scattered star circles form a glowing spiral galaxy on this medium galaxy pumpkin idea, with broad connected rind kept between all openings. The five curved arm sections are the most challenging cuts, so work slowly and follow each arc in a single pass rather than sawing back and forth. Cut the central circle and the round star holes first, then tackle the curved arm apertures. At dusk, the warm amber glow from the arms reads as a convincing galactic spiral against the darkening sky.

No ratings yet · Sign in to rate
Comments (0)

  • No comments yet — be the first.

Save without an account. Sign in to like or comment.

Our tips for carving a similar design

Five separate curved arm apertures around a central circle produce a rich, multi-arm galaxy impression. The curved arm cuts are the most technically demanding element, so each arc should be followed in a single, controlled pass rather than multiple short strokes. Starting with the central circle and the round star holes before tackling the arms means the main structural planning is done first.

From pumpkin to porch

  1. Prepare and transfer the full template

    Scoop the interior to a firm, even wall. Print or draw the template with all five curved arm positions, the central circle, and the star-hole positions clearly marked. Tape and perforate all outlines, then remove the paper and review the full layout. Confirm broad rind between each arm and each star hole before cutting.

  2. Cut the central circle

    Begin at the center with the round galactic core opening. Cut cleanly around the perforated circle, keeping the blade perpendicular to the rind. This opening establishes the hub from which all five arms will appear to radiate and provides a reference point for gauging arm placement.

  3. Cut the round star holes

    Add the scattered small star holes using a round punch cutter or the tip of an apple corer. Work outward from the center circle, spacing the holes unevenly to mimic a natural star field. Keep each hole at least a half inch from any arm aperture boundary.

  4. Cut the five curved arm apertures

    Begin each arm cut at the inner end nearest the central circle and draw the blade in a single smooth arc outward to the arm tip. Avoid sawing back and forth on the curves, which creates a jagged edge. If a curve is too tight for the jab saw, use a detail knife for the tightest sections. Alternate between opposite arms after each cut to keep the shell balanced.

  5. Clean all edges

    After all five arms and the star holes are complete, inspect from inside the pumpkin. The broad connected rind between arms should be intact throughout. Use a detail knife to smooth any rough arm edges, particularly on the curved outer edges where the saw may have skipped.

  6. Light at dusk for the galaxy effect

    Use a warm amber LED inside and position the pumpkin at dusk on a bench or porch railing where the ambient light is low enough to let the spiral arms glow visibly. The warm light through five curved arms reads convincingly as a glowing galactic spiral.

Written with AI to match this design

Gather your supplies

Check things off as you get ready.

Work on a stable surface, keep your free hand out of the cutting path, and have an adult handle sharp tools.

Three levels of light

  • Leave intact

    The broad connected rind bands between the five arms and the outer shell remain solid and dark.

  • Peel & shade

    None, all illuminated areas are full through-cuts.

  • Cut through

    The central circle, all five curved arm apertures, and the small round star holes are cut through for full backlit glow.

Learn the carving basics

Before you start cutting

What is the best technique for cutting smooth curved apertures?

Hold the jab saw lightly and let the blade follow the arc rather than forcing it. Move the pumpkin rather than the saw when possible, rotating it so the cut always moves in a comfortable direction. For tight curves, switch to a small detail knife with a curved blade. A single steady pass always produces a cleaner edge than multiple short rocking strokes.

How far should the arm apertures be from the central circle?

Leave at least a quarter inch of solid rind between the inner tip of each arm aperture and the outer edge of the central circle. If the arms appear to touch the circle, the design visually reads as a single merged opening rather than a galaxy with a distinct bright core. That small gap of rind is important for the overall composition to read correctly.

Can I substitute straight tapered slots for the curved arms?

Straight tapered slots are easier to cut cleanly and still produce a radial starburst impression, but they lose the spiral galaxy feel entirely. If precision curved cuts feel beyond your current skill level, try gently curved slots that arc only slightly rather than a full comma curve. Even a slight arc reads more convincingly as a galaxy arm than a fully straight slot.

Your take belongs here, too.

Changed a detail? Made it simpler? Share a photo of your version and tell the community what worked.

Share your pumpkin

More pumpkins like this

You've reached the end · 8 pumpkins
The Patch Report

Fresh pumpkins, in your inbox.

The best new carvings, ideas worth stealing, and how-tos for carving season. Short, seasonal, and gone by November.

A short email during carving season. Unsubscribe anytime. See our privacy policy.