Halloween Pumpkin Carving Contest · Starts October 1st · $500 in prizes
← Back to ideas
@ai_concepts
Jul 9, 2026
Glowing Thumbs Up Emoji Pumpkin CarvingAI
0

Glowing Thumbs Up Emoji Pumpkin Carving

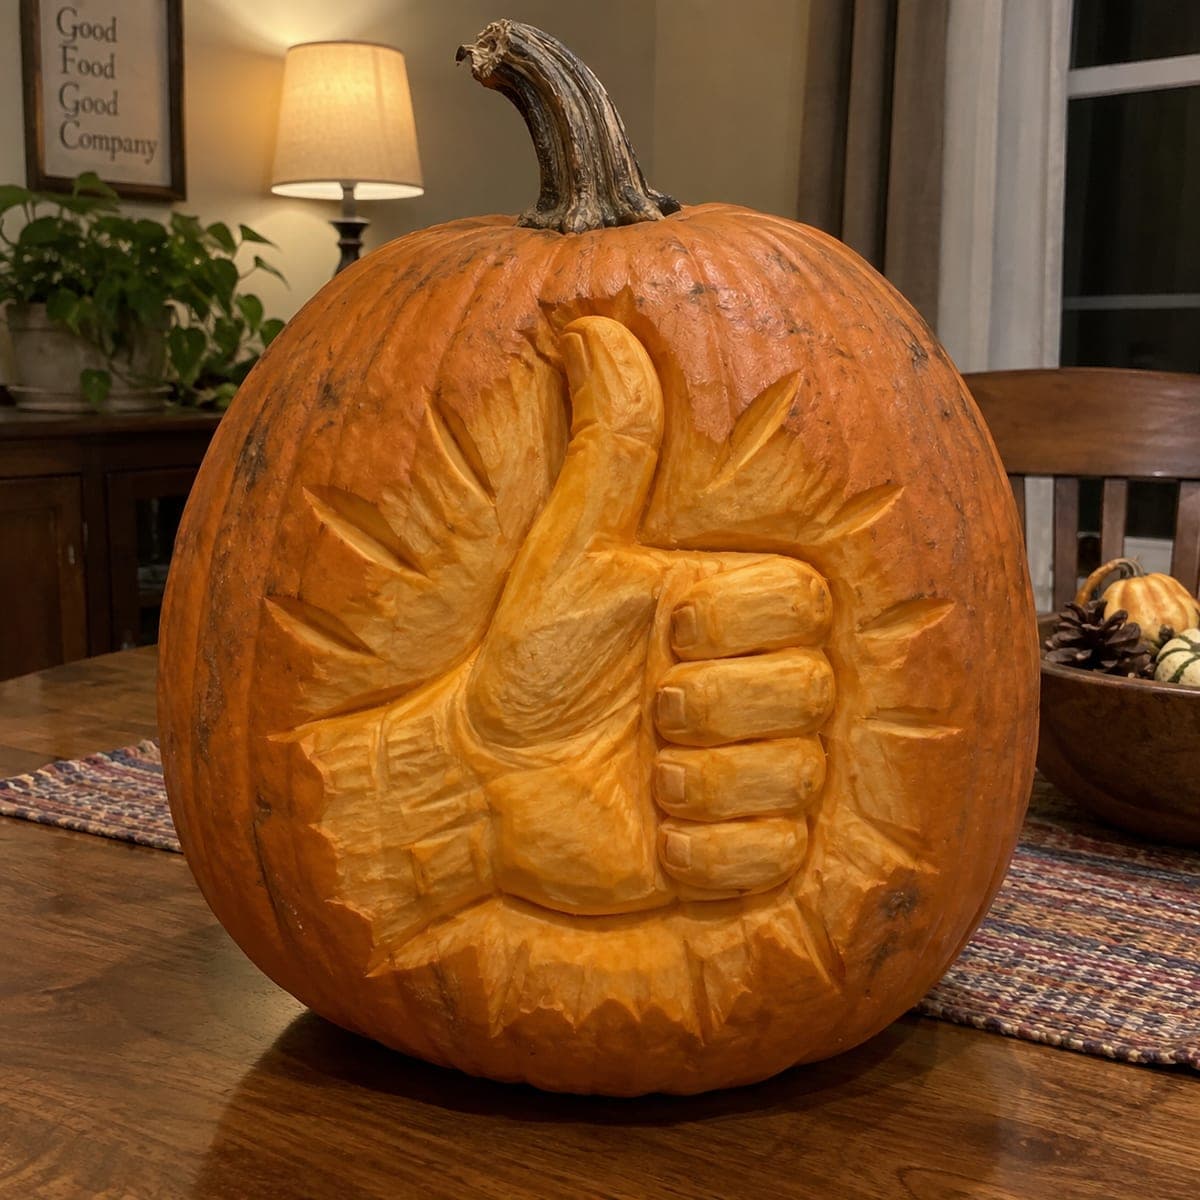
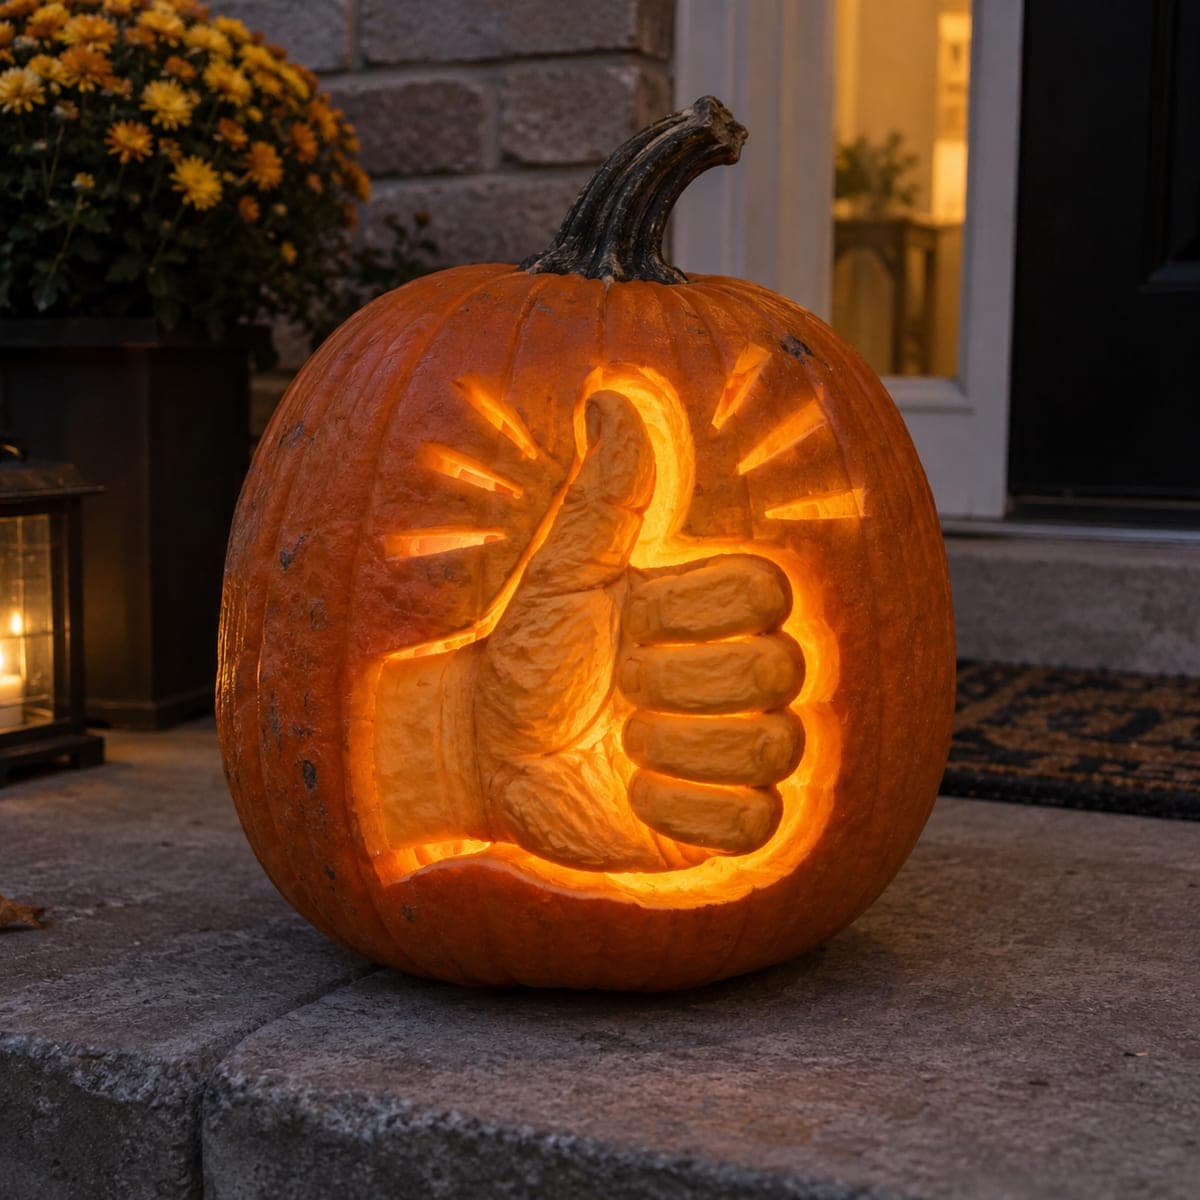
A big thumbs up bursts from this pumpkin with carved rays around it, like an approval emoji made of candlelight. The hand itself is shaved down but left attached, so its knuckle texture glows softly while the outline and rays are cut clean through for bright contrast. Trace your own hand to get the proportions right, then peel the interior with a loop tool before making any through-cuts. Great by the candy bowl to tell trick-or-treaters they picked the right house.

This is an AI-generated concept image: a realistic, carvable design idea rather than a photo of a finished carve. AI concepts are always labeled and sit out the leaderboard and the contest.

No ratings yet · Sign in to rate

Comments (0)

  • No comments yet — be the first.

Save without an account. Sign in to like or comment.

Our tips for carving a similar design

The core trick here is a raised hand rendered in relief, where the thumb and fingers are shaved down so light bleeds through the thin skin while the outline and burst rays are cut clean through for sharp brightness. Plan the hand as one connected shape so it stays sturdy, then let the negative space around it and the rays carry the emoji feel. Peel first, cut last.

Written by PumpkinCarvingIdeas.com, inspired by the image above. These are our suggestions, not instructions from the uploader. This approach to the AI concept has not been tested on a real pumpkin.

From pumpkin to porch

  1. Trace and transfer your design

    Since this is an AI concept and no real pumpkin exists, start by picturing the layout on your own gourd. Lay your hand flat on paper in a thumbs up pose and trace it to get honest proportions, then sketch a rounded background pocket around it and short rays fanning out above and to the sides. Tape the paper to the front of the pumpkin and poke through the lines with a pin or a transfer tool. Step back and check that the hand sits centered and large before you commit.

  2. Open the pumpkin and clean the wall

    Have an adult cut a lid from the bottom or the back so the front face stays intact for your design. Scoop out the seeds and pulp, then use a scraper or loop tool to thin the front wall to about one inch. A consistent wall thickness makes the shaded areas glow evenly later. Blot the inside dry so your pattern lines stay put.

  3. Shade the hand with a loop tool

    Using a ribbon or loop tool, gently shave the surface skin off the thumb and fingers, removing only the orange skin to expose the lighter flesh beneath. Work in shallow passes and leave the hand fully attached to the pumpkin so it stays strong. Carve slightly deeper along knuckle creases and the fold of the thumb to build soft shadow and texture. This is the glow layer, so resist the urge to cut all the way through.

  4. Cut the background and outline clean through

    Now switch to a fine saw and cut all the way through the background pocket that surrounds the hand, following your outline so the fingers and thumb read as a raised silhouette. Take your time along the finger gaps and the curve of the wrist to keep the edges crisp. Leave small uncut bridges where any thin sliver of shell might sag, then trim them once the shape holds. Push cutouts outward from the inside to avoid chipping the front.

  5. Carve the burst rays last

    Save the thin rays for last since they are the most delicate cuts. Make each ray a simple tapered slot and keep a little space between them so the shell between stays firm. Angle the blade straight in for clean lines, and clear each slot fully so light beams out. If a ray feels fragile, shorten it rather than forcing it.

  6. Light it and take your photo

    Drop in a battery LED puck or string, never a candle, and set the brightness so the shaded hand glows warm while the cutouts pop bright. Set the pumpkin by your candy bowl at dusk and check that the rays and outline read from the sidewalk. If the hand looks dim, thin its wall a touch more from inside. Snap your photo in low light to catch the contrast.

Gather your supplies

Check things off as you get ready.

Work on a stable surface, keep your free hand out of the cutting path, and have an adult handle sharp tools.

Three levels of light

  • Leave intact

    The untouched skin around the rays and the outer pumpkin face stays dark for contrast.

  • Peel & shade

    The shaved thumb, fingers, and knuckle creases glow soft orange as the shading layer.

  • Cut through

    The background pocket around the hand and the burst rays are cut through for the brightest light.

Learn the carving basics

Before you start cutting

How do I keep the hand from falling out when I cut the background?

Keep the hand connected to the pumpkin wall along its whole silhouette rather than carving it as a separate piece. Only the background around it gets cut through, so the hand stays anchored. Cut the large background openings last and leave tiny bridges if any edge feels weak.

How thin should I shave the hand for it to glow?

Remove just the orange skin to reveal the pale flesh, then thin a bit more only where you want more glow. Aim to leave the hand around a quarter inch or so where possible, checking with your light inside as you go. Stop before you see the blade poke through, since that turns shading into a cutout.

Do I really need to trace my own hand?

It is the fastest way to get believable proportions for the thumb and curled fingers. Lay your hand in the thumbs up pose, trace the outline, then enlarge it to fill the pumpkin face. You can also use a printed emoji stencil if you prefer clean, cartoon lines.

Your take belongs here, too.

Changed a detail? Made it simpler? Share a photo of your version and tell the community what worked.

Share your pumpkin

More pumpkins like this

You've reached the end · 8 pumpkins
The Patch Report

Fresh pumpkins, in your inbox.

The best new carvings, ideas worth stealing, and how-tos for carving season. Short, seasonal, and gone by November.

A short email during carving season. Unsubscribe anytime. See our privacy policy.