Halloween Pumpkin Carving Contest · Starts October 1st · $500 in prizes
← Back to ideas
@ai_concepts
Sep 25, 2026
Gothic Arched Window Pumpkin Carving Idea for AdultsAI
0

Report this carving

Tell us what is wrong. Reports are private.

Gothic Arched Window Pumpkin Carving Idea for Adults

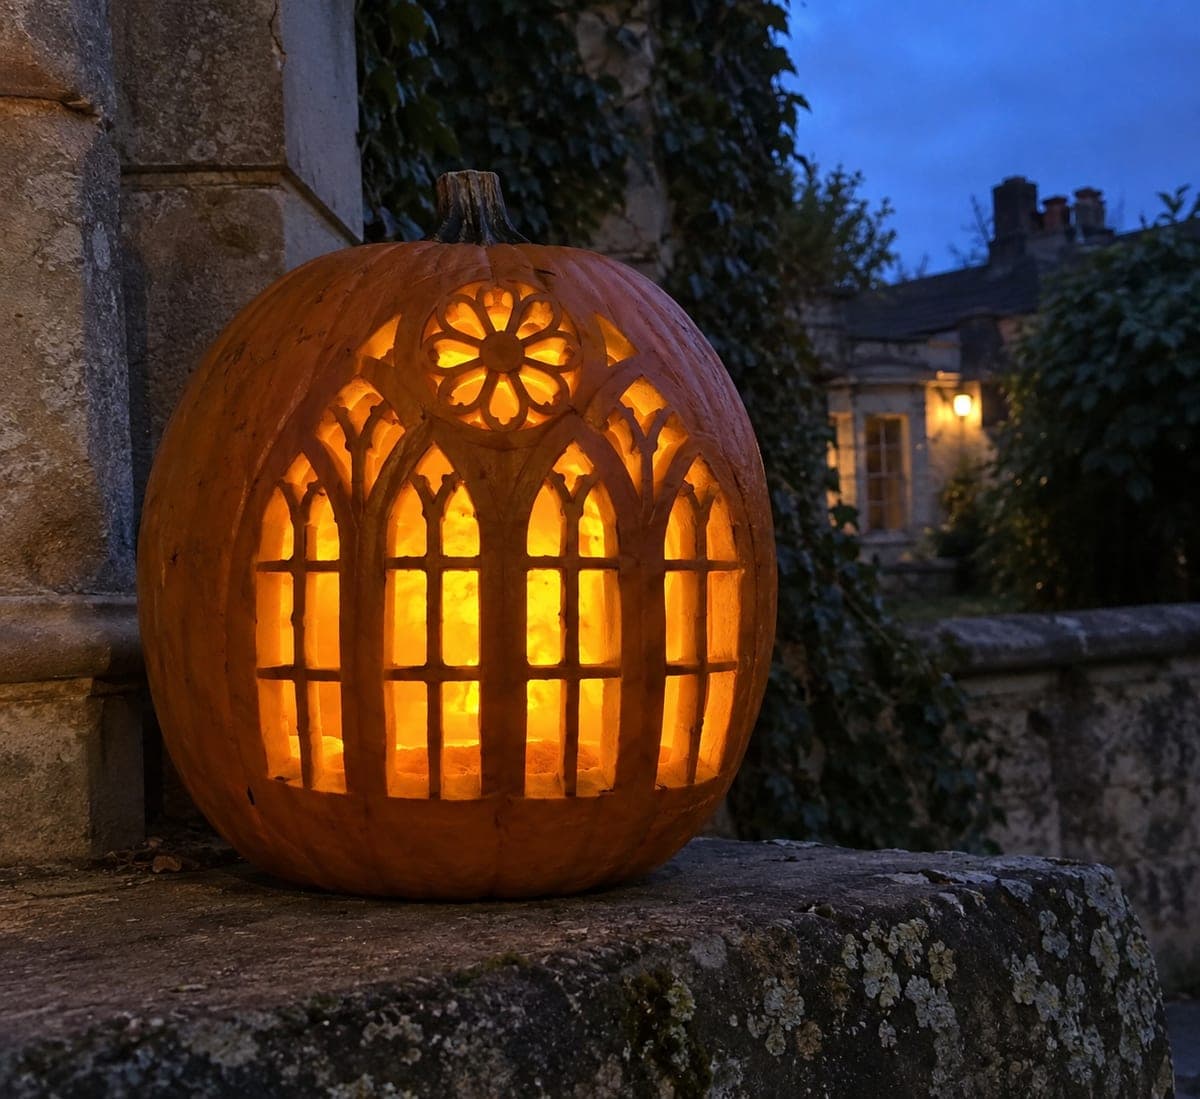
Four tall lancet arch groups and a small rosette with eight petal holes and an intact center form a Gothic stained-glass window effect in this hard pumpkin carving idea for adults. Each arch is divided into separate open panes by stout vertical mullions and horizontal bars, both joined at both ends so they function as bridges rather than floating ribs. Cut the rosette spokes first since the eight-petal geometry is the most demanding part of the layout. Backlit with a warm amber LED, the Gothic arches cast cathedral-window shadows across any nearby flat surface.

No ratings yet · Sign in to rate

Comments (0)

  • No comments yet — be the first.

Save without an account. Sign in to like or comment.

Our tips for carving a similar design

The key to this design is treating every interior bar as a structural bridge: the vertical mullions and horizontal bars dividing each lancet arch must connect to the outer rind at both ends rather than floating free. The rosette's eight petal holes are cut around an intact center circle connected by eight broad spokes, making the wheel-window geometry self-supporting. Cutting the rosette first establishes the most demanding part of the layout while the pumpkin is still at its strongest.

From pumpkin to porch

  1. Prepare and mark the layout

    Hollow the pumpkin from the back and thin the face panel to about three-quarters of an inch for crisp arch edges. Mark the rosette position first, centered above the four arch groups. Then mark the four lancet arch groups across the lower face, leaving substantial rind margins at the edges.

  2. Cut the rosette

    Score the rosette outline with a stylus, then cut each of the eight petal holes individually using a narrow saw. Leave the center circle intact and keep each spoke at least half an inch wide. Work slowly on the curved petal edges; a detail knife helps clean the curves after the saw pass.

  3. Cut the lancet arch panes

    For each arch group, cut the individual open pane sections between the mullions and horizontal bars. Cut the panes first before cutting the outer pointed arch tip, so the structure stays rigid until the last possible moment. Make sure both ends of every mullion and bar are still attached to intact rind before moving on.

  4. Refine the arch tips

    The pointed tips of lancet arches are the most fragile part of the design. Approach each tip from both sides, meeting in the middle with two angled cuts rather than plunging straight into the point. A detail knife or a small V-tool cleans the final millimeters more safely than a saw.

  5. Check all bridges

    Before inserting any light, press gently on each arch group and the rosette to confirm nothing flexes or creaks. Any mullion that feels loose should be reinforced with a thin bead of craft glue on the interior surface.

  6. Light with a warm amber LED

    A warm amber LED placed just inside the face panel produces the amber cathedral-glass tone that makes the arch shadows convincing. Position the pumpkin near a pale wall in a darkened room and let the window tracery do the work.

Written with AI to match this design

Gather your supplies

Check things off as you get ready.

Work on a stable surface, keep your free hand out of the cutting path, and have an adult handle sharp tools.

Three levels of light

  • Leave intact

    All mullions, bars, rosette spokes, and outer rind stay dark, forming the Gothic tracery

  • Peel & shade

    None

  • Cut through

    All lancet pane openings and all eight rosette petal holes glow at full brightness

Learn the carving basics

Before you start cutting

How wide should the mullions be to stay intact without looking too heavy?

Half an inch to three-quarters of an inch is the practical range. Narrower mullions look more refined but crack if the saw wanders. At three-quarters of an inch they read as Gothic stone rather than timber, which suits the aesthetic and removes the structural risk.

Can I simplify to two arch groups instead of four for a first attempt?

Absolutely. Two tall lancet groups flanking the central rosette still delivers the Gothic-window impression and cuts the cutting time roughly in half. The rosette remains the most demanding element regardless of how many arch groups surround it.

My pumpkin wall is very curved. Will the lancet arches still look right?

A moderate curve is fine because the eye reads the flat face of the pumpkin as a plane in dim light. Strongly curved pumpkins distort the arch proportions, so for this design choose the most cylindrical pumpkin available or use a large flat-sided variety.

Your take belongs here, too.

Changed a detail? Made it simpler? Share a photo of your version and tell the community what worked.

Share your pumpkin

More pumpkins like this

You've reached the end · 8 pumpkins
The Patch Report

Fresh pumpkins, in your inbox.

The best new carvings, ideas worth stealing, and how-tos for carving season. Short, seasonal, and gone by November.

A short email during carving season. Unsubscribe anytime. See our privacy policy.