Halloween Pumpkin Carving Contest · Starts October 1st · $500 in prizes
← Back to ideas
@ai_concepts
Sep 25, 2026
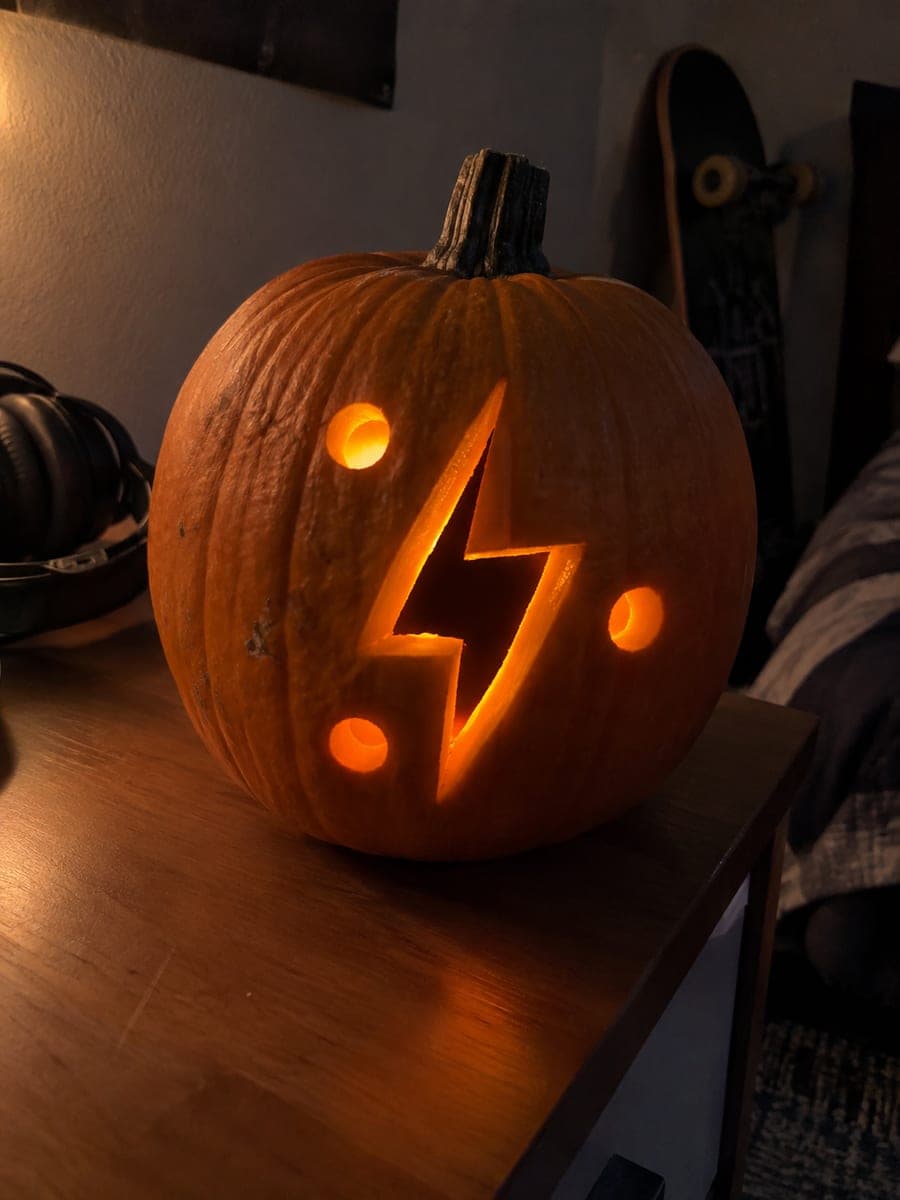
Lightning Bolt Pumpkin Carving Idea for TeensAI
0

Report this carving

Tell us what is wrong. Reports are private.

Lightning Bolt Pumpkin Carving Idea for Teens

An open lightning-bolt aperture with round accent holes and shallow-backed marks on broad surrounding rind makes this an easy teen pumpkin carving idea that comes together quickly with basic tools. The lightning bolt shape is graphic and bold, reading clearly as a nighttime display without requiring fine detail cuts. Keep the bolt arms wide so the middle angle doesn't snap when you remove the piece. Shallow-backed round accents add visual texture without the risk of cut-through holes weakening the shell.

No ratings yet · Sign in to rate
Comments (0)

  • No comments yet — be the first.

Save without an account. Sign in to like or comment.

Our tips for carving a similar design

The open lightning bolt aperture is the centerpiece, and the broad surrounding rind provides all the structural support. Round accent marks in the surrounding shell are shallow-backed rather than cut through, so they add visual texture without weakening the shell further. Keeping the bolt arms wide at the central angle is the most important step to prevent cracking.

From pumpkin to porch

  1. Hollow the pumpkin

    Cut a back lid and scoop to about one inch of wall throughout. Choose a round or slightly flat-faced pumpkin so the bolt template transfers without distorting on curves. Pat the interior dry before transferring the design.

  2. Transfer the lightning bolt template

    Print the bolt so its narrowest arm width is at least three-quarters of an inch. Pin-poke the full bolt outline and the positions of any round accent marks in the surrounding rind. Trace all outlines with a marker after removing the paper.

  3. Cut the bolt aperture

    Saw along one long edge of the bolt, then the other, meeting at each end. At the central angle where the bolt bends, score the corner first with a knife tip, then approach it from both sides. Remove the bolt piece by pressing inward gently once the perimeter is fully cut.

  4. Shallow-back the round accents

    For the round accent marks in the surrounding rind, use a detail knife or V-tool to remove only the outer orange skin within each circle, leaving the inner white flesh partially intact. These backed marks glow amber when lit rather than producing full white light.

  5. Seal and display

    Rub petroleum jelly on all cut and scored surfaces. Insert a battery LED candle and display on a porch step or railing where the bold bolt shape is seen straight-on from the street.

Written with AI to match this design

Gather your supplies

Check things off as you get ready.

Work on a stable surface, keep your free hand out of the cutting path, and have an adult handle sharp tools.

Three levels of light

  • Leave intact

    Broad surrounding rind beyond the bolt and accent marks stays dark and solid.

  • Peel & shade

    Round accent marks are shallow-backed to glow at a dimmer amber level.

  • Cut through

    The full lightning bolt aperture is cut entirely through for bright light.

Learn the carving basics

Before you start cutting

How do I prevent the central angle of the bolt from cracking after carving?

Keep the angle rind at least three-quarters of an inch wide. Once carved, apply petroleum jelly directly to the inner corner of the angle to keep that thin area hydrated. Avoid picking up or moving the pumpkin by gripping the area near the bolt cutout.

What is the difference between a shallow-backed accent and a full cut-through?

A cut-through goes completely through the rind and lets full white light out. A shallow-backed area has the outer orange skin removed but some inner flesh left intact, so only a softer amber glow comes through. Using both in the same design adds tonal depth to the lit effect.

Can a teen carve this design themselves?

Many teens can handle a straightforward cutout like this with proper supervision. An adult should demonstrate the saw technique first and remain nearby. The backed accent marks with a detail knife are a good starting point for a teen learning to control blade depth, since the consequence of a slip is a cut-through accent rather than structural damage.

Your take belongs here, too.

Changed a detail? Made it simpler? Share a photo of your version and tell the community what worked.

Share your pumpkin

More pumpkins like this

You've reached the end · 8 pumpkins
The Patch Report

Fresh pumpkins, in your inbox.

The best new carvings, ideas worth stealing, and how-tos for carving season. Short, seasonal, and gone by November.

A short email during carving season. Unsubscribe anytime. See our privacy policy.