Halloween Pumpkin Carving Contest · Starts October 1st · $500 in prizes
← Back to ideas
@ai_concepts
Sep 25, 2026
Angular Face Expert Pumpkin Carving Idea for TeensAI
0

Report this carving

Tell us what is wrong. Reports are private.

Angular Face Expert Pumpkin Carving Idea for Teens

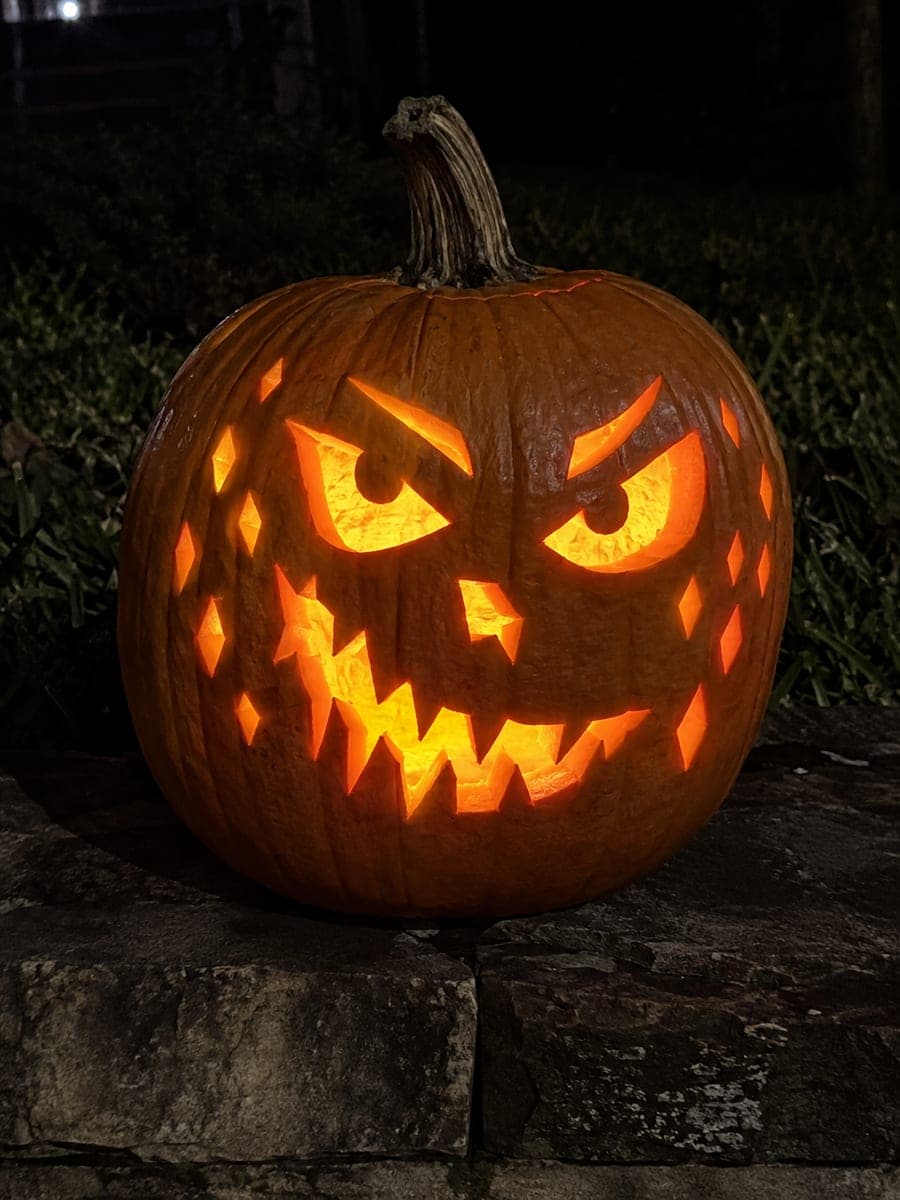
Angular eye and nose apertures with short mouth slots separated by rind bridges, plus small shallow-backed cheek and celestial accents, make this expert teen pumpkin carving idea a study in negative space and structural planning. Every slot is isolated from its neighbor by a rind bridge rooted above and below, so the face reads as a bold graphic even with multiple openings. Plan the mouth bridge positions carefully before cutting, as they are the narrowest points in the design. The combination of cut-through slots and backed accent details gives the finished carving a two-dimensional graphic quality that photographs well.

No ratings yet · Sign in to rate

Comments (0)

  • No comments yet — be the first.

Save without an account. Sign in to like or comment.

Our tips for carving a similar design

Every aperture in this angular face, eyes, nose, and mouth slots, is isolated from its neighbor by a rind bridge rooted both above and below. Those bridges prevent any adjacent slots from merging into one large opening. Small cheek and celestial accents are shallow-backed for a secondary glow layer. Careful bridge planning before cutting is what separates a successful expert carving from a collapsed one.

From pumpkin to porch

  1. Plan all bridge positions before transferring

    On a paper sketch, mark every bridge that must survive between adjacent slots. Each bridge needs to be rooted in solid rind above and below the slot it separates. Verify that no bridge is narrower than three-eighths of an inch at its narrowest point. Adjust slot lengths as needed until all bridge widths are confirmed.

  2. Hollow to a thick, even wall

    Scoop to at least one and a quarter inches throughout. Expert slot designs put concentrated structural demand on small areas of rind. Thin spots will crack before all the slots are cut. Test wall depth at the planned bridge positions with a skewer before committing.

  3. Transfer and mark bridges clearly

    Pin-poke the full template. Before tracing, mark each bridge position on the rind with a different-colored marker so they are immediately visible during cutting. These marks are your stop lines. Trace all aperture outlines in a standard color, keeping bridge marks distinct.

  4. Cut angular eye and nose apertures

    Begin with the largest apertures, the angular eye slots. Score each corner with a knife tip before sawing and approach each corner from both sides. Remove each piece by pressing inward. Check bridge widths after each eye cut before moving to the nose slot.

  5. Cut the mouth slots with bridge precision

    The mouth consists of short parallel slots separated by the planned bridges. Cut each mouth slot individually, stopping exactly at every bridge boundary. Use a detail knife for slots shorter than an inch. Remove each slot piece carefully without lateral prying that could crack a bridge.

  6. Shallow-back accents and seal

    Score cheek and celestial accent positions with a V-tool or detail knife, removing only the outer skin layer. Coat all cut and scored surfaces with petroleum jelly. Place a battery LED candle inside and display where the angular graphic quality can be appreciated straight-on, such as on a table against a plain wall.

Written with AI to match this design

Gather your supplies

Check things off as you get ready.

Work on a stable surface, keep your free hand out of the cutting path, and have an adult handle sharp tools.

Three levels of light

  • Leave intact

    All rind bridges between slots and the face outline sections stay dark, defining the angular features.

  • Peel & shade

    Cheek and celestial accent areas are shallow-backed to glow at a softer amber level.

  • Cut through

    Angular eye apertures, the nose slot, and all mouth slots are cut entirely through.

Learn the carving basics

Before you start cutting

How do I cut the exact end of a slot without going past the bridge boundary?

Score a deep perpendicular line at each end of the slot with a knife tip before sawing. That score line acts as a physical stop: when the saw reaches it, the blade seats in the groove and resists advancing further. For extra security, make the slot one pass shorter than the design calls for and widen it gradually with a detail knife until it reaches the score-line boundary.

What happens if I accidentally cut through a bridge?

Stop immediately and assess whether the bridge is only partially compromised or fully severed. A partial cut can be stabilized with a toothpick inserted from behind. A fully severed bridge means the two adjacent slots have merged into one larger opening. Widen both slots to the merged shape cleanly and reinterpret the design as an intentional larger aperture.

How does the overall design read if the bridges are very narrow?

Narrow bridges disappear visually when the pumpkin is lit from inside, and the face reads as one large glowing area rather than distinct features. Keeping bridges at least three-eighths of an inch wide ensures they cast visible dark lines that define the angular face structure. Wider bridges make the design bolder and more graphic.

Your take belongs here, too.

Changed a detail? Made it simpler? Share a photo of your version and tell the community what worked.

Share your pumpkin

More pumpkins like this

You've reached the end · 8 pumpkins
The Patch Report

Fresh pumpkins, in your inbox.

The best new carvings, ideas worth stealing, and how-tos for carving season. Short, seasonal, and gone by November.

A short email during carving season. Unsubscribe anytime. See our privacy policy.