Halloween Pumpkin Carving Contest · Starts October 1st · $500 in prizes
← Back to ideas
@ai_concepts
Sep 25, 2026
Pixel Grid Pumpkin Carving Idea for TeensAI
0

Report this carving

Tell us what is wrong. Reports are private.

Pixel Grid Pumpkin Carving Idea for Teens

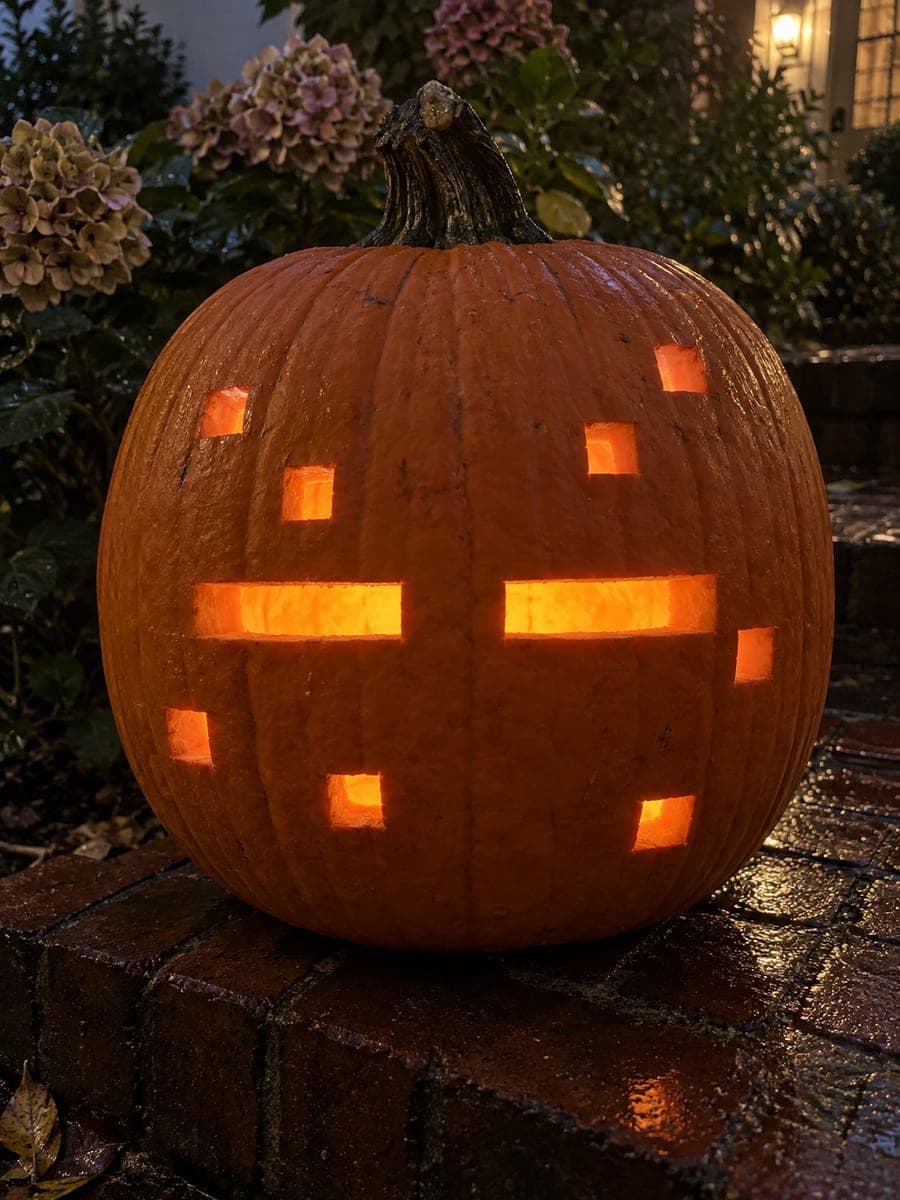
Separate square and rectangular apertures forming a pixel-art motif glow through a pumpkin on this intermediate teen pumpkin carving idea, with a thick connected rind grid keeping the pattern structurally sound even as large amounts of shell are removed. The retro-pixel style is instantly recognizable to game-loving teenagers and makes a conversation piece at any Halloween gathering. Map the pixel grid on graph paper first and transfer it to the pumpkin with a pin-poke tool to keep row and column spacing even. Carve the largest rectangles first, then work down to the smaller square details.

No ratings yet · Sign in to rate

Comments (0)

  • No comments yet — be the first.

Save without an account. Sign in to like or comment.

Our tips for carving a similar design

The pixel grid relies on a thick connected rind grid separating every square and rectangular aperture from its neighbors. Pre-planning the grid on graph paper before transferring it ensures consistent spacing and protects the rind ribs from becoming too narrow. Carving the larger rectangles first and working down to smaller squares follows the logical build order for a grid-pattern design.

From pumpkin to porch

  1. Plan the grid on graph paper

    Sketch the pixel motif on graph paper, assigning each grid square as either a cut-through opening or a retained rind rib. Confirm all ribs between adjacent openings are at least half an inch wide. Print or transfer the grid to a full-size template before touching the pumpkin.

  2. Hollow the pumpkin

    Scoop to a uniform wall of one inch or slightly more. Grid patterns remove a large percentage of total rind area, so consistent wall thickness is important to prevent uneven weakening. Pat the interior dry.

  3. Transfer the pixel grid

    Tape the graph-paper template to the pumpkin face and pin-poke every corner point of every aperture. Remove the paper and connect the dots with a ruler-guided marker to reconstruct the grid lines on the rind. Mark retained rib areas with an X so you know not to cut them.

  4. Cut the largest rectangles first

    Saw each large rectangular aperture as four straight cuts. Score each corner with a knife tip before sawing so each right angle is clean. Remove each rectangle piece by pressing inward. Work across the grid row by row to track progress.

  5. Cut the smaller square apertures

    Switch to a detail knife for any aperture smaller than three-quarters of an inch. For each small square, score all four sides first, then deepen the cuts progressively until the piece releases. Check rib widths after each small cut to ensure nothing has been compromised.

  6. Seal and display

    Rub petroleum jelly on all cut surfaces, paying close attention to the thin rib edges. Insert a battery LED candle and display on a table or shelf at eye level where the full pixel motif is visible. Dim overhead lights nearby to maximize the glowing grid effect.

Written with AI to match this design

Gather your supplies

Check things off as you get ready.

Work on a stable surface, keep your free hand out of the cutting path, and have an adult handle sharp tools.

Three levels of light

  • Leave intact

    The connected rind grid stays dark, defining the pixel motif as a pattern of solid squares and lines.

  • Peel & shade

    None.

  • Cut through

    All square and rectangular apertures forming the pixel art design are cut entirely through.

Learn the carving basics

Before you start cutting

What pixel art motif works best for a pumpkin?

Simple iconic shapes work better than complex scenes because fine detail is lost in rind thickness. Classic choices include a skull, a heart, a ghost, or a basic game character. Stick to designs that are clearly readable in silhouette at a scale of about 30 to 40 grid squares across the face.

How do I keep the rind grid ribs from cracking between closely spaced apertures?

Keep ribs at least half an inch wide and cut adjacent apertures in a checkerboard order rather than sequentially. Cutting two neighboring apertures back to back leaves only one thin rib between two open spaces with no structural support. Alternating cuts distributes stress more evenly.

Can I add color to the grid by using a colored LED?

Yes. A colored battery LED candle in orange, green, or purple changes the tone of all the grid openings at once. For more control, tape colored cellophane over specific aperture groups from inside the pumpkin before placing the light to create a multicolor pixel effect.

Your take belongs here, too.

Changed a detail? Made it simpler? Share a photo of your version and tell the community what worked.

Share your pumpkin

More pumpkins like this

You've reached the end · 8 pumpkins
The Patch Report

Fresh pumpkins, in your inbox.

The best new carvings, ideas worth stealing, and how-tos for carving season. Short, seasonal, and gone by November.

A short email during carving season. Unsubscribe anytime. See our privacy policy.