@stemandseed
Sep 7, 2026
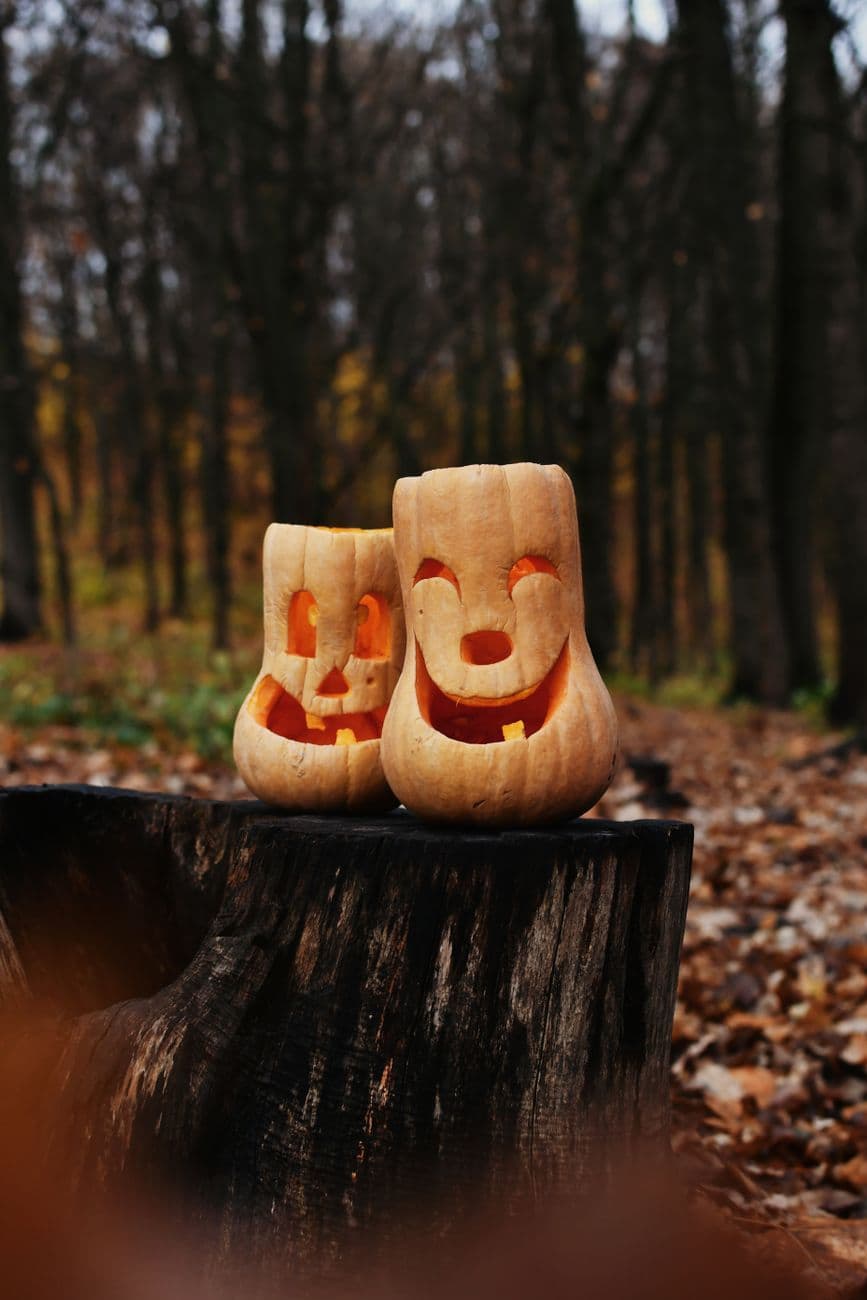
The whole charm here is a friendly cartoon face made from a few clean cutouts on a tall, slightly lumpy pumpkin. You cut simple curved eyes, a small nose, and one big open smile, then let the light pour out the mouth. Because every shape is separate and rounded, there is no fussy detail to snap, which makes this a relaxed carve you can finish in an afternoon.
Written by PumpkinCarvingIdeas.com, inspired by @stemandseed's photo above. These are our suggestions, not instructions from the uploader, and this approach hasn't been tested on their exact carve.
Look for a pumpkin with an upright, gourd-like shape and a smooth front panel for the face. Wipe it down and set it on a stable surface at a comfortable height. A slightly tall shape gives the face room to sit high, like the pair in the photo. Two matching pumpkins side by side make a fun set if you want company.
An adult should cut a hole to clean out the pumpkin. You can take off the top lid or cut a round door in the back so the front stays smooth. Cut the opening at an angle so the piece rests back in place without falling through. This is also where your LED light will go later.
Scrape out the seeds and pulp with a sturdy spoon or scoop. Thin the front wall where the face will be to about one inch so your tools glide through cleanly. A thinner wall also lets more light show at the cut edges. Save a handful of seeds for roasting if you like.
Sketch two curved eyes, a small oval nose, and one wide smiling mouth with a marker or a poke-through pattern. Keep the eyes as gentle arcs and give the smile soft rounded corners for that cheerful look. Leave a little space between each shape so the pumpkin wall stays strong. Step back and check the spacing before you cut.
An adult should start with the eyes and nose using a small serrated carving saw, then finish with the large smile. Cutting the big mouth last keeps the face rigid while you work the smaller pieces. Push the cutouts out gently from the inside. Trim any ragged edges so the shapes read clean and smooth.
Drop in a battery LED light and place the lid or back door in position. Set the pumpkin on a stump, step, or table as dusk falls for that cozy glow. Take your photo slightly off to the side so the light in the mouth reads warm. Skip real candles so the thin wall stays safe.
Check things off as you get ready.
Work on a stable surface, keep your free hand out of the cutting path, and have an adult handle sharp tools.
The whole outer skin of the pumpkin stays natural and dark, keeping that pale gourd surface.
Optional: lightly shave the skin around the eyes or smile for a soft halo if you want extra glow.
The eyes, nose, and wide open smile are cut clean through, so the LED shines brightest right out of the face.
Cut the eyes and nose first while the face is still solid, then cut the smile last. Keep a small band of pumpkin wall between the mouth and the bottom rim so the front does not sag. If the pumpkin feels soft, leave the smile a touch smaller than your sketch.
Either works, but two happy faces side by side make a charming little family like the photo. If you carve a pair, give each one a slightly different grin or eye shape so they feel like individuals. Matching heights and shapes help them read as a set.
A battery LED tea light or puck is best, especially outside where wind would blow out a flame. LEDs stay cool against the thin front wall and last for hours. Choose a warm white or flickering amber bulb for that cozy campfire glow.
Changed a detail? Made it simpler? Share a photo of your version and tell the community what worked.
The best new carvings, ideas worth stealing, and how-tos for carving season. Short, seasonal, and gone by November.







Comments (0)