Halloween Pumpkin Carving Contest · Starts October 1st · $500 in prizes
← Back to ideas
@ai_concepts
Aug 19, 2026
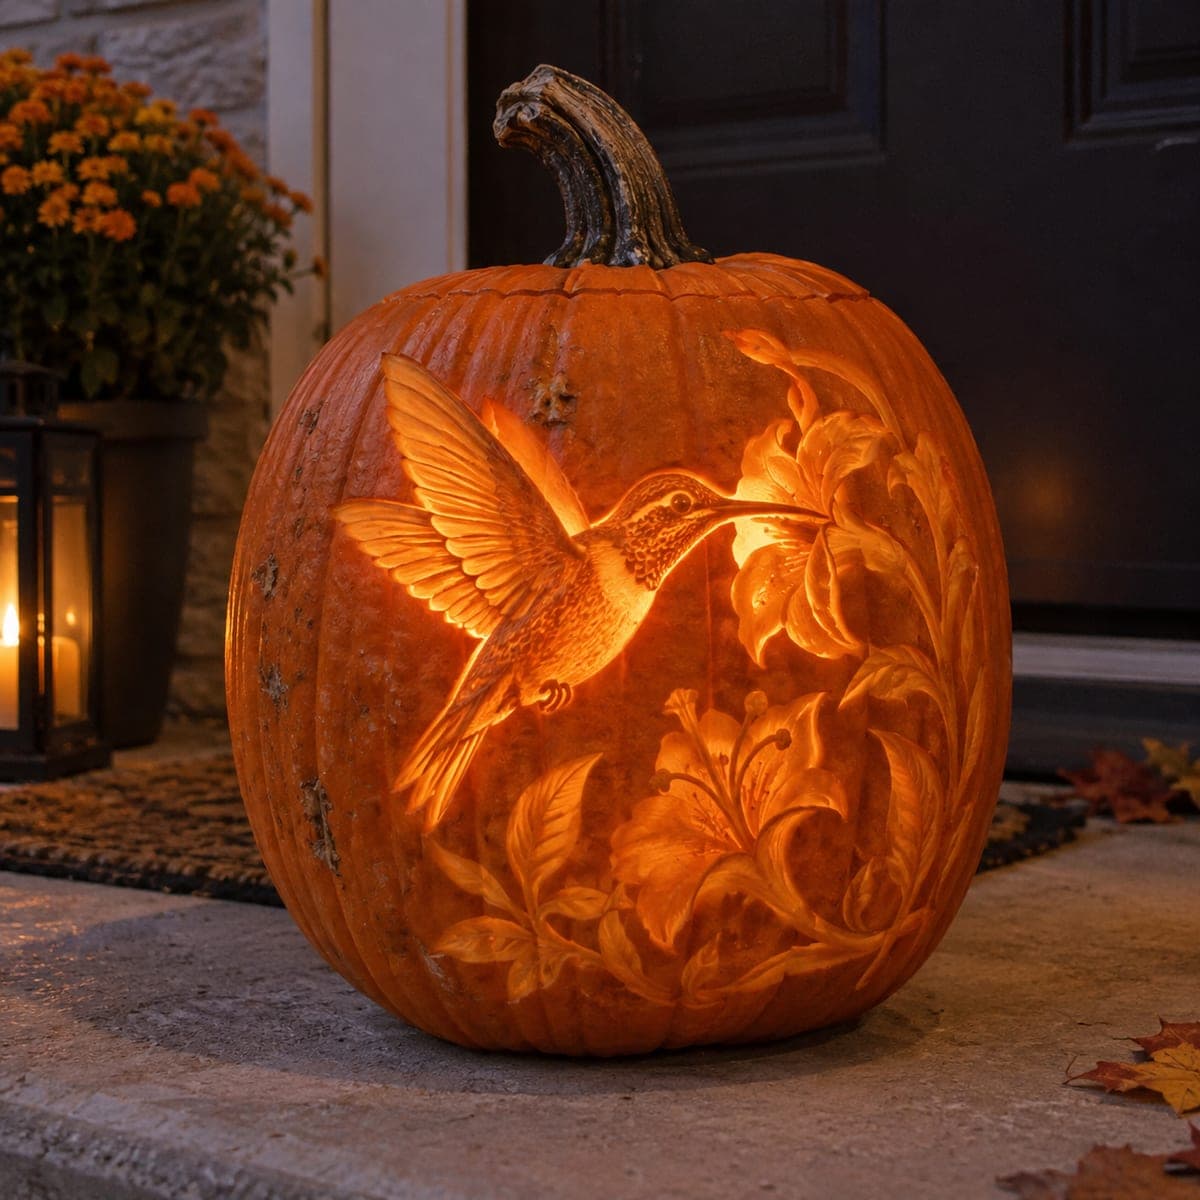
Hummingbird with Floral Wreath Expert Shading PumpkinAI
0

Hummingbird with Floral Wreath Expert Shading Pumpkin

A hummingbird hovers at a large trumpet flower surrounded by a lush wreath of carved leaves and blossoms, every element rendered in fine surface shading that creates a seamless composition across the entire pumpkin. The multi-layered botanical background distinguishes this design from simpler bird pumpkin carving ideas, requiring hours of careful depth-varied etching to build the full scene. Work from the background foliage inward, carving the leaves at a consistent shallow depth before deepening the shading on the hummingbird's body and wings in the foreground. Displayed on front steps with a lantern beside it, this pumpkin rivals hand-carved woodwork in its detail.

This is an AI-generated concept image: a realistic, carvable design idea rather than a photo of a finished carve. AI concepts are always labeled and sit out the leaderboard and the contest.
No ratings yet · Sign in to rate

Comments (0)

  • No comments yet — be the first.

Save without an account. Sign in to like or comment.

Our tips for carving a similar design

The core trick here is shading, not cutting. Almost the entire image is created by peeling the skin away at different depths so the pumpkin wall glows in varying tones, with only a few small full cutouts to add sparkle. Plan the whole scene first, then work from the softest background leaves inward to the boldest details on the bird.

Written by PumpkinCarvingIdeas.com, inspired by the image above. These are our suggestions, not instructions from the uploader. This approach to the AI concept has not been tested on a real pumpkin.

From pumpkin to porch

  1. Transfer the full scene and plan your depths

    Clean and dry the pumpkin, then tape your hummingbird and floral stencil smoothly across the front. Poke the outlines with a transfer tool or push pin so you can see every element once the paper comes off. Before you carve, mark in your head which areas will stay dark, which will be lightly shaded, and which will be cut through. A clear plan keeps a busy scene like this from turning muddy.

  2. Open the pumpkin and thin the carving wall

    Have an adult cut a lid from the bottom or the back rather than the top, so the stem stays intact and the scene wraps uninterrupted. Scoop the pulp and scrape the inside wall down to about one inch where your shading will be. A thinner wall lets the peeled areas glow more evenly. Keep the wall a bit thicker under any spots you plan to cut fully through so the pumpkin stays sturdy.

  3. Shade the background foliage first

    Using a ribbon or loop tool, peel the skin off the outer leaves and blossoms at a shallow, consistent depth. Remove only the top layer so these areas read as a dim, soft orange behind the bird. Work in gentle passes and keep your depth even so the wreath feels like it sits back in the composition. Leave narrow ridges of skin between petals and leaves to separate them.

  4. Deepen the flower and mid layers

    Move to the large trumpet flower the bird is feeding at and carve it a little deeper than the background so it glows brighter. Vary your pressure to round the petals and suggest folds. Scrape the leaf veins and flower throats a touch thinner where you want the most light. This middle tone bridges the dark background and the bright bird.

  5. Sculpt the hummingbird in the foreground

    Save the bird for last since it carries the most detail. Peel its body and wings to the thinnest depth so it becomes the brightest, most forward element, then scrape fine lines to suggest each feather. Keep the beak and wing tips backed by skin or a bridge so these thin shapes do not crack or fall away. Only cut fully through in a few tiny spots, such as a highlight in the eye or a gap between wing feathers, to add crisp points of light.

  6. Light it and photograph

    Set a battery LED puck or string inside, since an open flame is a fire risk and washes out subtle shading. Warm white light shows the depth transitions best. Rotate the pumpkin until the bird pops forward and the wreath fades softly behind it. Shoot at dusk on a step or porch, and mist the surface lightly if the shaded areas start to dry and curl.

Gather your supplies

Check things off as you get ready.

Work on a stable surface, keep your free hand out of the cutting path, and have an adult handle sharp tools.

Three levels of light

  • Leave intact

    The untouched skin around the wreath and any deep shadow gaps between the bird and flowers

  • Peel & shade

    The background leaves, blossoms, and the hummingbird body, shaded to different depths for a range of dim to mid glow

  • Cut through

    Only a few tiny points such as an eye highlight or a small gap between wing feathers

Learn the carving basics

Before you start cutting

This looks incredibly detailed. Can an intermediate carver attempt it?

The full scene is an expert-level shading project that takes hours of patient etching. If you are still building skill, try carving just the hummingbird with one or two flowers and skip the dense wreath. You can always add more foliage in future years as your control improves.

How do I keep the shaded areas from drying out while I work?

Peeled skin dries and curls faster than untouched pumpkin, and a scene this large takes a long time. Work in sections and mist the carved areas with water as you go. When you take breaks, wrap the pumpkin in a damp towel or plastic and keep it cool.

Should I cut all the way through anywhere in this design?

Almost none of it. The glowing look comes from peeling skin to different depths, not from open holes. Reserve full cutouts for a few tiny accents like the eye or a feather gap, and do those last so the wall stays strong while you shade.

Your take belongs here, too.

Changed a detail? Made it simpler? Share a photo of your version and tell the community what worked.

Share your pumpkin

More pumpkins like this

You've reached the end · 8 pumpkins
The Patch Report

Fresh pumpkins, in your inbox.

The best new carvings, ideas worth stealing, and how-tos for carving season. Short, seasonal, and gone by November.

A short email during carving season. Unsubscribe anytime. See our privacy policy.