Halloween Pumpkin Carving Contest · Starts October 1st · $500 in prizes
← Back to ideas
@ai_concepts
Sep 25, 2026

Intricate Segmented Rainbow Pumpkin With Glowing Cloud ArchesAI
0

Report this carving

Tell us what is wrong. Reports are private.

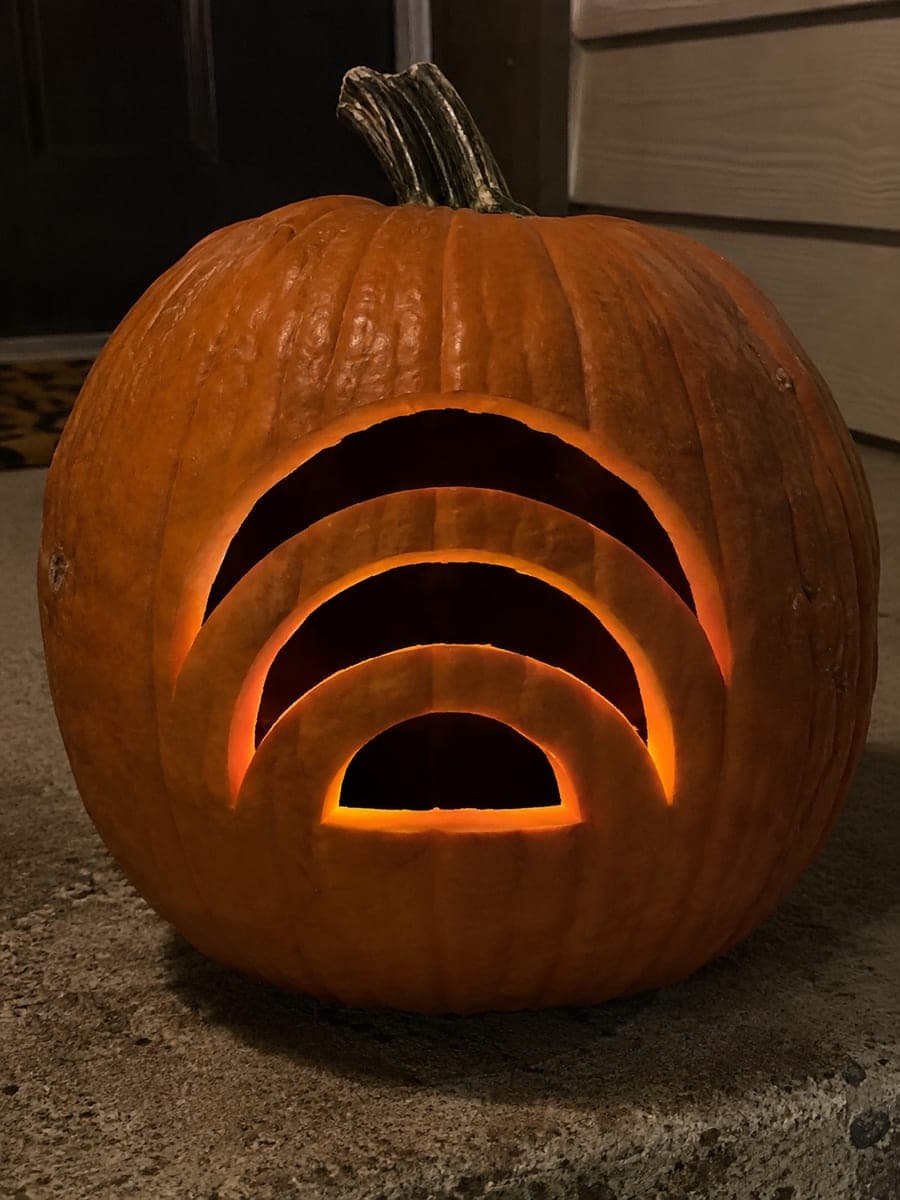
Intricate Segmented Rainbow Pumpkin With Glowing Cloud Arches

Open rainbow arch slots divided by two broad vertical support columns anchor this expert rainbow pumpkin carving, with separate cloud and raindrop apertures filling the spaces on either side. The two vertical supports are wider than in simpler versions, handling the greater span of the multi-arch segmented design. Map both support column positions before cutting any arches, then remove alternating arch segments first to keep even pressure on the shell. The generous retained rind between every element means this intricate rainbow pumpkin carving idea stays structurally sound through the entire Halloween season.

No ratings yet · Sign in to rate

Comments (0)

  • No comments yet — be the first.

Save without an account. Sign in to like or comment.

Our tips for carving a similar design

This expert design uses two broad vertical support columns to handle the wide span of a fully segmented multi-arch rainbow. Mapping both column positions before any cutting is non-negotiable since the columns carry the structural load for the entire design. Removing alternating arch segments keeps the load even on both columns during the cutting phase.

From pumpkin to porch

  1. Select and hollow the pumpkin

    Choose a large, wide-faced pumpkin to accommodate two support columns. Cut a bottom lid and scoop out all pulp. Keep the inner wall at a full inch throughout, especially in the area between the two columns.

  2. Map the support columns precisely

    Draw both vertical column positions on the face using a ruler and level. Mark the column edges clearly in pencil and reinforce them with masking tape as cut guards. Do not proceed to any other marking until both columns are fully defined.

  3. Transfer the arch and detail template

    Tape the template over the marked columns and poke through all arch segment endpoints, cloud outlines, and raindrop positions. Remove the template and confirm that no marked cut position overlaps either column boundary.

  4. Cut alternating arch segments

    Begin with the outermost arch segments on alternating sides. Cut one segment, skip one, cut one, to keep balanced pressure on both columns throughout. Complete all outermost alternating segments before moving to the next ring inward.

  5. Complete all arch rings and add details

    Finish the remaining arch segments in the same alternating pattern, ring by ring. Once all rainbow slots are open, cut the cloud apertures and raindrop holes as independent shapes around the periphery.

  6. Light and display

    Use a bright LED inside and let the full segmented design glow for the first time in a dark room before displaying outdoors. The generous rind between every element means this pumpkin should stay structurally sound for weeks.

Written with AI to match this design

Gather your supplies

Check things off as you get ready.

Work on a stable surface, keep your free hand out of the cutting path, and have an adult handle sharp tools.

Three levels of light

  • Leave intact

    Both vertical support columns, all rind bands between arch segments, and the lower base rind stay dark and load-bearing.

  • Peel & shade

    None for this cutout design.

  • Cut through

    Every arch slot segment, cloud aperture, and raindrop hole is cut fully through for maximum glow.

Learn the carving basics

Before you start cutting

Why cut alternating segments rather than one ring at a time?

Cutting a complete ring at once removes a full continuous strip of support from the shell all at once, which can cause the columns and adjacent rind to flex. Alternating segments distributes the opening evenly and keeps the remaining uncut segments as temporary braces.

How thick should the two vertical support columns be?

Plan for at least one inch each, wider if the pumpkin is extra large. The columns must bridge the entire rainbow from top to base, so any narrowing along their length creates a weak point. Use masking tape along both edges during cutting to prevent accidentally cutting into them.

The rind between two adjacent arch segments looks very thin. Should I reinforce it?

If a band between segments looks dangerously thin after cutting, push a small piece of dry foam wedge against it from the inside and press gently until the piece is stable. A tiny dab of craft glue can hold the foam in place. Avoid picking up the pumpkin by the carved face once the foam is in.

Your take belongs here, too.

Changed a detail? Made it simpler? Share a photo of your version and tell the community what worked.

Share your pumpkin

More pumpkins like this

You've reached the end · 8 pumpkins
The Patch Report

Fresh pumpkins, in your inbox.

The best new carvings, ideas worth stealing, and how-tos for carving season. Short, seasonal, and gone by November.

A short email during carving season. Unsubscribe anytime. See our privacy policy.