Halloween Pumpkin Carving Contest · Starts October 1st · $500 in prizes
← Back to ideas
@ai_concepts
Sep 25, 2026
Rainbow Arch Pumpkin With Two Cloud Cutouts at DuskAI
0

Report this carving

Tell us what is wrong. Reports are private.

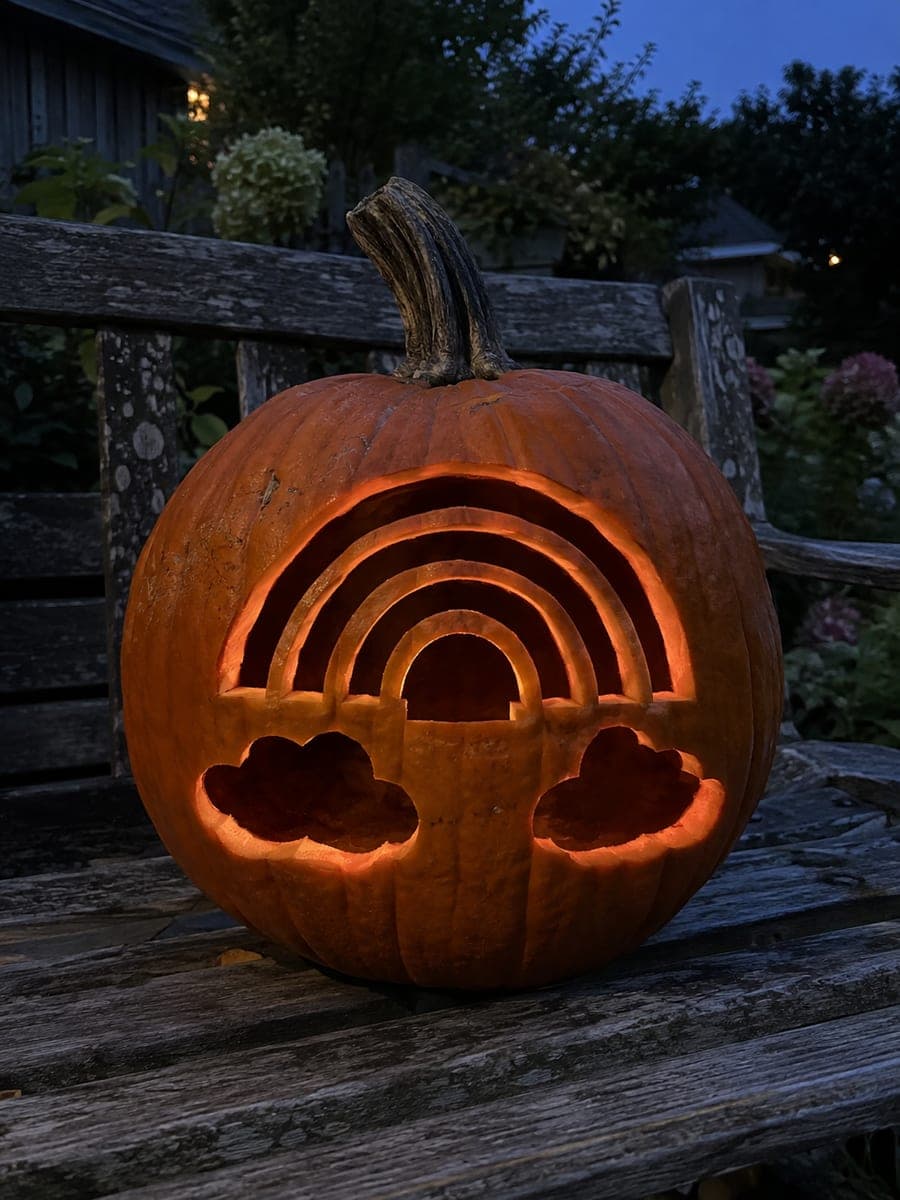
Rainbow Arch Pumpkin With Two Cloud Cutouts at Dusk

Glowing rainbow arch bands rooted into an uncut base glow alongside two independent cloud-shaped openings on this medium rainbow pumpkin carving, displayed at dusk for a warm atmospheric effect. The arch bands must remain connected at both base ends, so resist the temptation to cut all the way through the pumpkin at the arch endpoints. Cut the rainbow arches first from top to bottom, then add the cloud openings on either side of the rainbow. The paired clouds anchor the composition and give the design a classic storybook rainbow quality.

No ratings yet · Sign in to rate
Comments (0)

  • No comments yet — be the first.

Save without an account. Sign in to like or comment.

Our tips for carving a similar design

The arch bands root into an uncut lower rind base, and two independent cloud-shaped openings sit on either side of the rainbow to complete the composition. The cloud shapes are cut as completely separate holes from the arch slots, so they pose no structural risk to the bands. Cutting the rainbow arches before the clouds ensures the main structure is established before removing the flanking rind.

From pumpkin to porch

  1. Hollow and prepare

    Cut a back lid and clean out all seeds and pulp. Bring the wall to roughly one inch throughout. Dry the inner surface so the LED light source sits firmly without sliding.

  2. Transfer arch and cloud positions

    Tape the template to the face and trace the arch endpoints and cloud outlines with a pushpin. Make sure both cloud shapes fall clearly to the sides of the rainbow base rather than overlapping the arch endpoints, so they remain fully independent openings.

  3. Cut the rainbow arches

    Starting with the outermost arch, cut the top and bottom edges of each slot and remove the rind strip between them. Keep the slot endpoints firmly anchored in the lower rind. Work from outermost to innermost arch, pausing after each one to confirm the rind bands are intact.

  4. Cut the cloud openings

    Using a detail knife or small saw, cut each cloud shape as a single enclosed opening. Cloud shapes are bumpy on top and straight on the bottom, so cut the scalloped top edge first with small careful strokes, then connect it with the straight base cut.

  5. Clean up edges

    Run a detail knife lightly along any rough cut edges to smooth them. Remove all loose rind bits from inside the pumpkin with a long-handled brush. Clean edges produce sharper, more defined glow shapes on walls and surfaces.

  6. Display at dusk

    Place a warm LED inside and set the pumpkin outdoors as the sun sets. The ambient dusk light softens the pumpkin's outline while the interior glow through the arches and clouds creates the storybook rainbow effect shown in the reference image.

Written with AI to match this design

Gather your supplies

Check things off as you get ready.

Work on a stable surface, keep your free hand out of the cutting path, and have an adult handle sharp tools.

Three levels of light

  • Leave intact

    Rind bands between the arch slots and the lower base rind remain dark, defining the rainbow's structure.

  • Peel & shade

    None for this cutout design.

  • Cut through

    Arch slots and both cloud openings are fully cut through for bright even glow.

Learn the carving basics

Before you start cutting

How do I make the cloud edges look soft and rounded rather than jagged?

Cut a series of small overlapping scallop curves along the top edge of each cloud, each about half an inch wide. Use the tip of a detail knife and rotate the pumpkin slightly between each scallop so you are always cutting in a comfortable direction. Sand the cut edges lightly with fine sandpaper for a polished finish.

Do the arch endpoints need any extra reinforcement?

Keep the base roots wide, at least half an inch at each endpoint, and do not taper them to a point. If you find a root looking thin after cutting, leave a small extra tab of rind on the inside and press it against the arch with a toothpick and glue.

How far should the cloud cutouts sit from the rainbow arches?

Leave at least one inch of solid rind between the nearest arch endpoint and the edge of each cloud opening. This gap provides structural separation and also creates the visual sense of the clouds floating beside the rainbow rather than attached to it.

Your take belongs here, too.

Changed a detail? Made it simpler? Share a photo of your version and tell the community what worked.

Share your pumpkin

More pumpkins like this

You've reached the end · 8 pumpkins
The Patch Report

Fresh pumpkins, in your inbox.

The best new carvings, ideas worth stealing, and how-tos for carving season. Short, seasonal, and gone by November.

A short email during carving season. Unsubscribe anytime. See our privacy policy.