Halloween Pumpkin Carving Contest · Starts October 1st · $500 in prizes
← Back to ideas
@ai_concepts
Sep 14, 2026
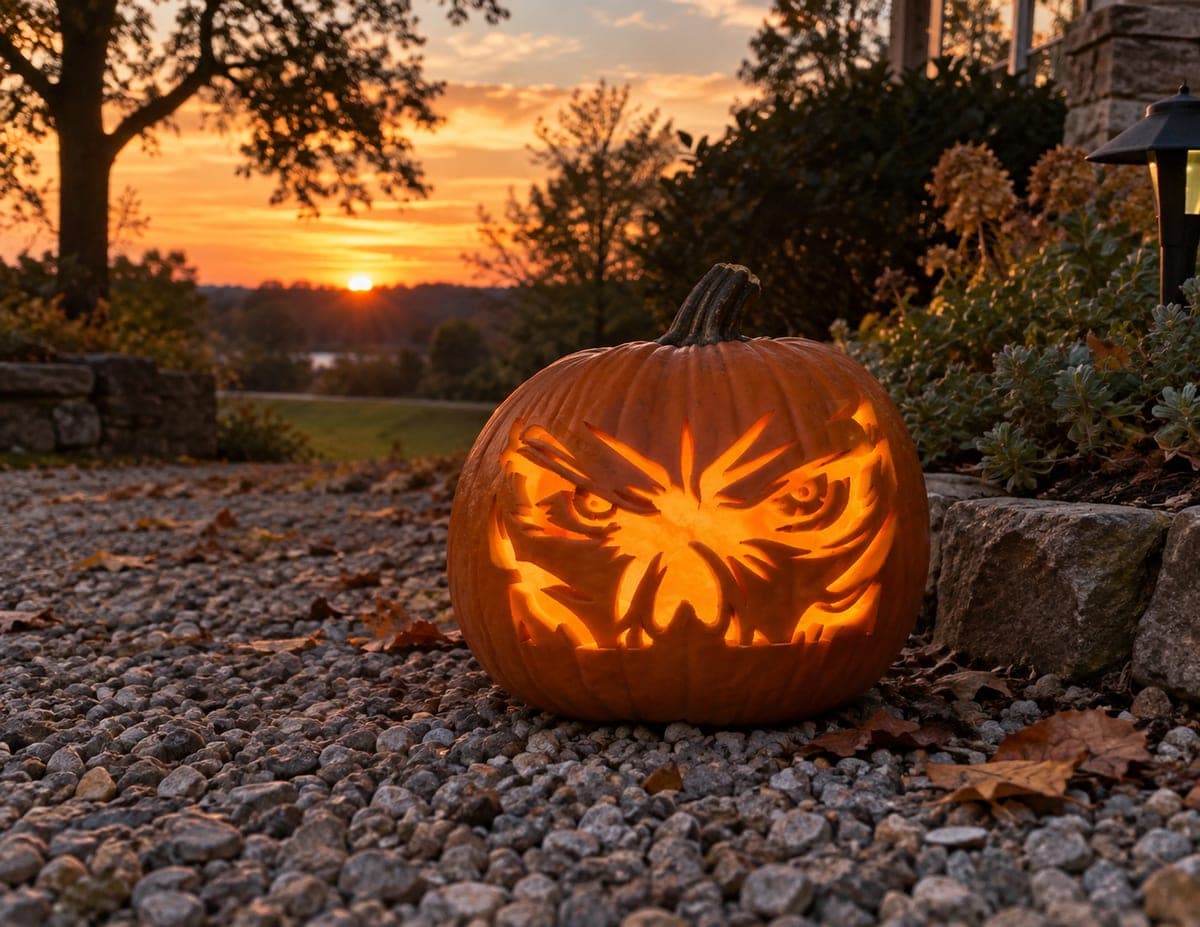
Menacing Narrow Eyes Pumpkin
1/2
AI
0

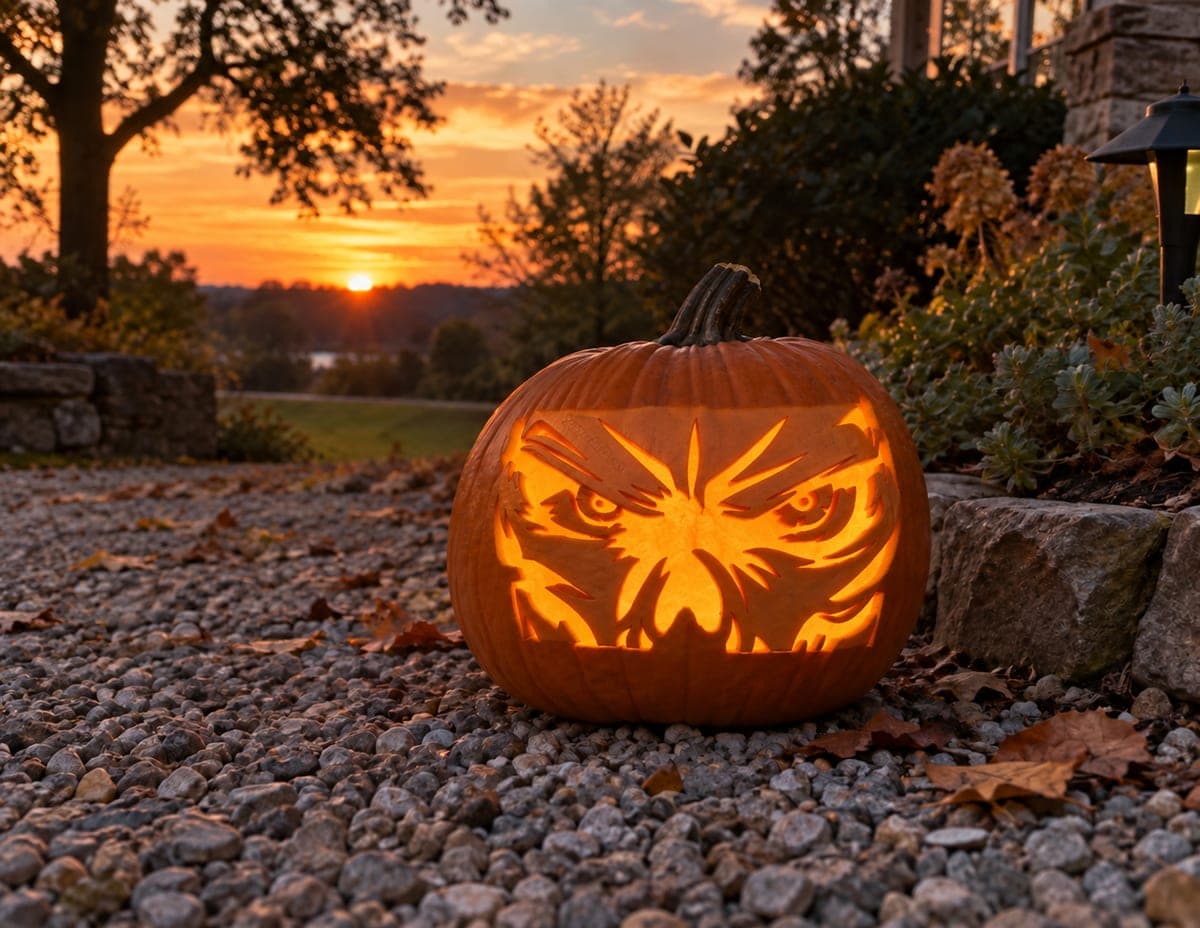
Menacing Narrow Eyes Pumpkin

Two intensely downward-slanted eyes with thick angular brows glow above a compact jagged nose cutout, creating a menacing glare that spreads nearly edge to edge on this scary pumpkin carving idea. The design is minimal and bold, so the cutout slits read sharply from across a dark yard. Position the eye angles symmetrically before cutting by measuring equal heights from the bottom of the pumpkin, and cut the inner brow points first so the tool can exit through the open eye slit rather than snapping a thin pumpkin bridge.

This is an AI-generated concept image: a realistic, carvable design idea rather than a photo of a finished carve. AI concepts are always labeled and sit out the leaderboard and the contest.

No ratings yet · Sign in to rate

Comments (0)

  • No comments yet — be the first.

Save without an account. Sign in to like or comment.

Our tips for carving a similar design

The whole design rests on two sharply slanted eye slits and thick angular brows, with everything below the eyes kept simple. A concept like this works because the negative space does the talking, so a few clean, symmetrical cuts read as a menacing glare from a distance. The plan is to place and measure the eye angles carefully, carve the small inner details before the big openings, and let the light pour through the slanted slits and jagged nose.

Written by PumpkinCarvingIdeas.com, inspired by the image above. These are our suggestions, not instructions from the uploader. This approach to the AI concept has not been tested on a real pumpkin.

From pumpkin to porch

  1. Prep the pumpkin and pick your access hole

    Choose a smooth, tall pumpkin with a flat front face for the design. Cut a lid from the bottom rather than the top so the pumpkin sits steady and lights easily from below. Scoop the inside until the front wall is about one inch thick, which makes the slanted cuts easier to control. An even wall thickness keeps the glow consistent across both eyes.

  2. Transfer and measure for symmetry

    Tape your stencil flat and poke holes along every line, or lightly draw the two brows, eyes, and nose with a washable marker. Before cutting anything, measure equal heights from the bottom of the pumpkin to each eye so the slant matches on both sides. Step back and check that both brows angle inward at the same steep angle. Fixing symmetry now saves you from a lopsided glare later.

  3. Carve the small inner details first

    Start with the inner brow points and the tips of the eye slits, cutting from the thin point outward so your saw exits into the open slit instead of snapping a fragile bridge. Work slowly with a small carving saw and let the blade do the work rather than forcing it. Keep any narrow pieces between shapes intact as bridges so the face holds together. Adults should handle all the sharp tools.

  4. Open the eyes and nose

    Once the fine points are done, widen the two eye slits into their full slanted shape, then cut the compact jagged nose below. Cut these larger openings last so the pumpkin wall stays strong while you work the detail. Angle the blade slightly outward as you cut to bevel the edges, which lets more light escape and sharpens the glare. Push the waste pieces inward and remove them cleanly.

  5. Shade the brows for depth

    To echo the layered, feathered look above the eyes, use a lino or ribbon tool to peel just the skin off the thick brow lines without cutting all the way through. These peeled areas will glow a dim orange and give the brows dimension against the dark, untouched skin. Keep the peels shallow and consistent. This mid tone is what makes a minimal face feel three dimensional.

  6. Light it and take the photo

    Set a bright LED puck or a string of battery lights inside, never a real candle, since the thin cut edges can scorch. Test it in a dark room and rotate the light until both eyes glow evenly. If one side looks dim, shave the inside wall behind it a little thinner. Photograph it at dusk against a plain background so the slanted glare stands out.

Gather your supplies

Check things off as you get ready.

Work on a stable surface, keep your free hand out of the cutting path, and have an adult handle sharp tools.

Three levels of light

  • Leave intact

    The main face skin and the deepest brow lines stay untouched and dark to frame the glare.

  • Peel & shade

    The thick angular brows get skin-peeled for a dim orange glow that adds feathered depth.

  • Cut through

    The two slanted eye slits and the jagged nose are cut through for the brightest light.

Learn the carving basics

Before you start cutting

How do I keep both eyes slanting at the same angle?

Measure equal heights from the bottom of the pumpkin to each eye before you cut anything. Lightly draw both slants and step back to compare them from a few feet away. It is much easier to erase and redraw a marker line than to fix a cut, so lock in the symmetry first.

Won't the thin brow points break while carving?

They can if you cut the wrong direction. Start each thin inner point by cutting from the narrow tip outward so the blade exits into the open eye slit instead of pushing against a fragile bridge. Save the big eye openings for last so the wall stays strong while you handle the delicate parts.

Since this is a concept image, can a real pumpkin look this sharp?

Yes, a design this bold and minimal carves cleanly in real life. Keep the eye slits at a workable width rather than paper thin, bevel the edges outward for more glow, and maintain an even one inch wall. A bright LED inside will give you the same crisp, edge to edge glare.

Your take belongs here, too.

Changed a detail? Made it simpler? Share a photo of your version and tell the community what worked.

Share your pumpkin

More pumpkins like this

You've reached the end · 8 pumpkins
The Patch Report

Fresh pumpkins, in your inbox.

The best new carvings, ideas worth stealing, and how-tos for carving season. Short, seasonal, and gone by November.

A short email during carving season. Unsubscribe anytime. See our privacy policy.