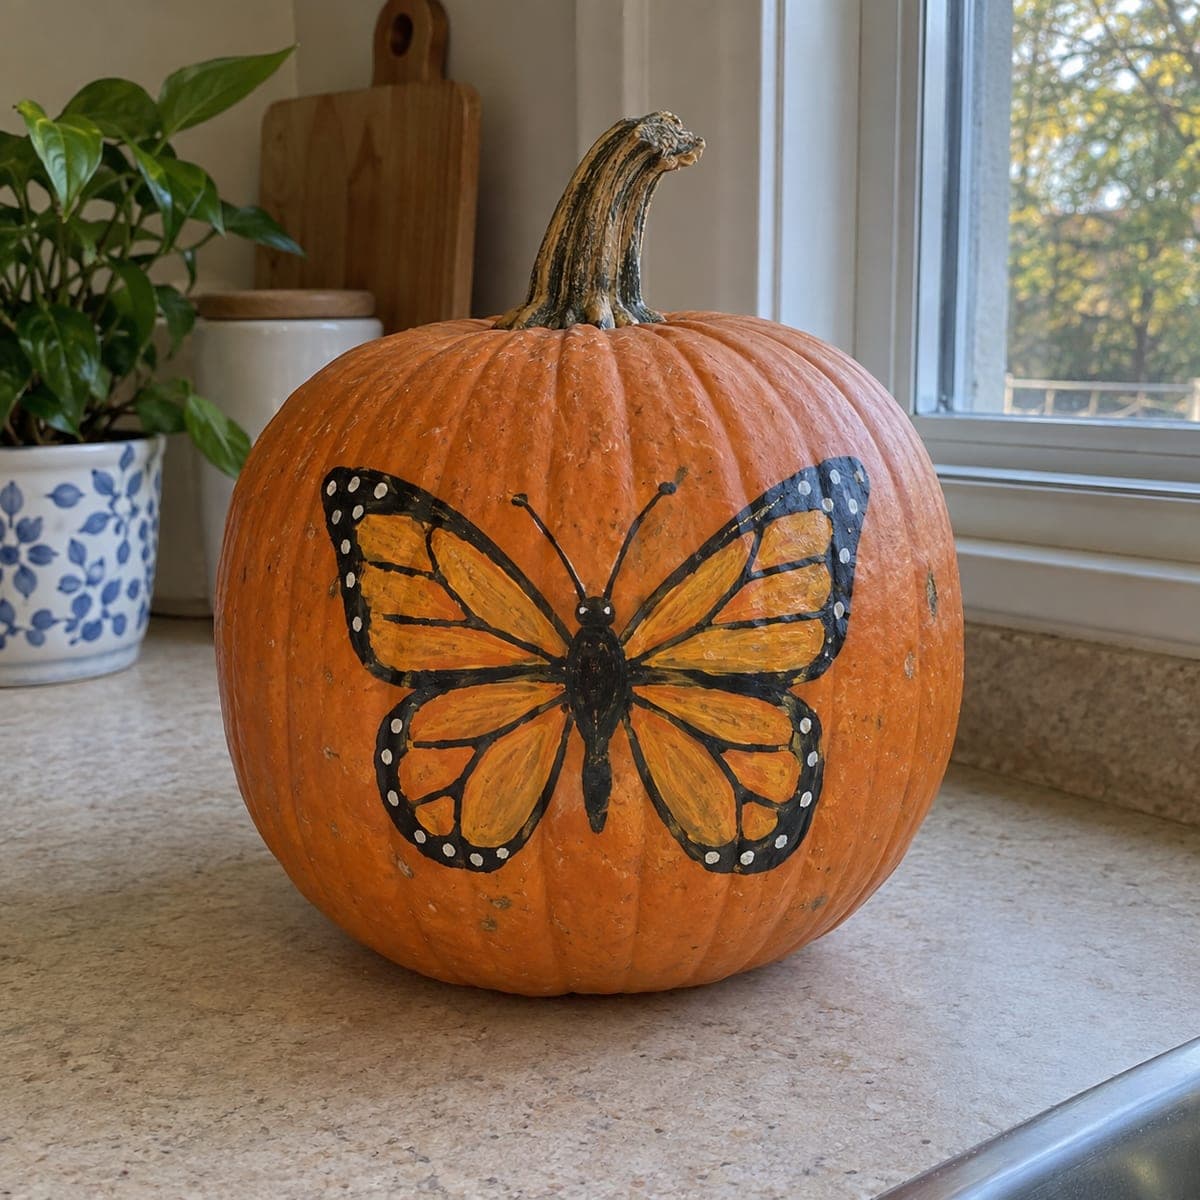
A monarch butterfly spreads its wings across this pumpkin, painted in orange and gold panels framed by black veins and a border of white dots. Because the wing color is close to the pumpkin itself, the black outline does most of the visual work, so take your time with a fine liner brush there. Chalk the symmetrical wing shapes first, fill the panels, then add veins and dots last. A no-carve pumpkin that fits fall decor well past Halloween.
This is an AI-generated concept image: a realistic, carvable design idea rather than a photo of a finished carve. AI concepts are always labeled and sit out the leaderboard and the contest.
The core trick here is that the wing panels sit close in color to the pumpkin skin, so the bold black outline and veins do almost all of the visual work. This is a no-carve design, which means no blades and no glow, just chalk lines, acrylic panels, and patient linework. Plan to map both wings symmetrically first, block in the orange and gold, then finish with crisp black veins and white border dots.
Written by PumpkinCarvingIdeas.com, inspired by the image above. These are our suggestions, not instructions from the uploader. This approach to the AI concept has not been tested on a real pumpkin.
From pumpkin to porch
1
Clean and dry the surface
Wipe the whole pumpkin with a damp cloth and let it dry fully so paint grips the skin. Pick the flattest, roundest face for your canvas and set the stem slightly off to one side if it wants to lean. A dry, dust-free surface keeps your acrylic from beading up. Since nothing is cut here, the pumpkin will last for weeks if you keep it out of direct sun.
2
Chalk the symmetry
Draw a light vertical center line for the body, then sketch the upper and lower wings on each side to match. Use chalk or a washable pencil so you can wipe and redo until both sides mirror each other. Keep the top wings larger and rounder and the bottom wings narrower and pointed. Step back often to check balance before any paint touches down.
3
Block in the wing panels
Fill the wing sections with orange and gold acrylic, leaving thin gaps where the black veins will go. Work from the center outward and let each panel dry before adding the next so colors stay clean. Two thin coats read better than one thick, gloppy one. Do not worry about perfect edges yet, the black outline will tidy them later.
4
Paint the body and outline
Load a fine liner brush with black and paint the thick body and the wing borders. Take your slow, steady strokes here since this outline is what makes the whole butterfly pop against the similar orange skin. Rest your painting hand on the pumpkin for stability and pull each line toward you. Let it dry completely before the next layer.
5
Add veins and white dots
With the same liner, draw the branching veins that split each wing panel. Then switch to white and dot the outer black border evenly, using the tip of a brush or a cotton swab for round marks. Space the dots by eye and keep them small so they read as a delicate edge. Add the two thin antennae last so you do not smudge them.
6
Seal and stage
Once everything is bone dry, brush on a thin coat of clear acrylic sealer to protect the paint. Set the pumpkin on a table or shelf with soft indoor light, since this is a decor piece rather than a glow piece. Snap your photo near a window for even, natural light. Keep it cool and dry to stretch its display life.
Gather your supplies
Check things off as you get ready.
Work on a stable surface, keep your free hand out of the cutting path, and have an adult handle sharp tools.
Three levels of light
Leave intact
The bare orange skin around the butterfly stays untouched as the natural background.
Peel & shade
If you want a glowing version later, lightly peel the gold wing panels so they read as a dim, warm orange.
Cut through
For a lit variation, cut through only the white border dots and thin vein gaps so pinpoints of full light frame the wings.
Draw a center line for the body first, then measure or eyeball matching wing shapes on each side with chalk. Chalk wipes off easily, so redo it until the mirror looks right before you commit to paint. Checking from a few feet back helps you catch lopsided spots.
The orange paint blends into the pumpkin. How do I make it stand out?
That is expected, and it is why the black outline matters so much. Use gold and a slightly deeper orange than the skin for contrast, then let the thick black veins and border do the heavy lifting. Crisp white dots along the edge add the final pop.
Can I turn this into a carved, lit pumpkin?
You can adapt it, but keep it structurally sound. Leave the black veins as uncut skin bridges so the wings stay connected, peel the panels for a soft glow, and only cut small dots for bright points. Use an LED light rather than a candle, and have an adult handle any blades.
Your take belongs here, too.
Changed a detail? Made it simpler? Share a photo of your version and tell the community what worked.
 AI
AI
Comments (0)