Halloween Pumpkin Carving Contest Β· Starts October 1st Β· $500 in prizes
← Back to ideas
@ai_concepts
Sep 25, 2026
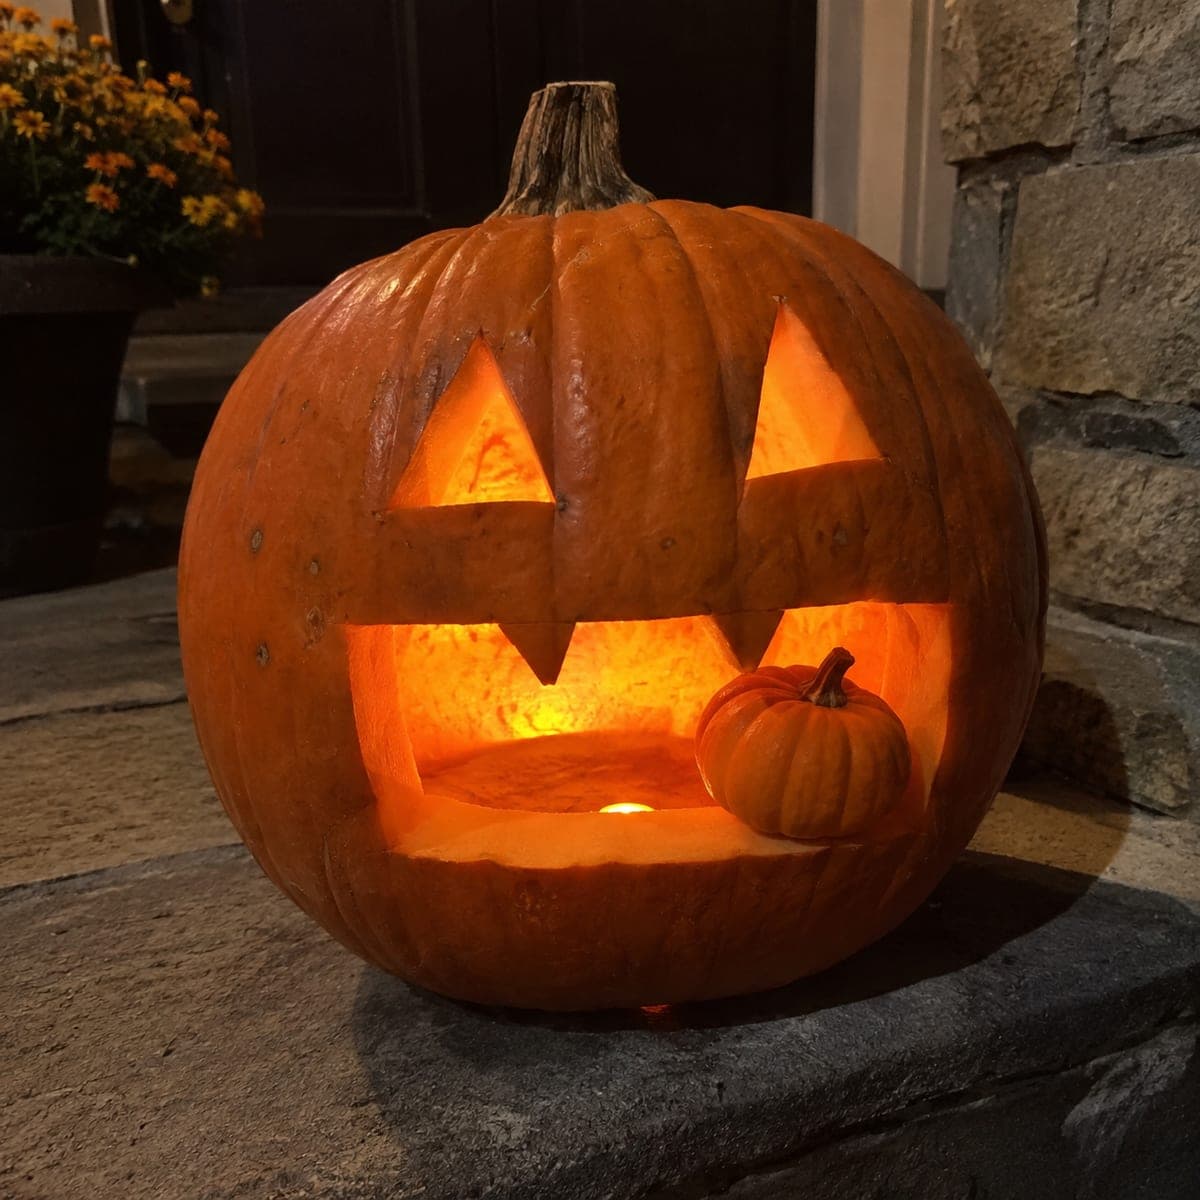
Monster Pumpkin with Crossbar Eyes Eating a Mini PumpkinAI
0

Report this carving

Tell us what is wrong. Reports are private.

Monster Pumpkin with Crossbar Eyes Eating a Mini Pumpkin

Spanning eye bars, rooted monster teeth, and a wide lower jaw shelf holding a small carved pumpkin make this hard pumpkin eating pumpkin carving a detailed build. Anchor the eye bars at both ends before cutting any surrounding rind, then carve the teeth broadly from the upper and lower mouth rims to prevent snapping. Seat the small pumpkin on the wide jaw shelf last, adjusting its position so both faces align toward the viewer. A bright warm LED in each pumpkin keeps both faces equally visible after dark.

No ratings yet Β· Sign in to rate

Comments (0)

  • No comments yet β€” be the first.

Save without an account. Sign in to like or comment.

Our tips for carving a similar design

The crossbar eyes are the structural centerpiece of the large pumpkin's face, and they must be fully anchored on both sides before any surrounding rind is removed. The wide lower jaw shelf is equally critical because it bears the physical weight of the seated small pumpkin. Carving both pumpkins in the correct sequence and aligning their faces toward the viewer from the beginning makes the finished composition read immediately from any approach angle.

From pumpkin to porch

  1. Carve the small pumpkin face first

    Hollow the small pumpkin from a back or bottom opening. Carve a simple scared or surprised face with broad features that will remain visible through the large pumpkin's open jaw. Use an LED inside so its expression glows independently when the display is assembled.

  2. Hollow the large pumpkin and mark anchor zones

    Cut a back-side lid on the large pumpkin and scoop to three-quarter-inch wall thickness across the face. Before transferring the design, mark the left and right anchor points of each crossbar eye on the template as no-cut zones. These anchors determine the entire structural strategy.

  3. Transfer the monster face design

    Tape the printed template and perforate all outlines including the crossbar anchor boundaries. Connect perforations with chalk marker. Confirm that the jaw ledge boundary is clearly marked as an uncut zone at least one and a half inches deep before cutting anything.

  4. Cut the crossbar eye flanking areas

    Remove the eye openings flanking each crossbar in sequence, testing each bar's anchor after every cut. The bar must not move at all under a light press after each flanking cut. If a bar shows any looseness, widen its nearest anchor connection before proceeding to the next eye element.

  5. Cut the monster teeth

    Mark upper and lower teeth as broad shapes rooted generously into both the upper and lower mouth rims. Cut each tooth slot from the mouth interior toward the gap, leaving wide bases. For this monster design, slightly irregular tooth sizes add character without adding structural risk.

  6. Seat the small pumpkin and light both

    Trim a small flat base from the small pumpkin if needed and seat it on the wide jaw shelf. Adjust its position so both faces point forward. Place a warm LED in each pumpkin. A bright warm LED in the large pumpkin and an equally bright one in the small pumpkin keeps both faces at equal visibility after dark.

Written with AI to match this design

Gather your supplies

Check things off as you get ready.

Work on a stable surface, keep your free hand out of the cutting path, and have an adult handle sharp tools.

Three levels of light

  • Leave intact

    All rind surrounding the eyes, mouth, and the full lower jaw shelf stays dark and solid.

  • Peel & shade

    None; both pumpkins use only full through cuts.

  • Cut through

    Crossbar eye flanking openings, monster teeth gaps, and the small pumpkin's full face are all cut through for full glow.

Learn the carving basics

Before you start cutting

How do I confirm a crossbar anchor is truly secure partway through cutting?

After each flanking cut, press the bar laterally with a fingertip. Zero movement means the anchor is solid. Any perceptible movement means the remaining anchor is too thin; add a thin rind connection from inside using a toothpick and craft glue before continuing.

The jaw shelf is wide enough but the small pumpkin still wobbles. What do I do?

Cut a small flat slice off the bottom of the mini pumpkin so it sits level. Place a folded piece of cardboard under the low side if it still tilts. For a multi-night display, press a bamboo skewer through the back of the large pumpkin into the small one to pin it in place.

My monster teeth look too similar to a normal jack-o-lantern. How do I make them look more monstrous?

Vary the tooth sizes so some are taller and narrower and some are shorter and wider. Add one or two pointed canine shapes among the broader teeth. Keep all teeth broadly rooted at the gumline for safety, but varying the silhouette above the root adds monster character.

Your take belongs here, too.

Changed a detail? Made it simpler? Share a photo of your version and tell the community what worked.

Share your pumpkin

More pumpkins like this

You've reached the end Β· 8 pumpkins
The Patch Report

Fresh pumpkins, in your inbox.

The best new carvings, ideas worth stealing, and how-tos for carving season. Short, seasonal, and gone by November.

A short email during carving season. Unsubscribe anytime. See our privacy policy.