Halloween Pumpkin Carving Contest · Starts October 1st · $500 in prizes
← Back to ideas
@ai_concepts
Sep 25, 2026
Detailed Monster Pumpkin Eating a Tiny PumpkinAI
0

Report this carving

Tell us what is wrong. Reports are private.

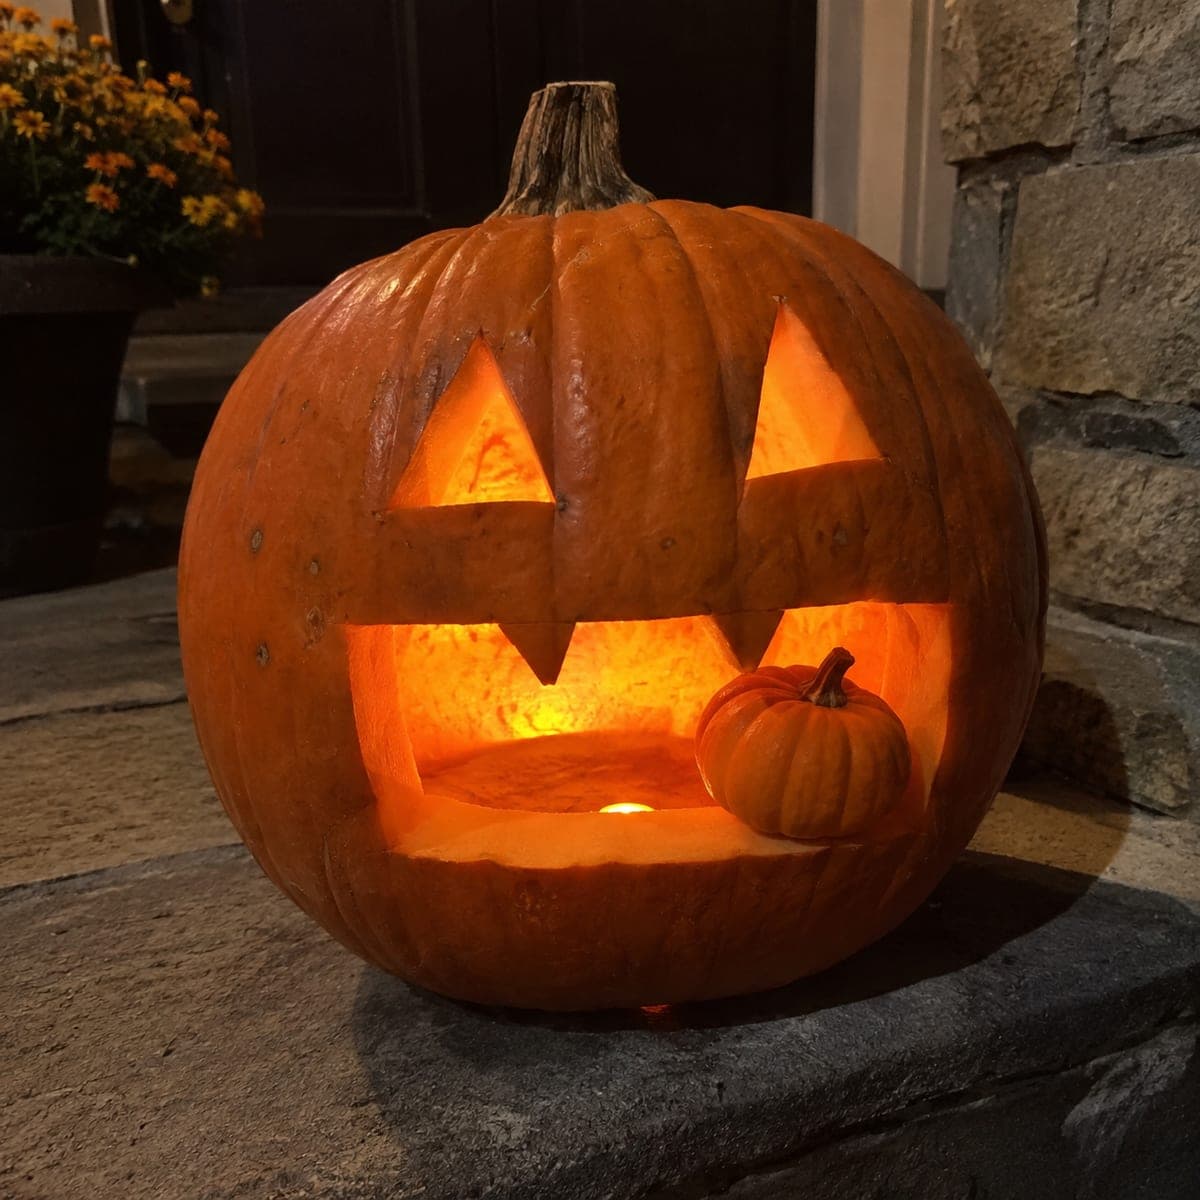
Detailed Monster Pumpkin Eating a Tiny Pumpkin

Broad crossbar eye supports, rooted monster teeth, a lower jaw shelf for the miniature pumpkin, and separate accent holes around the face define this expert pumpkin eating pumpkin carving. Establish all structural bars and tooth roots before adding any accent apertures, as the accent holes are finishing details that should not weaken the main face structure. The miniature pumpkin is seated on the jaw shelf as the last step once all carving is complete and stable. Placing a cooler-toned LED in the large pumpkin and a warmer one in the small pumpkin makes them visually distinct.

No ratings yet · Sign in to rate

Comments (0)

  • No comments yet — be the first.

Save without an account. Sign in to like or comment.

Our tips for carving a similar design

This design has a clear structural hierarchy: load-bearing bars and tooth roots are established first, accent holes come last as finishing details that must never weaken the main structure. The miniature pumpkin is seated only after all carving is confirmed stable, because adjusting or removing it during carving would disturb the jaw shelf. Two independently lit pumpkins with contrasting LED temperatures make the pair visually distinct.

From pumpkin to porch

  1. Carve the miniature pumpkin face independently

    Hollow and carve the miniature pumpkin separately before the main assembly. Give it a simple but expressive face with features large enough to remain visible through the large pumpkin's open jaw. Seat it tentatively in the jaw area to check sizing, then remove it while you carve the main pumpkin.

  2. Plan and mark all structural elements before cutting

    Transfer the full design to the large pumpkin. Mark both crossbar anchor points, both sets of tooth roots, the minimum jaw shelf depth of one and a half inches, and all accent hole positions. Review every structural element and confirm it connects back to the outer shell frame before making any cut.

  3. Establish the crossbar eyes

    Cut the flanking openings of each crossbar eye, testing each bar's anchor after every flanking cut. Use the press test: the bar must not move laterally or vertically under a firm fingertip press. Complete both eye bars fully before cutting any other element in the design.

  4. Cut the monster teeth with broad roots

    Mark teeth on both the upper and lower rims of the mouth area. Cut each tooth slot from the mouth interior toward the gap, never from the gap inward. Upper teeth should connect into the upper rim and lower teeth into the lower rim. Leave the full jaw shelf as an uncut zone throughout this step.

  5. Add accent apertures as the finishing pass

    Cut each accent hole around the face only after both crossbar eyes and all teeth are confirmed solid. These are purely decorative and should never be cut if the shell shows any flex after the structural passes. Work from the center of the face outward to the border accent positions.

  6. Seat the miniature pumpkin and light with two LEDs

    Place the miniature pumpkin on the jaw shelf as the very last step. Fine-tune its position so both faces point forward. Install a cooler-toned LED in the large pumpkin and a warmer-toned LED in the small pumpkin. The color temperature contrast makes the two faces visually distinct at night.

Written with AI to match this design

Gather your supplies

Check things off as you get ready.

Work on a stable surface, keep your free hand out of the cutting path, and have an adult handle sharp tools.

Three levels of light

  • Leave intact

    All structural rind including crossbar bars, tooth roots, jaw shelf, and outer frame stays dark and solid.

  • Peel & shade

    None; all shapes are full through cuts.

  • Cut through

    Crossbar eye flanking openings, tooth gap areas, accent holes, and the miniature pumpkin's full face are all cut through for layered glow at two color temperatures.

Learn the carving basics

Before you start cutting

Why should the accent holes be cut last rather than earlier in the process?

Accent holes are small and structural impact seems minimal, but each one removes material from rind that may be part of the load-bearing web near the crossbar anchors or tooth roots. Cutting them last, when the structural skeleton is verified solid, eliminates any risk of weakening an anchor or tooth root during the detail pass.

How do I choose the right LED temperatures to contrast the two pumpkins?

A cool white LED (around 5000K) inside the large pumpkin and a warm amber LED (around 2700K) inside the small one creates an immediate visual distinction. The cool large pumpkin reads as a predator monster while the warm small one reads as a helpless victim. Any combination of clearly different color temperatures achieves this effect.

The accent holes look fine individually but they make the face look cluttered. How do I thin them out?

Leave alternate accent positions uncut and assess the composition from arm's length. Fewer, well-placed accent holes usually have more visual impact than a dense cluster. If you have already cut too many, you cannot remove them, but grouping a few into a loose cluster can make the pattern look more intentional.

Your take belongs here, too.

Changed a detail? Made it simpler? Share a photo of your version and tell the community what worked.

Share your pumpkin

More pumpkins like this

You've reached the end · 8 pumpkins
The Patch Report

Fresh pumpkins, in your inbox.

The best new carvings, ideas worth stealing, and how-tos for carving season. Short, seasonal, and gone by November.

A short email during carving season. Unsubscribe anytime. See our privacy policy.